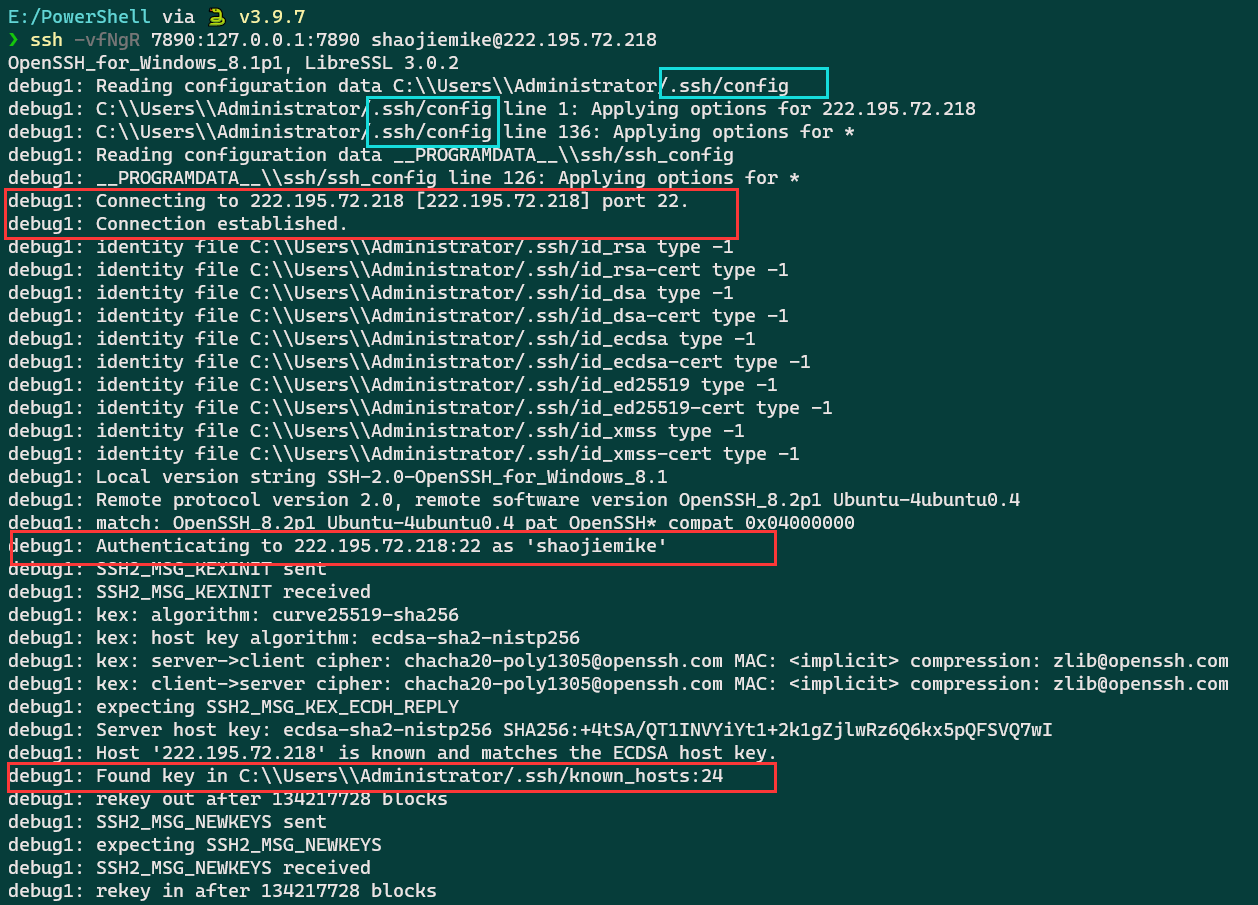
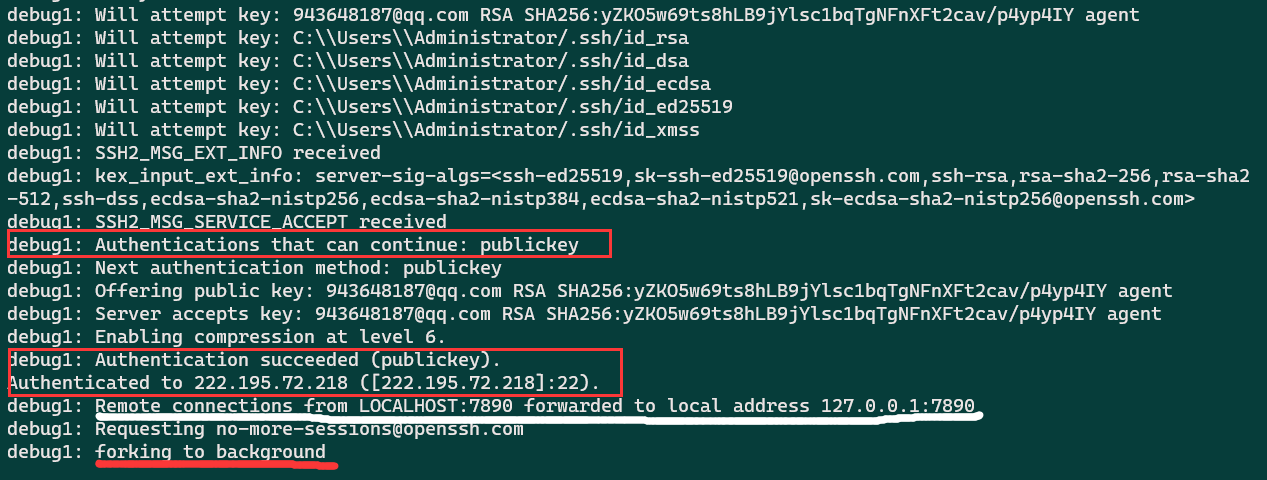
服务器没网,姜师兄说可以ssh转发网络请求到本地windows
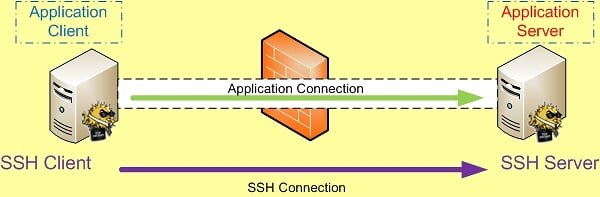
四类ssh转发 SSH 端口转发自然需要 SSH 连接,而SSH 连接是有方向 的,从 SSH Client 到 SSH Server 。
而我们所要访问的应用也是有方向 的,应用连接的方向也是从应用的 Client 端连接到应用的 Server 端。比如需要我们要访问Internet上的Web站点时,Http应用的方向就是从我们自己这台主机(Client)到远处的Web Server。
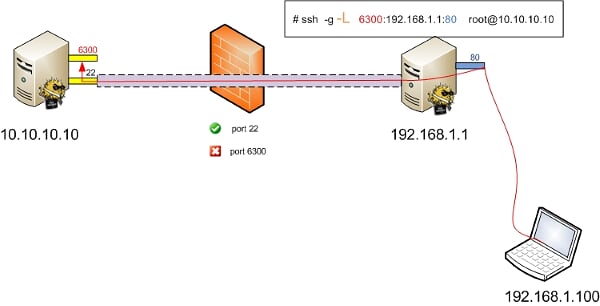
本地转发Local Forward 如果SSH连接和应用的连接这两个连接的方向一致 ,那我们就说它是本地转发。
1
2
3
ssh -L [bind_address:]port:host:hostport <SSH hostname> ssh -L 3333:127.0.0.1:2333 -vN -f -l shaojiemike 222.195.72.218 debug1: Local connections to LOCALHOST:3333 forwarded to remote address(222.195.72.218) 127.0.0.1:2333
<SSH hostname> 可以是不同的主机。
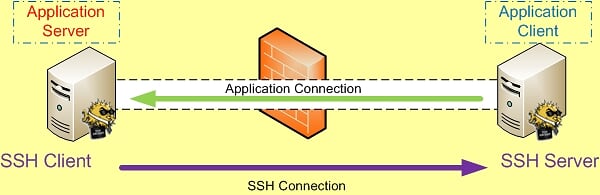
远程转发Remote Forward 如果SSH连接和应用的连接这两个连接的方向不同 ,那我们就说它是远程转发。
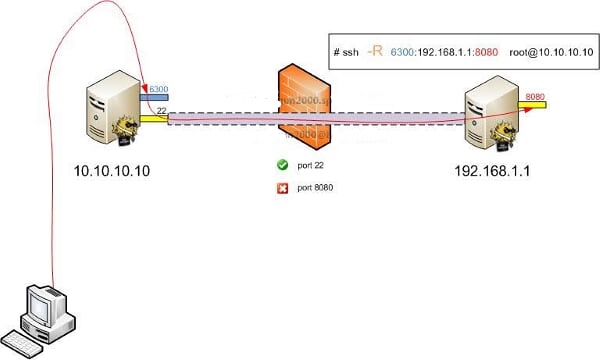
1 ssh -R [bind_address:]port:host:hostport <SSH hostname>
远程转发与本地转发正好相反,打开ssh隧道以后,在远端服务器监听一个端口,所有访问远端服务器指定端口都会通过隧道传输到本地的对应端口上,下面是例子。
动态转发
X转发
实用参数 1 2 3 4 -C:压缩数据传输。 -f :后台认证用户/密码,通常和-N连用,不用登录到远程主机。 -N :不执行脚本或命令,通常与-f连用。 -g :在-L/-R/-D参数中,允许远程主机连接到建立的转发的端口,如果不加这个参数,只允许本地主机建立连接。
1 2 3 4 5 6 -f Requests ssh to go to background just before command execution. This is useful if ssh is going to ask for passwords or passphrases, but the user wants it in the background. This implies -n. The recommended way to start X11 programs at a remote site is with something like ssh -f host xterm. If the ExitOnForwardFailure configuration option is set to "yes", then a client started with -f will wait for all remote port forwards to be successfully established before placing itself in the background.
常见例子 将发往本机的80端口访问转发到174.139.9.66的8080端口
将发往174.139.9.66的8080访问转发到本机的80端口
使用远程管理服务器上的MySQL
一次同时映射多个端口
1 ssh -L 8888:www.host.com:80 -L 110:mail.host.com:110 -L 25:mail.host.com:25 user@host -N
先在公司机器(LAN_ip)上执行1 ssh -NfR 2222:localhost:22 home_ip
然后到home_ip上面
1 ssh -f -N -L 31609:www.xxx.com:80 user@remote_ip
现在我们就可以在本地打开 http://localhost:31609 访问www.xxx.com了。
1 ssh -NfD 8888 user@remote_ip
现在在浏览器socks 5 proxy设置为localhost:8888,所有之前无法访问的网站现在都可以访问了。
1 ssh -fNgR 80:localhost:80 root@host-B
通过访问 http://host-B 来访问主机A上的HTTP服务了。
如果没有主机B的root账号,则只能远程转发到1024以后的端口号
1 ssh -fNgR 8080:localhost:80 lige@host-B
通过访问http://host-B:8080 来访问主机A上的HTTP服务
但是由于怕防火墙屏蔽,而不想直接访问
1 ssh -fNgL 80:localhost:80 root@host-B
ssh_config设置技巧 客户端 .ssh/config修改
1 2 3 4 5 6 7 8 9 10 11 12 13 14 15 16 17 18 19 20 21 22 23 24 25 26 Host * ControlPersist yes ControlMaster auto ControlPath /tmp/sshcontrol-%C ControlPersist 1d # 以上四条配合使用,实现多条ssh连接共享,而且保持1天内ssh存在。再次执行ssh命令几乎秒连 TCPKeepAlive=yes # 发送空TCP包来保持连接,但是可能被防火墙过滤 ServerAliveInterval 30 # 表示每隔多少秒(30秒),从客户端向服务器发送一次心跳(alive检测) # 心跳具体格式: debug1: client_input_global_request: rtype [email protected] want_reply 1 ServerAliveCountMax 240 # 表示服务端多少次(240次)心跳无响应后, 客户端才会认为与服务器到SSH链接已经断开,然后断开连接。 Port 443 Host * ForwardAgent yes # 可以讓本地的 SSH Key 在遠端 Server 上進行轉送,也就是经过跳板机Server1,使用本地key访问Server2,不用把key传到Server1上导致泄露 # 虽然Server1不会获得key,但是可以使用key。所以该选项不宜用于Host *,应该只添加您信任的服务器以及打算用于代理转发的服务器。 # 注意跳板机需要设置允许代理转发, /etc/ssh/sshd_config 将AllowAgentForwarding的值设置为yes, 并重启服务 AddKeysToAgent yes ForwardX11 yes ForwardX11Trusted yes Compression yes # 压缩,加快数据传输速度
服务器端 更改ssh服务器的配置文件/etc/ssh/sshd_config
1
2
3
ClientAliveInterval 60 # 默认是0,不发送 ClientAliveCountMax 3
原理同上
服务器端如何将端口绑定到外部地址上 我们可以把这个映射的端口绑定在0.0.0.0的接口上,方法是加上参数-b 0.0.0.0。
同时修改SSH服务器端 /etc/sshd_config中 GatewayPorts no为 GatewayPorts yes来打开它。
自动重连/保持长时间连接 1 2 Host * ServerAliveInterval 60
检查隧道状态
netstat ps
autossh
实践 服务器网站端口转发到本地 1 ssh -L 6006:127.0.0.1:6006 -N -f -l acsacom snode6.swangeese.fun
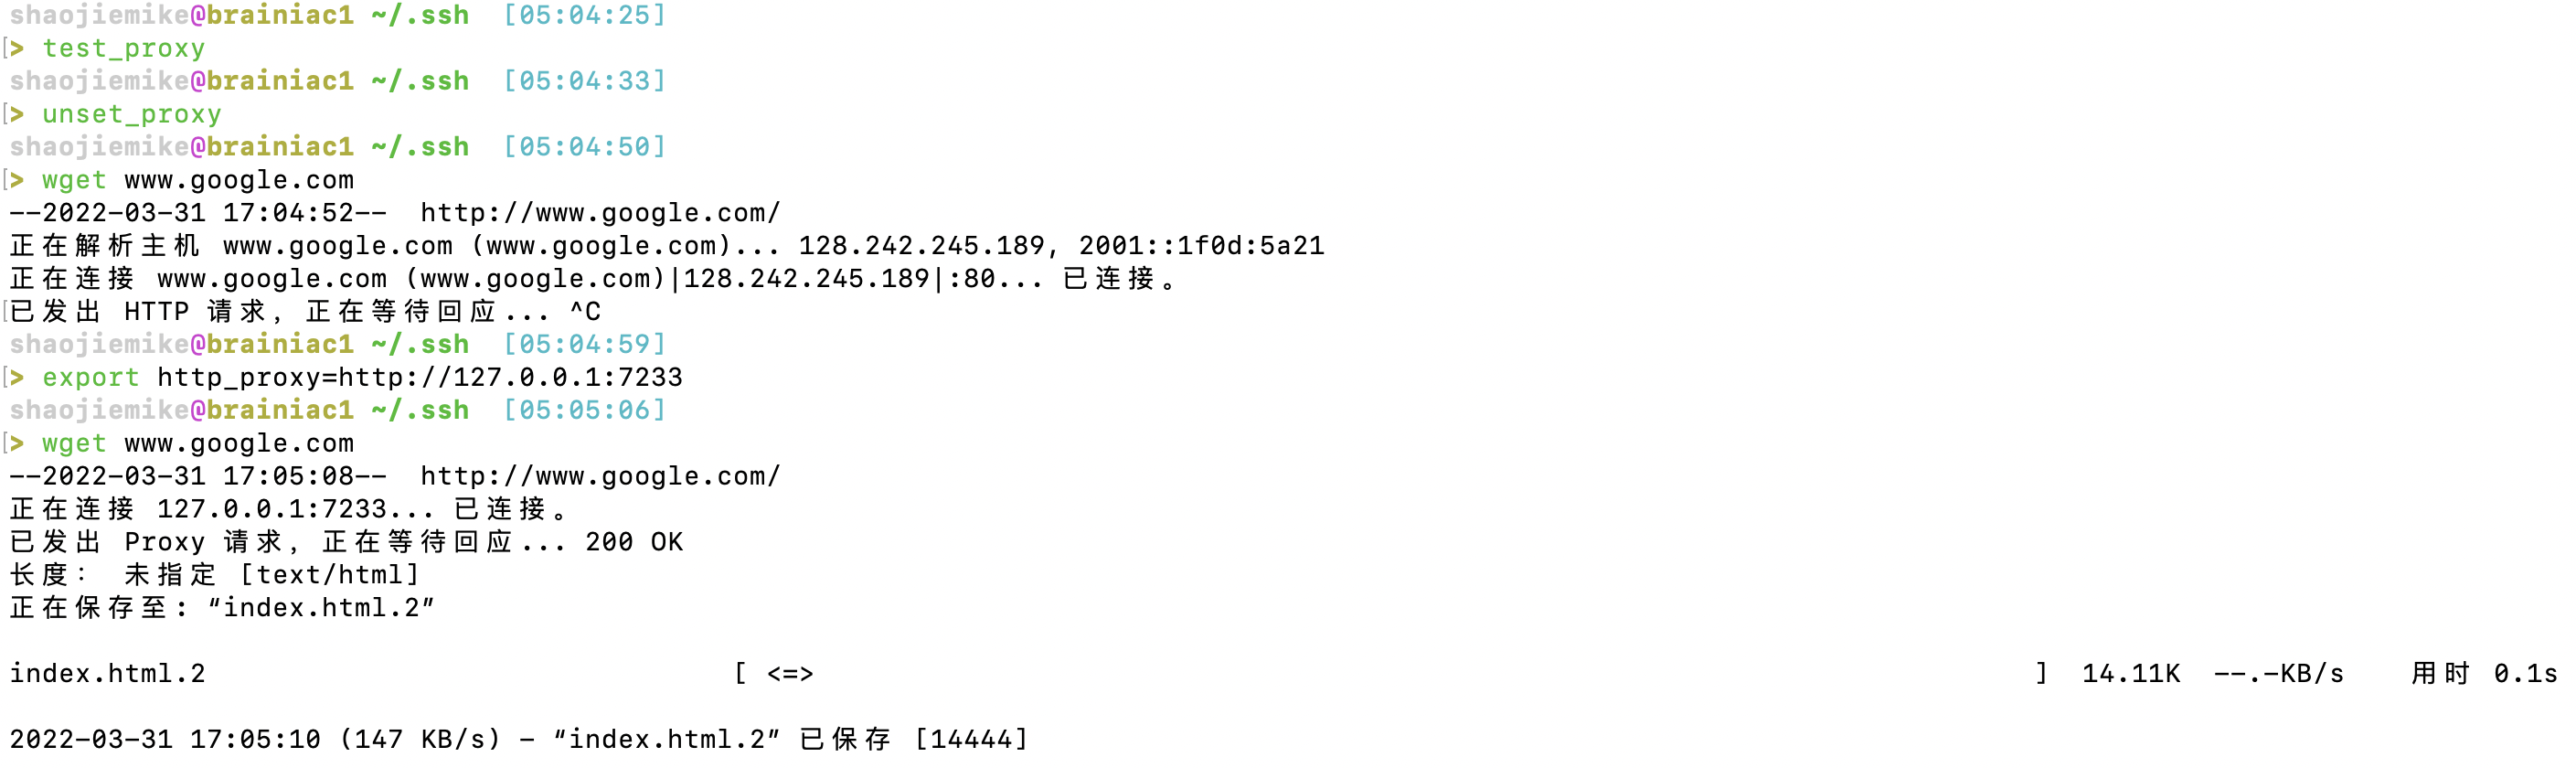
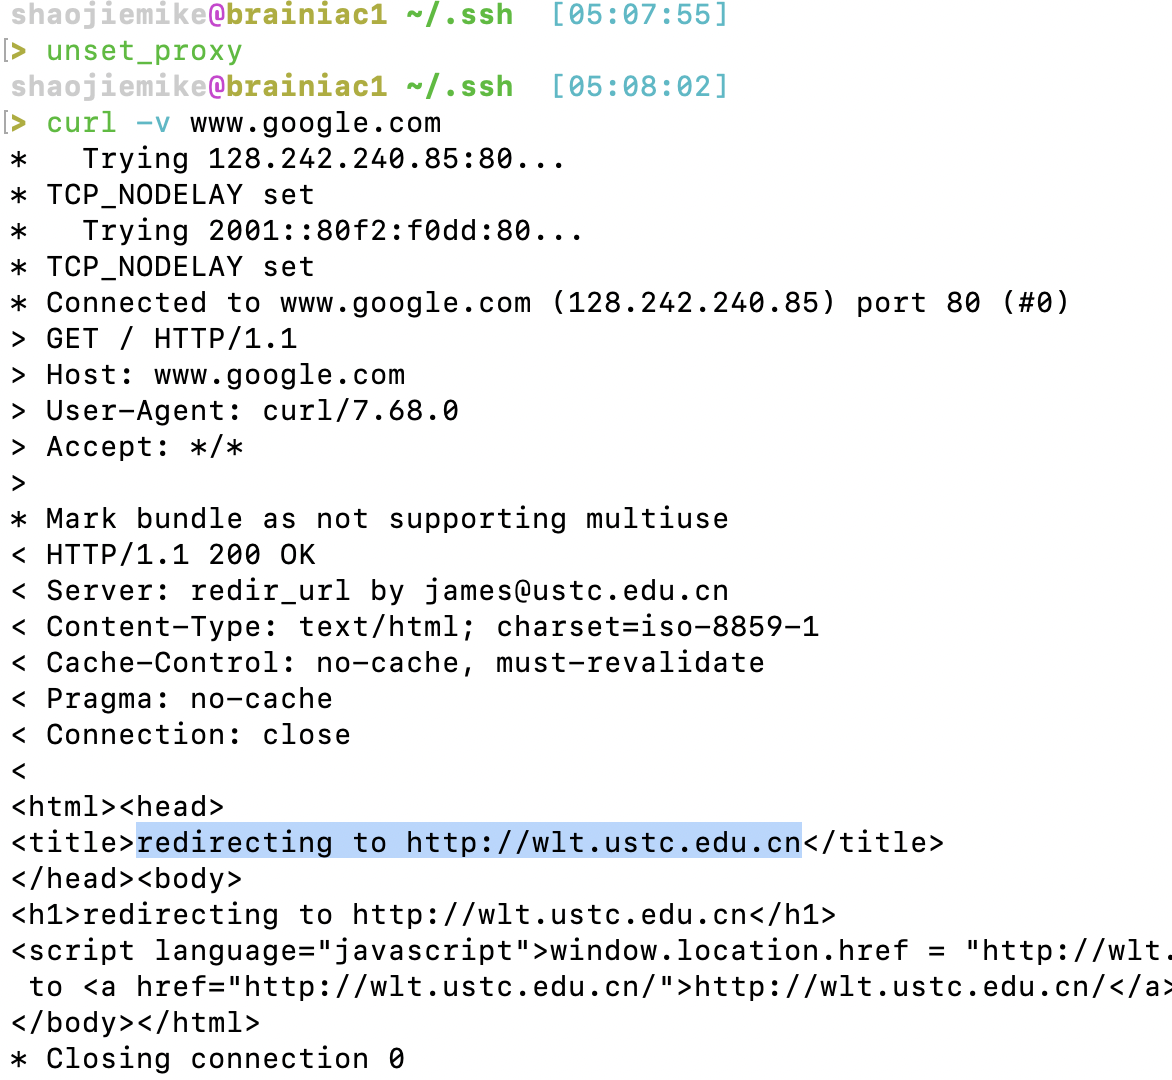
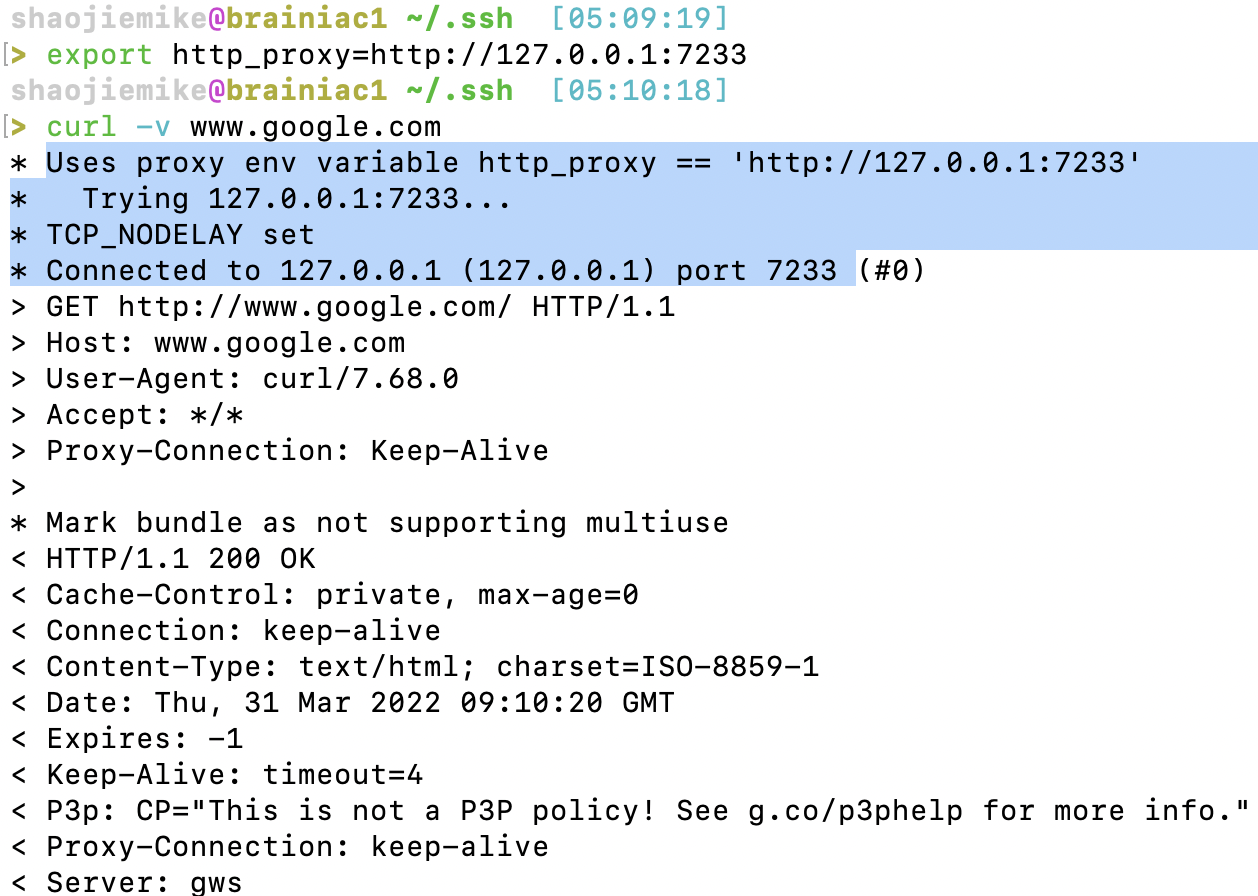
给服务器提供网络代理 本地网络代理到服务器
7333数字不要太小,以免冲突。7890是本地clash端口,80也可以。
title 1 2 3 4 5 6 7 8 9 10 11 12 13 14 15 16 17 18 19 20 21 22 23 24 export proxy_addr=localhostexport proxy_http_port=7890export proxy_socks_port=7890function set_proxy export http_proxy=http://$proxy_addr :$proxy_http_port export https_proxy=http://$proxy_addr :$proxy_http_port git config --global https.proxy http://$proxy_addr :$proxy_http_port git config --global https.proxy https://$proxy_addr :$proxy_http_port export all_proxy=socks5://$proxy_addr :$proxy_socks_port export no_proxy=127.0.0.1,.huawei.com,localhost,local ,.local } function unset_proxy git config --global --unset http.proxy git config --global --unset https.proxy unset http_proxy unset https_proxy unset all_proxy } function test_proxy curl -v -x http://$proxy_addr :$proxy_http_port https://www.google.com | egrep 'HTTP/(2|1.1) 200' }
1 2 3 4 5 6 export http_proxy=http://127.0.0.1:7333export all_proxy=socks5://127.0.0.1:7333unset http_proxyunset all_proxy
特定软件也需要设置代理
1 2 3 4 5 6 7 git config --global https.proxy http://127.0.0.1:1080 git config --global https.proxy https://127.0.0.1:1080 git config --global http.proxy 'socks5://127.0.0.1:1080' git config --global https.proxy 'socks5://127.0.0.1:1080' git config --global --unset http.proxy git config --global --unset https.proxy
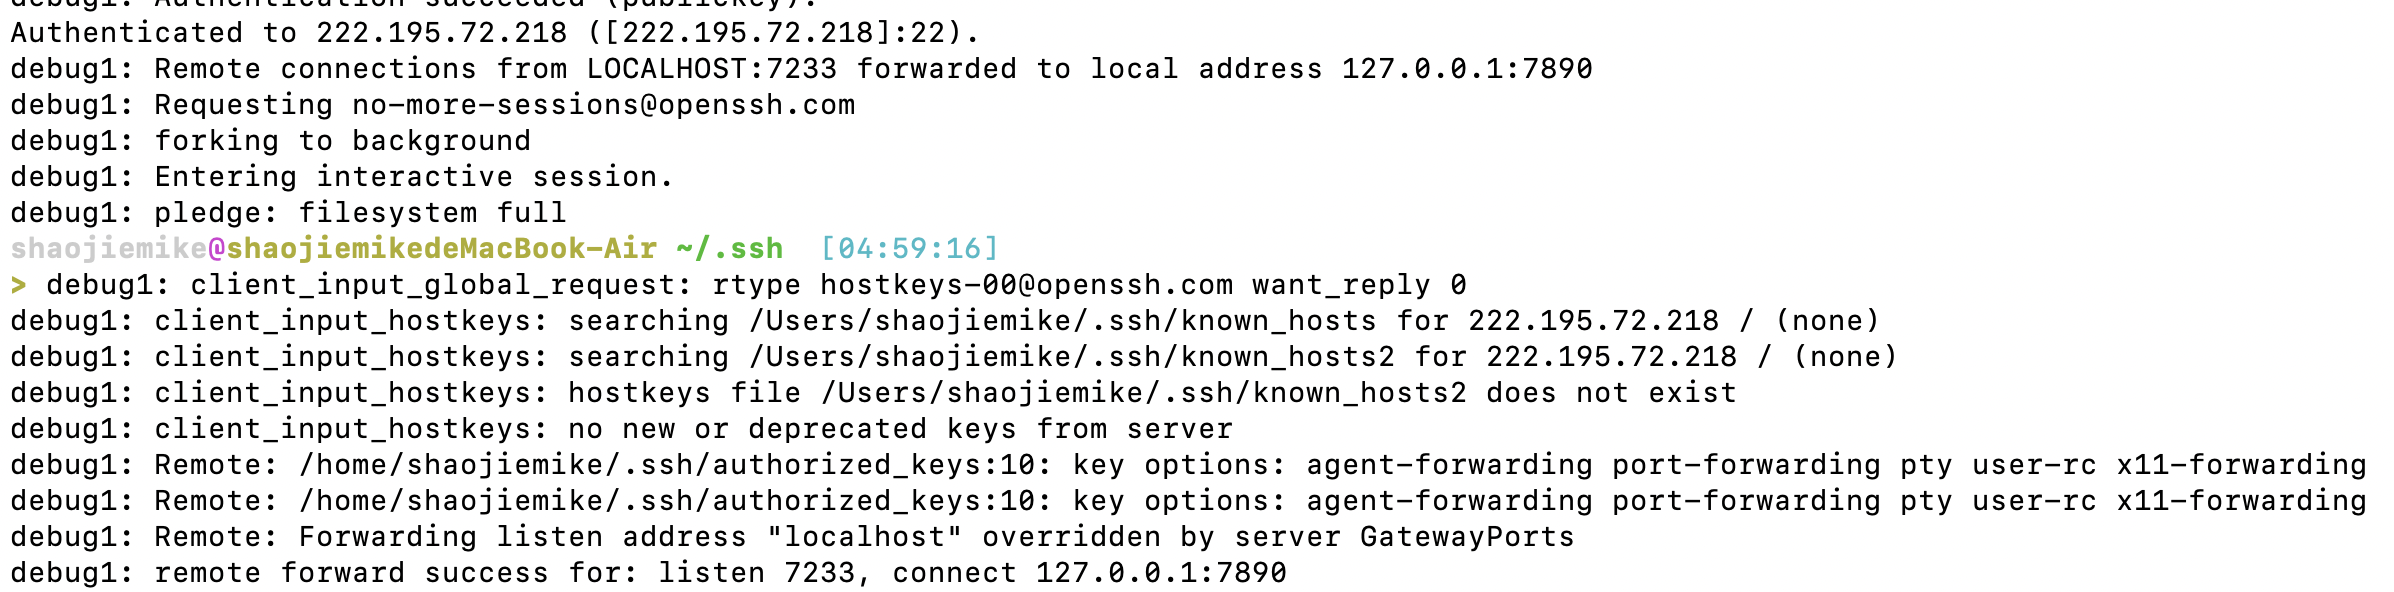
首先看看Windows上的输出
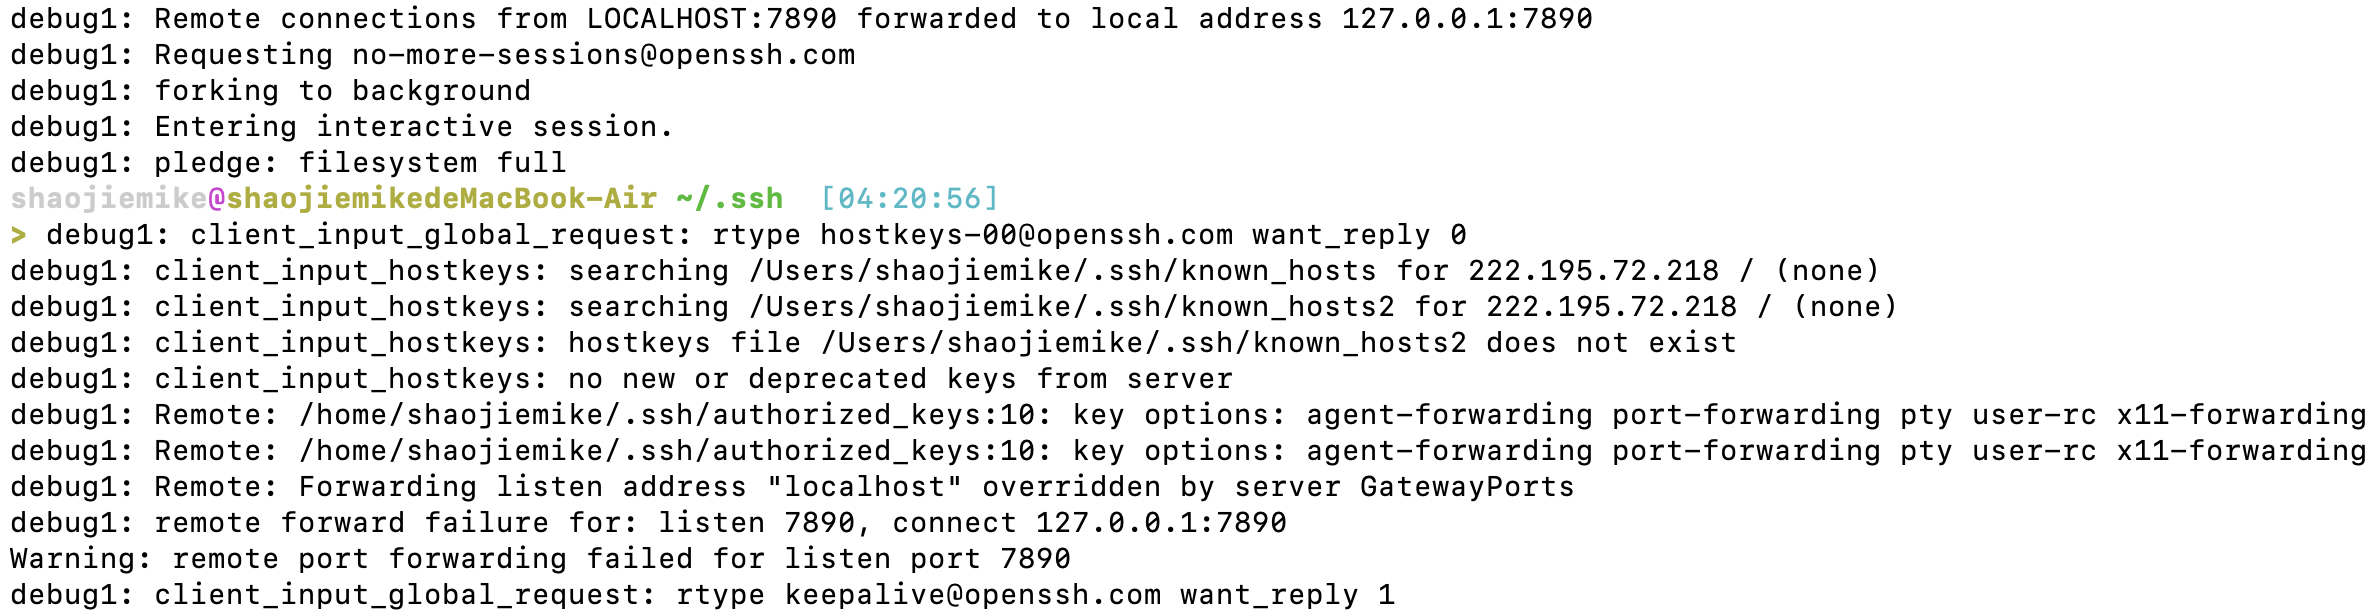
Mac的错误
在完成windows所有输出后,
首先调用了shell
错误
1
2
3
debug1: Remote: Forwarding listen address "localhost" overridden by server GatewayPorts debug1: remote forward failure for: listen 7890, connect 127.0.0.1:7890 Warning: remote port forwarding failed for listen port 7890
猜测应该是已经端口占用了
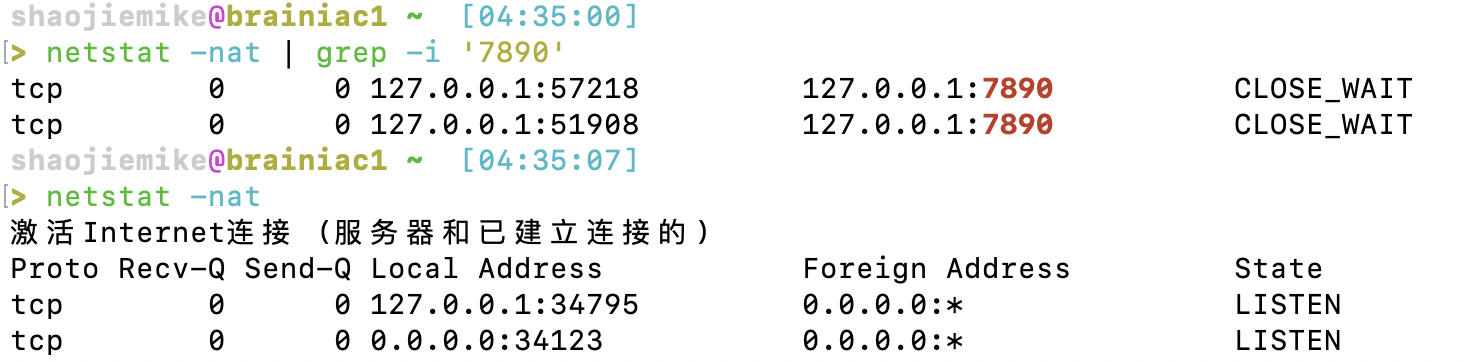
1 netstat -nat |grep -i '7233'
1
2
3
4
sudo lsof -i TCP:7890sudo kill -9 process_id_1 process_id_2 process_id_3sudo ps -ef | grep 'nc -X' | grep -v grep | awk '{print $2}' | sudo xargs -r kill -9sudo lsof -i TCP:7233 |grep shaojiemike| awk '{print $2}' |sudo xargs -r kill -9
FD: File Descriptor number of
不敢kill师兄的,然后发现并没有用,寄 。kill掉师兄的之后就行了,嘻嘻~~ 师兄不要怪我
参考文献 http://blog.sina.com.cn/s/blog_704836f40100lwxh.html
https://blog.csdn.net/xyyangkun/article/details/7025854?utm_medium=distribute.pc_relevant_t0.none-task-blog-2%7Edefault%7ECTRLIST%7Edefault-1.no_search_link&depth_1-utm_source=distribute.pc_relevant_t0.none-task-blog-2%7Edefault%7ECTRLIST%7Edefault-1.no_search_link