Cloudflare warp proxy
简介
- Cloudflare 作为全球最大的网络服务提供商,全球大约有30%的网络服务由它提供。
- WARP是Cloudflare提供的免费的,没有带宽上限或限制的VPN服务,可以让你在任何地方访问互联网,而不会受到地域限制。
- WARP软件是基于wireguard魔改的。
- WARP有安卓和Windows的客户端,但是使用人数过多,体验并不好
- Linux下通过WARP代理能实现20MB/s的下载速度。
WARP on Linux
安装配置
- 缘由:WARP下的PT做种快得多。(不是,是因为网络硬盘,所以下载多少要占用多少上传)
- 参考教程。
- 脚本和所需文件在
Z:\shaojiemike\Documents\文献\计算机网络目录下。这里先使用fjw的脚本。
- 通过注册脚本
register.py,获得私钥和分配的ip - 配置wg。其中Endpoint端口可从官方文档中找到,默认的2408很可能被封。WARP with firewall · Cloudflare Zero Trust docs
1
2
3
4
5
6
7
8
9
10
[Interface]
PrivateKey = xxxx #register.py的私钥
Address = xxx/32,xxx/128 #register.py的ipv4和ipv6
Table = off # off禁止wg修改路由表
[Peer]
PublicKey = bmXOC+F1FxEMF9dyiK2H5/1SUtzH0JuVo51h2wPfgyo=
AllowedIPs = 0.0.0.0/0,::/0
Endpoint = [2606:4700:d0::a29f:c001]:500 #2408, 1701, 500, 4500
PersistentKeepalive = 25 - warp使用的不是标准的wg协议,root下运行,需要通过一个nft脚本
main.sh修改包的3个字节。- 安装nft
apt-get install nftables - 需要
/etc/default/warp-helper文件填写对应的 - ROUTING_ID对应register.py的ROUTING_ID。注意三个数之间没空格
- UPSTREAM对应
wg-conf里Endpoint。比如: ROUTING_ID=11,45,14 UPSTREAM=[2606:4700:d0::a29f:c001]:5001
2
3
4
5
6
7
8
9
10
11
12
13
14
15
16
17
18
19
20
212. 最后开启路由表,Root权限运行` ip route add default dev warp proto static scope link table default`
## WARP on OpenWRT
* 目的:为了防止大量流量通过WARP,导致被官方封禁,所以只在OpenWRT上配置WARP分流github的流量。
* 实现思路:
* 运行python脚本,通过github的API获得所有的github域名ip,
* 使用iptables的warp_out表,将目的地址为github域名ip路由到WARP的虚拟网卡上。
### WARP Wireguard Establishment
```bash
python register.py #自动生成warp-op.conf,warp.conf和warp-helper
mv warp-helper /etc/default
# cat main.sh
# cat warp-op.conf
vim /etc/config/network #填写warp-op.conf内容,默认只转发172.16.0.0/24来测试连接
ifup warp #启动warp, 代替wg-quick up warp.conf
bash main.sh #启动防火墙实现报文头关键三字节修改
nft list ruleset #查看防火墙,是否配置成功
wg #查看warp状态,测试是否连接成果
- 安装nft
这时还没创建warp_out路由表,所以还不能通过WARP出数据。
1 | #/etc/config/network |
然后WebUI点击apply 或者命令行运行ifconfig warp down && ifup
Network planning and design
添加了WARP的网络出口后,路由器不在只是通过WAN出数据。防火墙需要更新: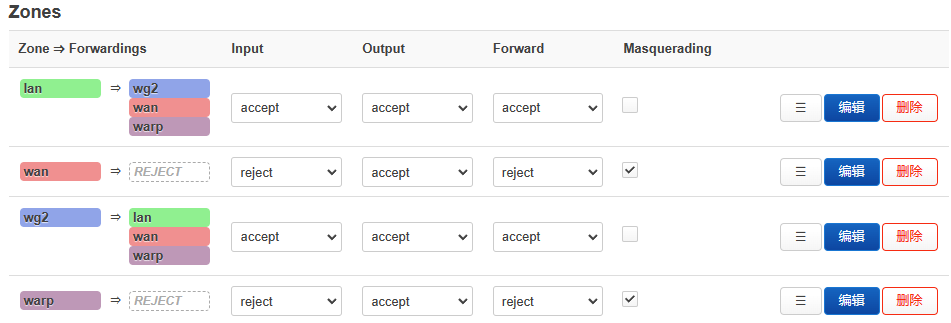
- 原路返回规则。
- 针对有公网ip的接口,需要原路返回。
- 配置来自wan和WARP的信报,使用wan和WARP的路由表,优先级3
- 来自wan的比如来自外部的ssh,为了防止失联。
- 来自WARP的比如
wget --bind-address=WARP_ip来模拟
- 内网地址没有必要配置,因为通过内网地址访问host,则dst必然也是内网地址。因此会匹配main中的内网地址规则。
- 针对有公网ip的接口,需要原路返回。
- wan和WARP的路由表内各自走wan和WARP的网卡
- 为了使得原本wg正常运行,
10: from all lookup main suppress_prefixlength 1- 假如warp_out是defualt规则,该项也是为了防止失联。
- 创建warp_out的空路由表
1000: from all lookup warp_out,优先级1000
1 | root@tsjOp:~/warp# ip rule |
填充warp_out路由表
1 | cd ip_route |
对所有github域名的ip执行类似ip ro add 192.30.252.0/22 dev warp proto static table warp_out操作。
测试
1 | mtr www.github.com |
添加到启动项
修改/etc/rc.local
1 | # Put your custom commands here that should be executed once |
WARP on Windows
基于1.1.1.1 的安装windows版本直接白嫖
需要进一步的研究学习
暂无
遇到的问题
暂无
开题缘由、总结、反思、吐槽~~
参考文献
https://gist.github.com/iBug/3107fd4d5af6a4ea7bcea4a8090dcc7e
glados
Cloudflare warp proxy
http://icarus.shaojiemike.top/2023/05/11/Work/network/vpn/3-cloudflare/