Colorful Commands
导言
电脑玩家经常说RGB是最重要的,对于程序员来说,彩色的terminal有助于快速的分辨输出的有效信息。为此有一些有意思的彩色输出命令。
还有些必备的
- 内网下的文件同步: https://github.com/syncthing/syncthing
笔误改正
Cheat sheet (命令行小抄/备忘录)
最经典 tdlr
使用时需要网络
1 | npm install -g tldr |
tealdeer - simplest example
a RUST fast version oftdlr
Tips: OpenSSL development headers
get a “failed to run custom build command for openssl-sys” error message. The package is calledlibssl-dev on Ubuntu.
1 | # install |
部分支持中文,支持多平台
自定义
- cheat + 编写的cheatsheets
- 支持fzf和自动补全
- kb. A minimalist knowledge base manager
- eg provides examples of common uses of command line tools.
支持在线网页版
- Linux Command Line Cheat Sheet
- devhints.io
- 各种的选项,不止命令,包括bash, vim, mysql, git
- 语言 go, python, java, JS, NodeJS, Ruby 3.
- navi
- 支持语意转换的补全 🔥
- cheat.sh 🔥
- 支持
curl命令直接访问或者交互式 - 支持补全
- 返回内容集成cheat cheat.sheets tdlr
- 支持
- bropages.org
- 用户自发投票排序的命令用例
navi installation & usage
1 | # install |
SHELL
awesome-shell里多看看。
set_tsj.sh
1 | HOME=/home/t00906153 |
oh my zsh
虽然这个ohmyzsh好用,但是我用惯了hyq的模板, 从github上下载后解压就安装了zsh模板。(之后可以考虑传到云盘或者cloudflare)
1 | HOME=/home/xxx |
1 | # git clone https://github.com/Kirrito-k423/QuickStartLinux.git --depth=1 |
oh my zsh
有时候hyq模版有些兼容性问题,比较老的zsh不支持(大约是5.0.2到5.5.1的版本)。这时候只能手动安装了,包括主题和插件。请看zsh一文。
zsh_history 支持多端口同步,实时保存
1 | HISTFILE=~/.zsh_history |
窗口管理器 tmux-like
大部分Linux 系统自带的 screen 命令来多终端控制
外部控制:
- 创建:
screen -S name - 恢复:
screen -r name - 列表:
screen -ls - 删除:
screen -X -S name kill
内部控制:
CtrlA + d分离CtrlA + x终端上锁,CtrlA + k是killCtrlA + S上下分屏,CtrlA + |左右分屏。- 在
screen -S name创建会话后,需要在新窗口中执行screen来创建额外的终端;这样分屏之后才有两个以上的终端可以使用。 CtrlA + w查看终端CtrlA + [数字]切换到第几个CtrlA + Tab返回上一个CtrlA + X关闭分屏CtrlA + :进入命令模式,输入resize -v 100或者resize -h 100调整大小。
- 在
oh my tmux 🔥
1 | ## Install |
基于Rust的zellij
开发编辑器 vim-like
vimrc 🔥
1 | git clone --depth=1 https://github.com/amix/vimrc.git ~/.vim_runtime |
emacs
针对不同语言有许多可选插件
Ubuntu install emacs27
1 | add-apt-repository ppa:kelleyk/emacs |
问题:
1 | dpkg-deb: error: paste subprocess was killed by signal (Broken pipe) |
版本解决,强制安装 sudo apt-get -o Dpkg::Options::="--force-overwrite" install emacs27-common
1 | sudo apt --purge remove emacs27 |
doom
常用命令的”Colorful”版本
cd
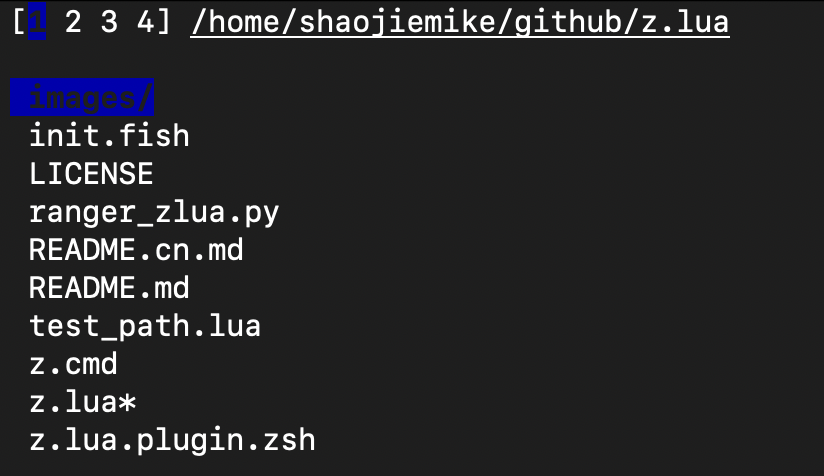
z.lua - learning cd 🔥
Install LUA
1 | curl -R -O http://www.lua.org/ftp/lua-5.4.4.tar.gz |
Install
1 | cd ~/github |
常用命令
1 | # 弹出栈顶 (cd 到上一次的老路径),和 "z -0" 相同 |
1 | z foo # 跳转到包含 foo 并且权重(Frecent)最高的路径 |
缺点:
- 没去过的路径,每级文件夹的补全没有了
- 可以和cd结合使用
ls
exa 🔥 - better ls
1 | # Manual installation from GitHub. Ubuntu 20.10才支持 |
grep
rg (Fast & Good multi-platform compatibility) > ag > ack(ack-grep) 🔥
1 | # 当前文件夹下查找 dlog关键字 |
[repgrep(rg)](https
1 | # ripgrep(rg) 但是readme说这样有bugs |
repgrep(rg) 常用选项
--no-ignore忽略.gitignore之类的文件,也搜索忽略的文件。(默认是不搜索的)-t txt指定搜索类型rg 'content' ABC/*.cpp搜索和正则ABC/*.cpp匹配的文件
ag
1 | # ag 2020年就不维护了 |
find
find . -name "*xxx*"
fzf 🔥带预览的find
1 | # ubuntu |
telescope.nvim 也带预览的find
1 | # 先安装vim-plug |
fdfind(fd)
cat
bat 🔥 - colorful cat
1 | # Install |
git
gitui 🔥 - fast Rust lazygit
https://github.com/extrawurst/gitui/releases
1 | # 建议Rust,三句命令,安装Rust,source,gitui |
lazygit
1 | # install go |
docker
lazydocker
高亮终端输出/log文件
bash脚本输出颜色文本示例
1 | RED='\033[0;31m' |
颜色编号如下
| 颜色 | 编号 |
|---|---|
| Black | 0;30 |
| Dark Gray | 1;30 |
| Red | 0;31 |
| Light Red | 1;31 |
| Green | 0;32 |
| Light Green | 1;32 |
| Brown/Orange | 0;33 |
| Yellow | 1;33 |
| Blue | 0;34 |
| Light Blue | 1;34 |
| Purple | 0;35 |
| Light Purple | 1;35 |
| Cyan | 0;36 |
| Blue | 0;37 |
| Light Cyan | 1;36 |
| Light Gray | 0;37 |
| White | 1;37 |
hl 🔥自定义高亮各种log文件
通过regular expressions自定义高亮各种log文件
install需要 lex
1 | git clone https://github.com/mbornet-hl/hl |
颜色支持(3浅中深 * 6颜色 * 背景色反转)
1 | # 前面 123 是深浅 , 4是下划线 |
正则标记log关键词
绿色和红色
1 | cat exemple.log | hl -g start -r stop |
1 | -e : extended regular expressions |
命令配置文件 hl_ha.cfg
默认设置
1 | export HL_CONF=/staff/shaojiemike/github/hl/config_files |
1 | -%c : specifies the beginning of a range colorized in color 'c' |
Colorize hl configurations :
1 | hl -vop '*' | hl --hl_conf |
example Commands
1 | lD # ls by date |
errors
常用方式
在~/.zshrc 里如下配置:
1 | export HL_CONF=/home/shaojiemike/github/hl/config_files |
编译时如此使用make 2>&1|my_hl
系统信息
dua-cli - best disk space viewer 🔥
资源监控
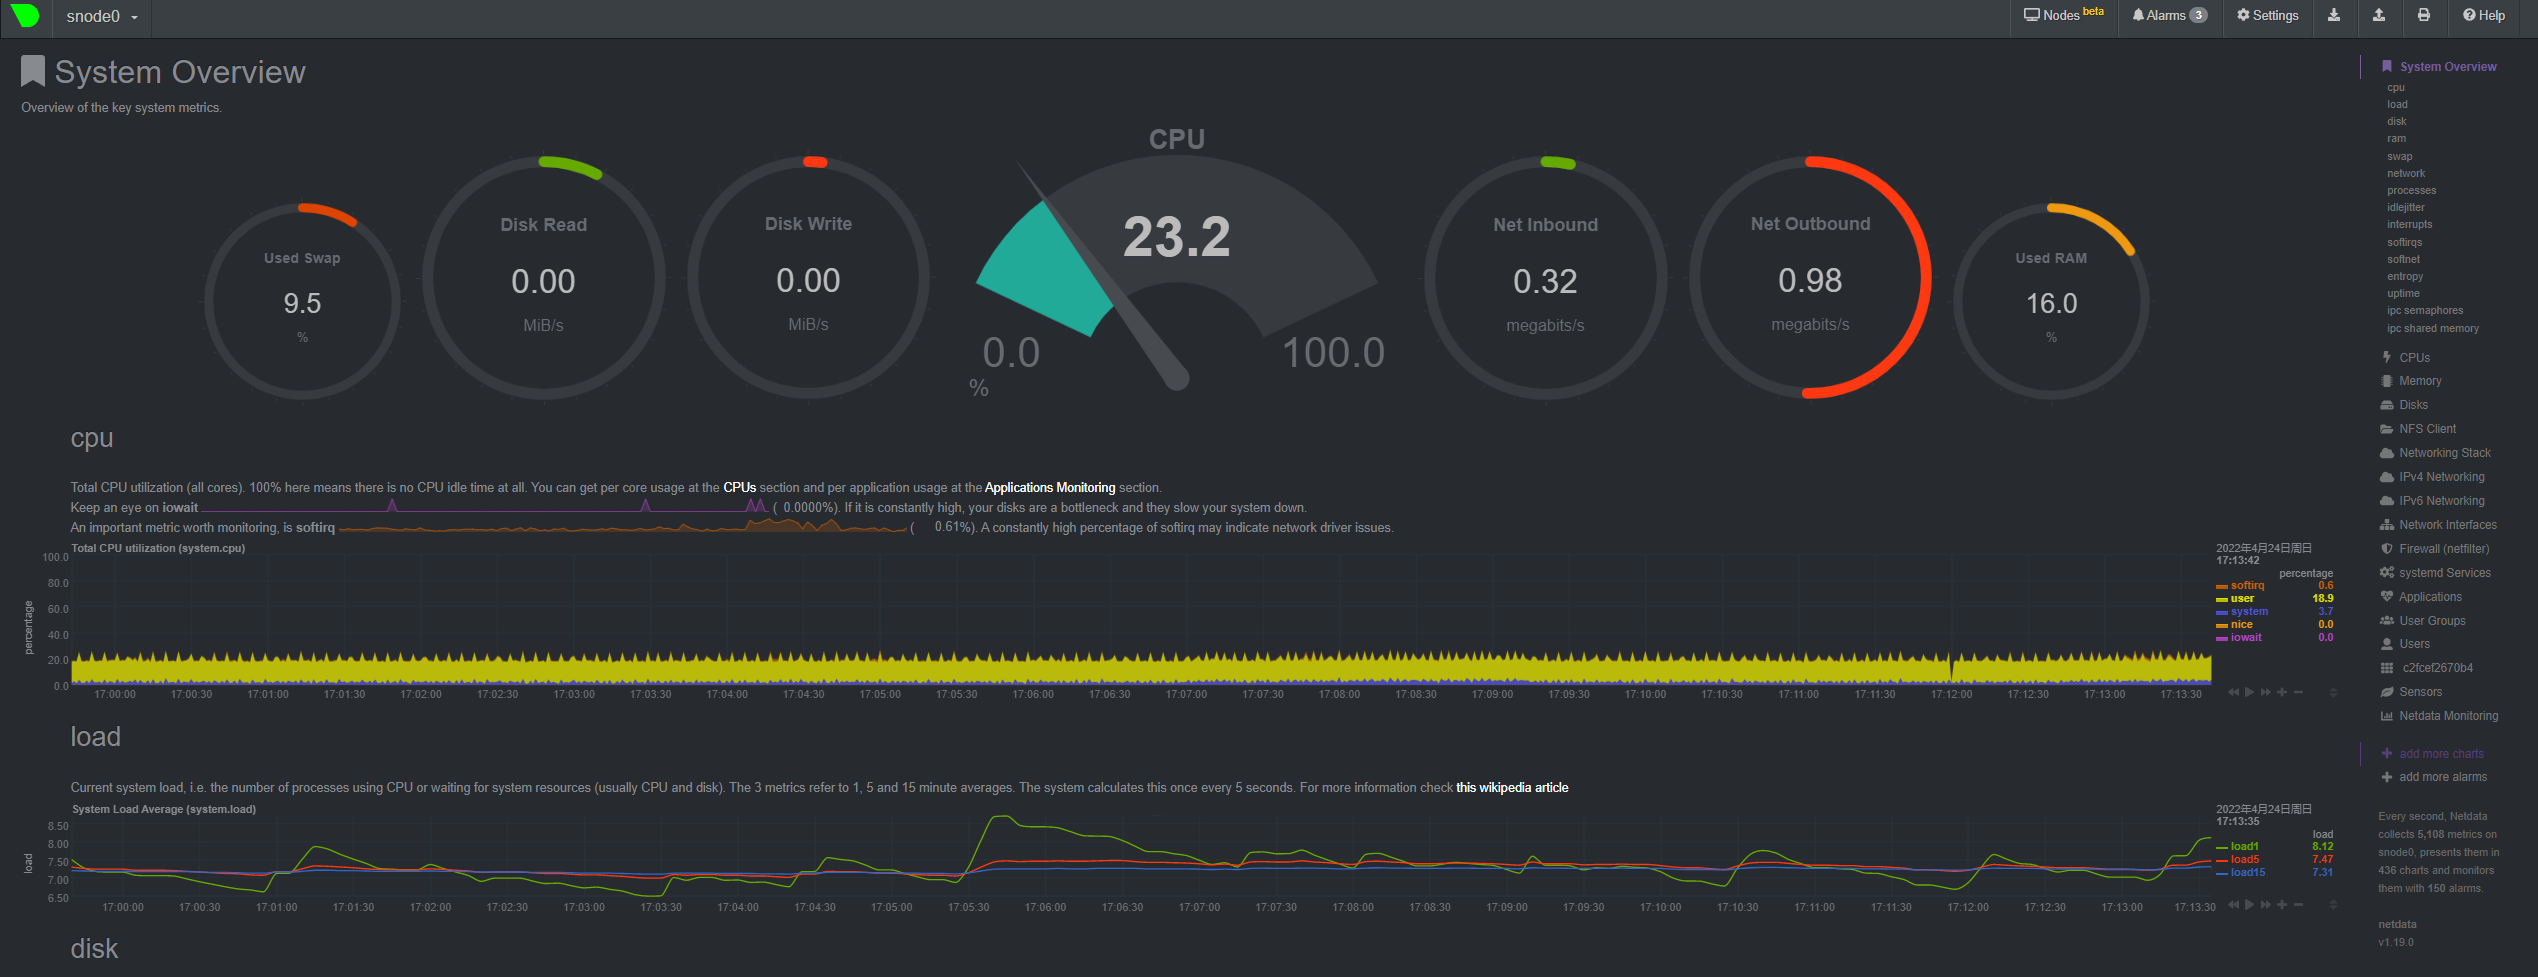
资源监控软件netdata
- netdata 默认挂载在
http://127.0.0.1:19999/。想要WebUI运行sudo netdata -i node5.acsalab.com - cpu, disk, memory, network,温度都有记录
- arm下有问题,需要自己编译
资源监控命令bottom(htop like)
1 | # install |
类似s-tui可以观察CPU 温度,频率
网络监控 bmon
bmon是类 Unix 系统中一个基于文本,简单但非常强大的网络监视和调试工具
Compile yourself
Install libconfuse
sh wget https://github.com/martinh/libconfuse/releases/download/v2.8/confuse-2.8.zip unzip confuse-2.8.zip && cd confuse-2.8 PATH=/usr/local/opt/gettext/bin:$PATH ./configure make make install Install bmon
sh git clone https://github.com/tgraf/bmon.git cd bmon ./autogen.sh ./configure make make install bmon
文件管理器
nnn 多平台
ranger 基于vi的支持预览的横向多级显示 🔥
https://github.com/ranger/ranger
1 | pip install ranger-fm |
xplr - 筛选排序tips板 - 支持多选,正则查找, mov改名delete 🔥
https://github.com/sayanarijit/xplr
sh cargo install --locked --force xplr