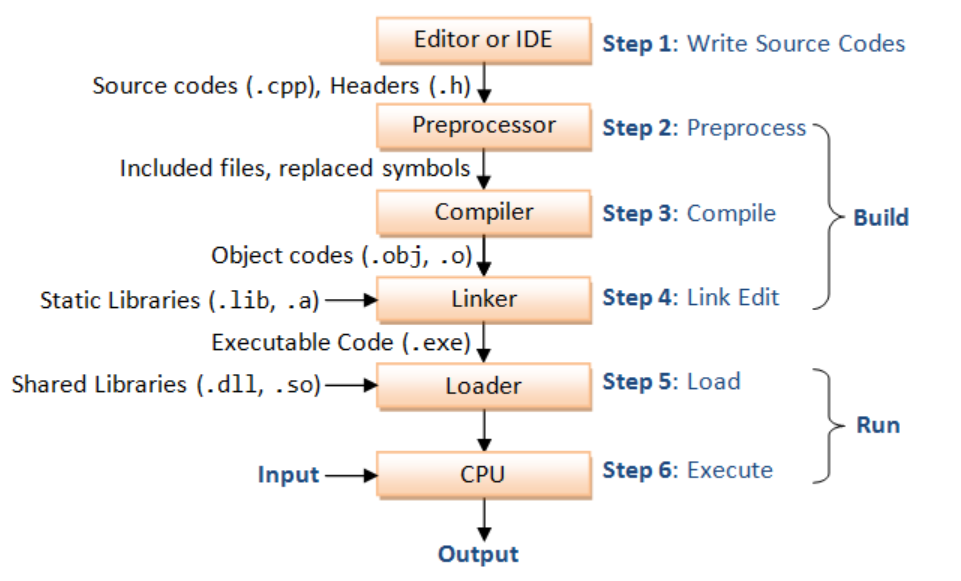
编译总流程
编译是指编译器读取源程序(字符流),对之进行词法和语法的分析,将高级语言指令转换为功能等效的汇编代码。
- 预处理阶段:
- 把
#include语句以及一些宏插入程序文本中,得到main.i和sum.i文件。
- 把
- 编译阶段:
- 将文本文件
main.i和sum.i编译成文本文件main.s和sum.c的汇编语言程序。
低级的汇编语言为不同的高级语言提供了通用输出语言。
- 将文本文件
- 汇编阶段:
- 将
main.s和sum.s翻译成机器语言的二进制指令,并打包成一种叫做可重定位目标程序的格式,并将结果保存在main.o和sum.o两个文件中。这种文件格式就比较接近elf格式了。
- 将
- 链接阶段:
- 合并
main.o和sum.o,得到可执行目标文件,就是elf格式文件。
- 合并

目标文件
目标文件有三种形式:
- 可重定位目标文件。包含二进制代码和数据,其形式可以在编译时与其他可重定位目标文件合并起来,创建一个可执行目标文件。
- 可执行目标文件。包含二进制代码和数据,其形式可以被直接复制到内存并执行。
- 共享目标文件。一种特殊类型的可重定位目标文件,可以在加载或者运行时被动态地加载进内存并链接。
1 预处理
- 预处理器: 将
.c文件转化成.i文件.
生成预处理文件
- 使用的gcc命令是:
gcc –E filename.cpp -o filename.i-E Preprocess only; do not compile, assemble or link.- 通过
-C能保留头文件里的注释,如gcc -E -C circle.c -o circle.c
- 另一种方式
gcc -save-temps -c -o main.o main.c - 也可以调用
cpp filename.cpp -o filename.i命令
理解预处理文件
- 输出文件会出现许多名叫
linemarkers类似# linenum filename flags的注释,这些注释是为了让编译器能够定位到源文件的行号,以便于编译器能够在编译错误时给出正确的行号。- They mean that the following line originated in file filename at line linenum.
flagsmeaning- ‘1’ This indicates the start of a new file.
- ‘2’ This indicates returning to a file (after having included another file)
- ‘3’ This indicates that the following text comes from a system header file, so certain warnings should be suppressed
- ‘4’ This indicates that the following text should be treated as being wrapped in an implicit extern “C” block.
- ‘4’表示接下来的文本应被视为被包含在隐式的“extern “C””块中。在C++中,函数名和变量名可以有不同的命名空间,但是使用“extern “C””修饰时可以取消这种区别,使得函数名和变量名可以在C++和C代码之间共享。因此,在C++中使用“extern “C””来声明C函数或变量时,需要使用‘4’来指示编译器此处的文本应该被视为C代码,而不是C++代码。[来自chatGPT的解释]
预处理内容(过程)
除开注释被替换成空格,包括代码里的预处理命令:
#error "text"的作用是在编译时生成一个错误消息,它会导致编译过程中断。 同理有#warning- 宏定义指令,如
#define a b对于这种伪指令,预编译所要做的是将程序中的所有a用b替换,但作为字符串常量的 a则不被替换。还有 #undef,则将取消对某个宏的定义,使以后该串的出现不再被替换。 - 条件编译指令,如
#ifdef SNIPER,#if defined SNIPER && SNIPER == 0,#ifndef,#else,#elif,#endif等。 这些伪指令的引入使得程序员可以通过定义不同的宏来决定编译程序对哪些代码进行处理。预编译程序将根据有关的文件,将那些不必要的代码过滤掉- gcc编译使用
-DSNIPER=5
- gcc编译使用
- 头文件包含指令,如
#include "FileName"或者#include 等。
该指令将头文件中的定义统统都加入到它所产生的输出文件中,以供编译程序对之进行处理。 - 特殊符号,预编译程序可以识别一些特殊的符号。
例如在源程序中出现的LINE标识将被解释为当前行号(十进制数),FILE则被解释为当前被编译的C源程序的名称。
预编译程序对于在源程序中出现的这些串将用合适的值进行替换。
头文件搜索优先级
#include "" vs #include <> 区别在于前者会在文件的当前目录寻找,但是后者只会在编译器编译的official路径寻找
通常的搜索顺序是:
包含指定源文件的目录(对于在
#include命令中以引号包括的文件名)。采用
-iquote选项指定的目录,依照出现在命令行中的顺序进行搜索。只对#include命令中采用引号的头文件名进行搜索。所有header file的搜寻会从
-I开始, 依照出现在命令行中的顺序进行搜索。(可以使用-I/path/file只添加一个头文件,尤其是在编译的兼容性修改时)采用环境变量 CPATH 指定的目录。
采用
-isystem选项指定的目录,依照出现在命令行中的顺序进行搜索。然后找环境变量
C_INCLUDE_PATH,CPLUS_INCLUDE_PATH,OBJC_INCLUDE_PATH指定的路径再找系统默认目录
(/usr/include、/usr/local/include、/usr/lib/gcc-lib/i386-linux/2.95.2/include......)通过如下命令可以查看头文件搜索目录
gcc -xc -E -v - < /dev/null或者g++ -xc++ -E -v - < /dev/null*. 如果想改,需要重新编译gcc或者在编译出错时,
g++ -H -v查看是不是项目下的同名头文件优先级高于sys-head-file
2 编译优化Compile
- 将经过预处理之后的程序转换成特定汇编代码(assembly code)的过程
- 一般将
.c/.h或者.i文件转换成.s文件,
生成汇编代码
- 使用的gcc命令是:
gcc –S filename.cpp -o filename.s,对应于-S Compile only; do not assemble or link.- 理论上
gcc –S filename.i -o filename.s也是可行的。但是我遇到头文件冲突的问题error: declaration for parameter ‘__u_char’ but no such parameter
- 编译命令
cc –S filename.cpp -o filename.s - 或者
cc1命令
编译内容(过程)
- 词法分析、语法分析、语意分析、中间代码生成,在语法检查、类型检查之后,将其翻译成等价的中间代码表示或汇编代码
- 优化(
-O3)- 常规优化:删除死代码、减少寄存器传输、常量折叠、提取中间量
- 高阶优化:循环展开、指针优化、函数内联,自动SIMD向量化
- 关于内联函数
- 内联函数是在函数定义前加上关键字inline的函数。它用于请求编译器将函数的代码插入到每个调用该函数的地方,而不是通过函数调用来执行。这样可以减少函数调用的开销,提高程序的执行效率。
- 内联函数一般适用于函数体较小、频繁调用的函数,但最终是编译器决定是否将函数内联,编译器可以忽略对内联函数的请求。
如果想把 C 语言变量的名称作为汇编语言语句中的注释,可以加上 -fverbose-asm 选项:
1 | gcc -S -O3 -fverbose-asm ../src/pivot.c -o pivot_O1.s |
理解汇编文件
请阅读 GNU assembly file一文
3 汇编assemble
汇编器:将.s 文件转化成 .o文件,
生成可重定位目标程序
- 使用的gcc 命令是:
gcc –c,-c Compile and assemble, but do not link.
- 汇编命令是
as;
汇编过程
- 汇编实际上指汇编器(as)把汇编语言代码翻译成**目标机器指令(二进制)**的过程。
- 目标文件中所存放的也就是与源程序等效的目标的机器语言代码。
- 目标文件由段组成。通常一个目标文件中至少有两个段:
- 代码段:该段中所包含的主要是程序的指令。该段一般是可读和可执行的,但一般却不可写。
- 数据段:主要存放程序中要用到的各种全局变量或静态的数据。一般数据段都是可读,可写,可执行的。
查看理解
- 查看汇编代码
objdump -Sd ../build/bin/pivot > pivot1.s-S以汇编代码的形式显示C++原程序代码,如果有debug信息,会显示源代码。
nm file.o查看目标文件中的符号表
注意,这时候的目标文件里的使用的函数可能没定义,需要链接其他目标文件.a .so .o .dll(Dynamic Link Library的缩写,Windows动态链接库)
nm 命令
List symbol names in object files.
查找动态库
顺序
- LD_LIBRARY_PATH 环境变量:用户可以通过设置 LD_LIBRARY_PATH 环境变量来指定额外的库搜索路径。
- /etc/ld.so.cache:这是 ldconfig 生成的缓存文件,包含了系统共享库的路径。
- 默认路径:如果以上路径都没有找到所需的库,动态链接器会搜索以下默认路径:
/lib,/usr/lib,/lib64(在64位系统上),/usr/lib64(在64位系统上)
LD_LIBRARY_PATH
遍历 LD_LIBRARY_PATH 中的每个目录,并查找包括软链接在内的所有 .so 文件。
1 | IFS=':' dirs="$LD_LIBRARY_PATH" |
ldconfig
ldconfig 命令用于配置动态链接器的运行时绑定。你可以使用它来查询系统上已知的库文件的位置()。
ldconfig 会扫描
- 指定的目录(通常是
/lib和/usr/lib,以及 /etc/ld.so.conf中列出的目录),查找共享库文件(.so 文件), - 并生成一个缓存文件
/etc/ld.so.cache。这个缓存文件会被动态链接器(ld.so 或 ld-linux.so)使用,以加快共享库的查找速度。
1 | # 查看所有是path 的库 |
ldd 检查是否链接成功
ldd会显示动态库的链接关系,中间的nm为U没关系,只需要最终.so对应符号是T即可。- 出于安全考虑,建议在使用
ldd时避免对不可信的可执行文件运行,因为它可能会执行恶意代码。 - 相对安全的替代方法是使用
readelf -d或objdump -p来查看库依赖。
4 链接过程
通过使用ld命令,将编译好的目标文件连接成一个可执行文件或动态库。
- 链接器的核心工作就是符号表解析、重定位和库文件链接三个部分。(具体细节看CSAPP7.5-7.7)
- 符号解析
- 每个可重定位目标程序中都存在符号表的数据结构,包含了一些被声明的函数和变量的符号。依上例,main.o和sum.o都有一个这样的结构。符号表中的每一项都包含一个符号名字和一个符号定义的地址。
- 符号解析的任务就是将这些符号和它们所在的源文件、库文件中的定义进行匹配。这个过程会生成符号表,用于给链接器在后续的重定位中找到函数所在的地址。
- 对于符号解析有重载(不同的类,函数名相同)的特殊情况,比如
Foo::bar(int,long)会变成bar__3Fooil。其中3是名字字符数
- 重定位:在符号解析完成后,链接器会把不同的目标文件合并在一起,此时就需要对目标代码进行地址的修正,使得各个目标文件之间的函数调用或者变量访问都可以正确。这个过程叫做重定位。链接器会根据符号表信息,将每个函数调用位置中的符号替换成实际的地址。
- 库文件链接:链接器还需要为程序链接不同的库文件,包括系统库和用户库。这些库文件可能是静态库或者动态库。
- 如果是静态库,链接器会从库文件中提取目标代码并将其与目标文件合并成一个可执行文件。
- 如果是动态库,则需要在运行时动态加载库文件,并将其链接到应用程序中。
- 符号解析
符号和符号表
见 Linux Executable file: Structure & Running
符号解析
- 局部变量
- 编译器只允许每个模块中每个局部符号有一个定义。同时确保它们拥有唯一的名字。
- 全局变量
- 缺失情况:当编译器遇到一个不是在当前模块中定义的符号(变量或函数名)时,会假设该符号是在其他某个模块中定义的,生成一个链接器符号表条目,并把它交给链接器处理。如果链接器在它的任何输入模块中都找不到这个被引用符号的定义,就输出
undefined reference to - 同名情况:编译器报错或者选择一个,
- 函数和已初始化的全局变量是强符号,
- 未初始化的全局变量是弱符号。
- 选择规则:
- 规则 1:不允许有多个同名的强符号。
- 规则 2:如果有一个强符号和多个弱符号同名,那么选择强符号。
- 规则 3:如果有多个弱符号同名,那么从这些弱符号中任意选择一个。
- 规则 2 和规则 3 的应用会造成一些不易察觉的运行时错误,对于不警觉的程序员来说,是很难理解的,尤其是如果重复的符号定义还有不同的类型时。
- 缺失情况:当编译器遇到一个不是在当前模块中定义的符号(变量或函数名)时,会假设该符号是在其他某个模块中定义的,生成一个链接器符号表条目,并把它交给链接器处理。如果链接器在它的任何输入模块中都找不到这个被引用符号的定义,就输出
重定位
一旦链接器完成了符号解析这一步,就把代码中的每个符号引用和正好一个符号定义(即它的一个输入目标模块中的一个符号表条目)关联起来。此时,链接器就知道它的输入目标模块中的代码节和数据节的确切大小。现在就可以开始重定位步骤了,在这个步骤中,将合并输入模块,并为每个符号分配运行时地址。重定位由两步组成:
- 重定位节和符号定义。
- 在这一步中,链接器将所有相同类型的节合并为同一类型的新的聚合节。
- 例如,来自所有输入模块的
.data节被全部合并成一个节,这个节成为输出的可执行目标文件的.data节。 - 然后,链接器将运行时内存地址赋给新的聚合节,赋给输入模块定义的每个节,以及赋给输入模块定义的每个符号。
- 当这一步完成时,程序中的每条指令和全局变量都有唯一的运行时内存地址了。
- 例如,来自所有输入模块的
- 在这一步中,链接器将所有相同类型的节合并为同一类型的新的聚合节。
- 重定位节中的符号引用。
- 在这一步中,链接器修改代码节和数据节中对每个符号的引用,使得它们指向正确的运行时地址。
- 要执行这一步,链接器依赖于可重定位目标模块中称为重定位条目(relocation entry)的数据结构,我们接下来将会描述这种数据结构。
重定位条目
当汇编器生成一个目标模块时,它并不知道数据和代码最终将放在内存中的什么位置。它也不知道这个模块引用的任何外部定义的函数或者全局变量的位置。所以,无论何时汇编器遇到对最终位置未知的目标引用,它就会生成一个重定位条目,告诉链接器在将目标文件合并成可执行文件时如何修改这个引用。
代码的重定位条目放在 .rel.text 中。已初始化数据的重定位条目放在 .rel.data 中。
下面 展示了 ELF 重定位条目的格式。
- offset 是需要被修改的引用的节偏移。
- symbol 标识被修改引用应该指向的符号。
- type 告知链接器如何修改新的引用。
- ELF 定义了 32 种不同的重定位类型,有些相当隐秘。我们只关心其中两种最基本的重定位类型:
R_X86_64_PC32。重定位一个使用 32 位 PC 相对地址的引用。回想一下 3.6.3 节,一个 PC 相对地址就是距程序计数器(PC)的当前运行时值的偏移量。当 CPU 执行一条使用 PC 相对寻址的指令时,它就将在指令中编码的 32 位值加上 PC 的当前运行时值,得到有效地址(如 call 指令的目标),PC 值通常是下一条指令在内存中的地址。(将 PC 压入栈中来使用)R_X86_64_32。重定位一个使用 32 位绝对地址的引用。通过绝对寻址,CPU 直接使用在指令中编码的 32 位值作为有效地址,不需要进一步修改。
- ELF 定义了 32 种不同的重定位类型,有些相当隐秘。我们只关心其中两种最基本的重定位类型:
- addend 是一个有符号常数,一些类型的重定位要使用它对被修改引用的值做偏移调整。
1 | typedef struct { |
目标文件与库的位置
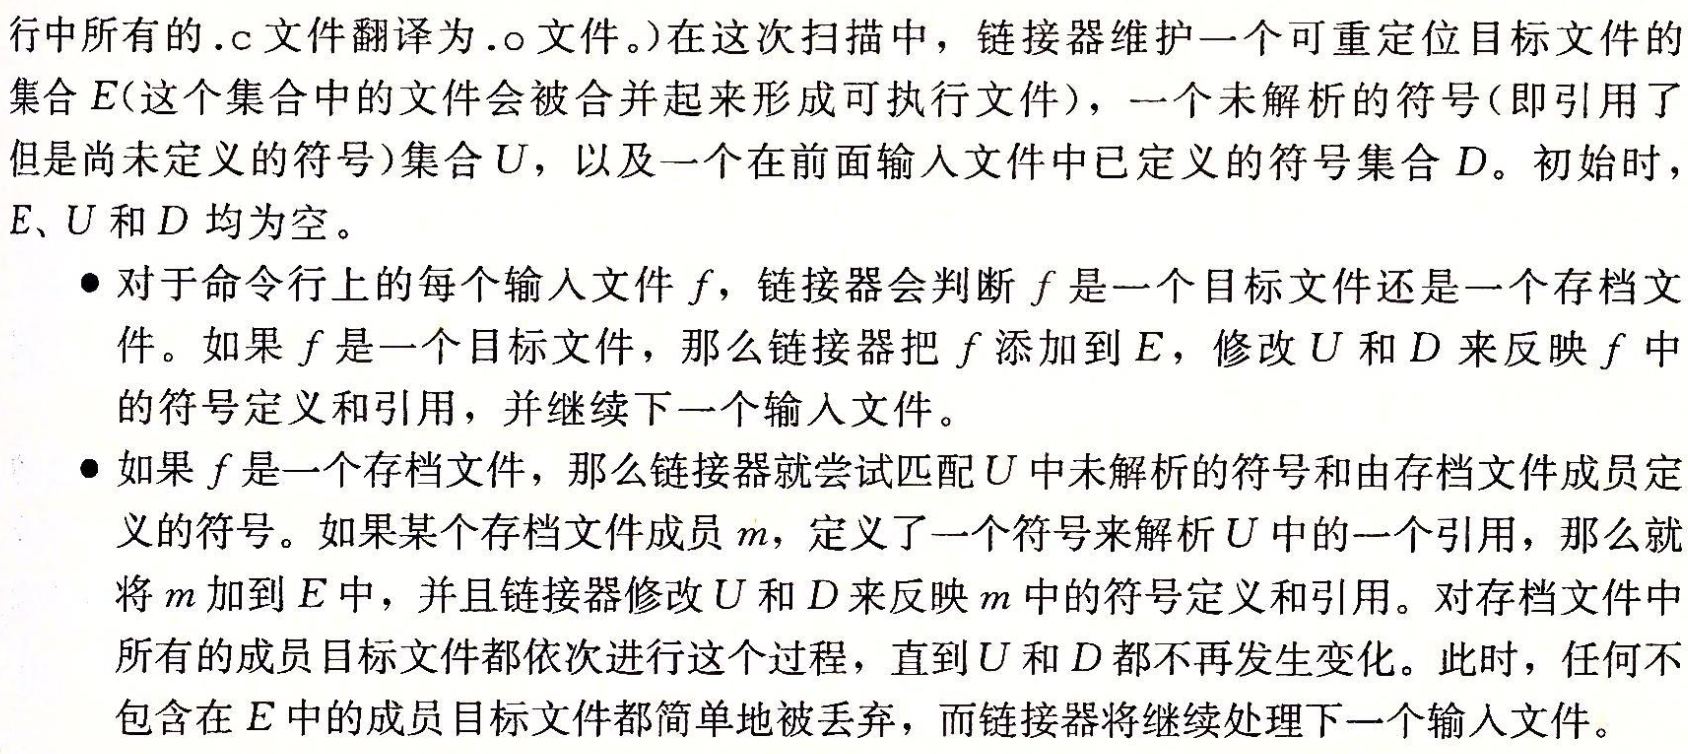
链接器通常从左到右解析依赖项,这意味着如果库 A 依赖于库 B,那么库 B 应该在库 A 之前被链接。


4.1 静态链接
静态库static library就是将相关的目标模块打包形成的单独的文件。使用ar命令。
- 在Linux系统中,静态库以一种称为存档(archive)的特殊文件格式存放在磁盘中。
- 存档文件是一组连接起来的可重定位目标文件的集合,有一个头部用来描述每个成员目标文件的大小和位置。
- 存档文件名由后缀.a标识。
优点与问题
静态库的优点在于:
- 程序员不需要显式的指定所有需要链接的目标模块,因为指定是一个耗时且容易出错的过程;
- 链接时,连接程序只从静态库中拷贝被程序引用的目标模块,这样就减小了可执行文件在磁盘和内存中的大小。
问题:
- 几乎所有程序都需要printf这样的库函数,每个可执行文件都包含该模块的代码段和数据段,浪费磁盘空间。
- linux采用虚拟内存管理内存分配,每个进程的内存空间是独立的,运行时所有程序都要把这些库函数代码段和数据段加载到自己的内存里,浪费内存。
- 静态库和所有的软件一样,需要定期维护和更新。如果应用程序员想要使用一个库的最新版本,他们必须以某种方式了解到该库的更新情况,然后显式地将他们的程序与更新了的库重新链接。
静态链接过程
深入理解计算机系统P477,静态库例子
1 | gcc -static -o prog2c main2.o -L. -lvector |
图 7-8 概括了链接器的行为。-static 参数告诉编译器驱动程序,链接器应该构建一个完全链接的可执行目标文件,它可以加载到内存并运行,在加载时无须更进一步的链接。-lvector 参数是 libvector.a 的缩写,-L. 参数告诉链接器在当前目录下查找 libvector.a。

- 当链接器运行时,它判定 main2.o 引用了 addvec.o 定义的 addvec 符号,所以复制 addvec.o 到可执行文件。
- 因为程序不引用任何由 multvec.o 定义的符号,所以链接器就不会复制这个模块到可执行文件。
- 链接器还会复制 libc.a 中的 printf.o 模块,以及许多 C 运行时系统中的其他模块。
4.2 动态链接
- 共享库(shared library)是致力于解决静态库缺陷的一个现代创新产物。共享库是一个目标模块,在运行或加载时,可以加载到任意的内存地址,并和一个在内存中的程序链接起来。
- 共享库也称为共享目标(shared object),在 Linux 系统中通常用 .so 后缀来表示。微软的操作系统大量地使用了共享库,它们称为 DLL(动态链接库)。
- 这个过程称为动态链接(dynamic linking),是由一个叫做动态链接器(dynamic linker)的程序来执行的。
共享库是以两种不同的方式来“共享”的:
- 首先,在任何给定的文件系统中,对于一个库只有一个. so 文件。所有引用该库的可执行目标文件共享这个 .so 文件中的代码和数据,而不是像静态库的内容那样被复制和嵌入到引用它们的可执行的文件中。
- 其次,在内存中,一个共享库的 .text 节的一个副本可以被不同的正在运行的进程共享

如上创建了一个可执行目标文件 prog2l,而此文件的形式使得它在运行时可以和 libvector.so 链接。基本的思路是:
- 当创建可执行文件时,静态执行一些链接
- 此时,没有任何 libvector.so 的代码和数据节真的被复制到可执行文件 prog2l 中。反之,链接器复制了一些重定位和符号表信息,它们使得运行时可以解析对 libvector.so 中代码和数据的引用。
- 然后在程序加载时,动态完成链接过程。
- 动态链接可以在可执行文件第一次加载和运行时发生(加载时链接)
- Common case for Linux,handled automatically by the dynamic linker (ld-linux.so).
- Standard C library (libc.so)usually dynamically linked.
- 动态链接也可以在程序开始运行后发生(运行时链接).
- In Linux,this is done by calls to the
dlopen()interface.- Distributing software.
- High-performance web servers.
- Runtime library interpositioning.
- In Linux,this is done by calls to the
- 动态链接可以在可执行文件第一次加载和运行时发生(加载时链接)
加载情况一
情况:在应用程序被加载后执行前时,动态链接器加载和链接共享库的情景。
核心思想:由动态链接器接管,加载管理和关闭共享库(比如,如果没有其他共享库还在使用这个共享库,dlclose函数就卸载该共享库。)。
- 首先,加载部分链接的可执行文件 prog2l。
- prog2l 包含一个
.interp节,这一节包含动态链接器的路径名,动态链接器本身就是一个共享目标(如在 Linux 系统上的 ld-linux.so). 加载器不会像它通常所做地那样将控制传递给应用,而是加载和运行这个动态链接器。然后,动态链接器通过执行下面的重定位完成链接任务:- 重定位 libc.so 的文本和数据到某个内存段。
- 重定位 libvector.so 的文本和数据到另一个内存段。
- 重定位 prog2l 中所有对由 libc.so 和 libvector.so 定义的符号的引用。
最后,动态链接器将控制传递给应用程序。从这个时刻开始,共享库的位置就固定了,并且在程序执行的过程中都不会改变。
加载情况二
情况:应用程序在运行时要求动态链接器加载和链接某个共享库,而无需在编译时将那些库链接到应用。
实际应用情况:
- 分发软件。微软 Wmdows 应用的开发者常常利用共享库来分发软件更新。他们生成一个共库的新版本,然后用户可以下载,并用它替代当前的版本。下一次他们运行应用程序时,应用将自动链接和加载新的共享库。
- 构建高性能 Web 服务器。
- 许多 Web 服务器生成动态内容,比如个性化的 Web 页面、账户余额和广告标语
- 早期的 Web 服务器通过使用 fork 和 execve 创建一个子进程,并在该子进程的上下文中运行 CGI 程序来生成动态内容。
- 然而,现代高性能的 Web 服务器可以使用基于动态链接的更有效和完善的方法来生成动态内容。
思路是将每个生成动态内容的函数打包在共享库中。
- 当一个来自 Web 浏览器的请求到达时,服务器动态地加载和链接适当的函数,然后直接调用它,而不是使用 fork 和 execve 在子进程的上下文中运行函数。
- 函数会一直缓存在服务器的地址空间中,所以只要一个简单的函数调用的开销就可以处理随后的请求了。这对一个繁忙的网站来说是有很大影响的。更进一步地说,在运行时无需停止服务器,就可以更新已存在的函数,以及添加新的函数。
动态库的优点
- 更新动态库,无需重新链接;对于大系统,重新链接是一个非常耗时的过程;
- 运行中可供多个程序使用,内存中只需要有一份,节省内存。运行时一个共享库的代码段和数据段在物理内存中只有一份,但映射到多个虚拟内存片段上,供不同程序使用。其中代码段是只读的,整个操作系统绝对只有一份。但数据段有可能被修改,在修改的时候则会复制一个副本,每个进程有自己的一个内存副本。
- 共享库是.so文件,不会和我们自己的代码一起合并成可执行文件,不占磁盘空间。
动态链接
fPIC,fPIE
编译器yasm的参数-DPIE
如果同一份代码可能被加载到进程空间的任意虚拟地址上执行(如共享库和动态加载代码),那么就需要使用-fPIC生成位置无关代码。
如何实现动态链接
- 共享库是.so文件,不会和我们自己的代码一起合并成可执行文件,不占磁盘空间。
- 运行时一个共享库的代码段和数据段在物理内存中只有一份,但映射到多个虚拟内存片段上,供不同程序使用。
- 其中代码段是只读的,整个操作系统绝对只有一份。
- 但数据段有可能被修改,在修改的时候则会复制一个副本,每个进程有自己的一个内存副本。
- 共享库的代码段和数据段加载到任意的内存段中,位置不固定。
- 加载完成后,进行符号重定位。回想一下之前说过的重定位过程,需要修改所有符号引用的地址。
- 由于动态链接在运行时才确定共享库代码段和数据段的内存地址,所以在运行时才能进行重定位。
- 运行时修改代码,想想就觉得不优雅。而且Linux不允许在运行时修改代码段。
- 由此,要完成动态链接,还需要引入了最后一个重要的概念,位置无关代码,即在加载时无需重定位的代码。
位置无关代码(Position-Independent Code, PIC)
问题:多个进程是如何共享程序的一个副本的呢?
- 一种方法是给每个共享库分配一个事先预备的专用的(虚拟)地址空间片,然后要求加载器总是在这个地址加载共享库。
问题。
- 地址空间的使用效率不高,因为即使一个进程不使用这个库,那部分空间还是会被分配出来。
- 难以管理。我们必须保证没有片会重叠。
- 库修改了之后,我们必须确认已分配给它的片还适合它的大小。如果不适合了,必须找一个新的片。
- 创建了一个新的库,我们还必须为它寻找空间。随着时间的进展,假设在一个系统中有了成百个库和库的各个版本库,就很难避免地址空间分裂成大量小的、未使用而又不再能使用的小洞。
- 更糟的是,对每个系统而言,库在内存中的分配都是不同的,这就引起了更多令人头痛的管理问题。
可以加载而无需重定位的代码称为位置无关代码(Position-Independent Code,PIC)
- 无限多个进程可以共享一个共享模块的代码段的单一副本。(当然,每个进程仍然会有它自己的读/写数据块。)
在一个 x86-64 系统中,对同一个目标模块中符号的引用是不需要特殊处理使之成为 PIC。可以用 PC 相对寻址来编译这些引用,构造目标文件时由静态链接器重定位。
然而,对共享模块定义的外部过程和对全局变量的引用需要一些特殊的技巧,接下来我们会谈到。
PIC 数据引用
- 目标:生成对全局变量的 PIC 引用
- 思想:无论我们在内存中的何处加载一个目标模块(包括共享目标模块),数据段与代码段的距离总是保持不变。因此,代码段中任何指令和数据段中任何变量之间的距离都是一个运行时常量,与代码段和数据段的绝对内存位置是无关的。由于数据段是可以在运行时修改的,所以可以把对代码段的修改转化为对数据段的修改。
- 实现:在数据段前面加入一个数据结构,全局偏移量表(Global Offset Table,GOT)。每一个被该模块引用的全局数据目标(过程或全局变量),都在GOT里有一个8字节条目,并为每个条目生成一个重定位条目。
- 实际使用:在加载时,动态链接器会重定位 GOT 中的每个条目,使得它包含目标的正确的绝对地址。然后程序执行时就能正确访问正确的绝对地址了。
PIC 函数调用
- 情况:假设程序调用一个由共享库定义的函数。编译器没有办法预测这个函数的运行时地址,因为定义它的共享模块在运行时可以加载到任意位置。
- 简单方法:为该引用生成一条重定位记录,然后动态链接器在程序加载的时候再解析它。不过,这种方法并不是 PIC,因为它需要链接器修改调用模块的代码段。
解决方法:延迟绑定(lazy binding),将过程地址的绑定推迟到第一次调用该过程时。
动机:使用延迟绑定的动机是对于一个像 libc.so 这样的共享库输出的成百上千个函数中,一个典型的应用程序只会使用其中很少的一部分。把函数地址的解析推迟到它实际被调用的地方,能避免动态链接器在加载时进行成百上千个其实并不需要的重定位。
结果:第一次调用过程的运行时开销很大,但是其后的每次调用都只会花费一条指令和一个间接的内存引用。
实现:延迟绑定是通过两个数据结构之间简洁但又有些复杂的交互来实现的,这两个数据结构是:GOT 和过程链接表(Procedure Linkage Table,PLT)。如果一个目标模块调用定义在共享库中的任何函数,那么它就有自己的 GOT 和 PLT。GOT 是数据段的一部分,而 PLT 是代码段的一部分。
首先,让我们介绍这两个表的内容。
- 过程链接表(PLT)。PLT 是一个数组,其中每个条目是 16 字节代码。
PLT[0]是一个特殊条目,它跳转到动态链接器中。- 每个被可执行程序调用的库函数都有它自己的 PLT 条目。每个条目都负责调用一个具体的函数。
PLT[1](图中未显示)调用系统启动函数(__libc_start_main),它初始化执行环境,调用 main 函数并处理其返回值从 PLT[2] 开始的条目调用用户代码调用的函数。在我们的例子中,PLT[2] 调用 addvec,PLT[3](图中未显示)调用 printf。
- 全局偏移量表(GOT)。正如我们看到的,GOT 是一个数组,其中每个条目是 8 字节地址。
- 和 PLT 联合使用时,GOT[O] 和 GOT[1] 包含动态链接器在解析函数地址时会使用的信息。GOT[2] 是动态链接器在 ld-linux.so 模块中的入口点。
- 其余的每个条目对应于一个被调用的函数,其地址需要在运行时被解析。每个条目都有一个相匹配的 PLT 条目。例如,GOT[4] 和 PLT[2] 对应于 addvec。初始时,每个 GOT 条目都指向对应 PLT 条目的第二条指令。

上图a 展示了 GOT 和 PLT 如何协同工作,在 addvec 被第一次调用时,延迟解析它的运行时地址:
- 第 1 步。不直接调用 addvec,程序调用进入 PLT[2],这是 addvec 的 PLT 条目。
- 第 2 步。第一条 PLT 指令通过 GOT[4] 进行间接跳转。因为每个 GOT 条目初始时都指向它对应的 PLT 条目的第二条指令,这个间接跳转只是简单地把控制传送回 PLT[2] 中的下一条指令。
- 第 3 步。在把 addvec 的 ID(0x1)压入栈中之后,PLT[2] 跳转到 PLT[0]。
- 第 4 步。PLT[0] 通过 GOT[1] 间接地把动态链接器的一个参数压入栈中,然后通过 GOT[2] 间接跳转进动态链接器中。动态链接器使用两个栈条目来确定 addvec 的运行时位置,用这个地址重写 GOT[4],再把控制传递给 addvec。
上图b 给出的是后续再调用 addvec 时的控制流:
- 第 1 步。和前面一样,控制传递到 PLT[2]。
- 第 2 步。不过这次通过 GOT[4] 的间接跳转会将控制直接转移到 addvec。
库搜索优先级
静态库
- gcc先从-L寻找;
- 再找环境变量LIBRARY_PATH指定的搜索路径;
- 再找内定目录 /lib /usr/lib /usr/local/lib 这是当初compile gcc时写在程序内的。
动态库
- 编译目标代码时指定的动态库搜索路径-L;
- 环境变量LD_LIBRARY_PATH指定的动态库搜索路径;
- 配置文件/etc/ld.so.conf中指定的动态库搜索路径;
- 默认的动态库搜索路径/lib /usr/lib/ /usr/local/lib
1 | shaojiemike@snode6 /lib/modules/5.4.0-107-generic/build [06:32:26] |
5. 加载器
加载器:将可执行程序加载到内存并进行执行,loader和ld-linux.so。
将可执行文件加载运行
其他技巧:GNU用于理解和处理目标文件的相关命令
| 命令 | 描述 |
|---|---|
| ar | 创建静态库,插入、删除、列出和提取成员; |
| stringd | 列出目标文件中所有可以打印的字符串; |
| strip | 从目标文件中删除符号表信息; |
| nm | 列出目标文件符号表中定义的符号; |
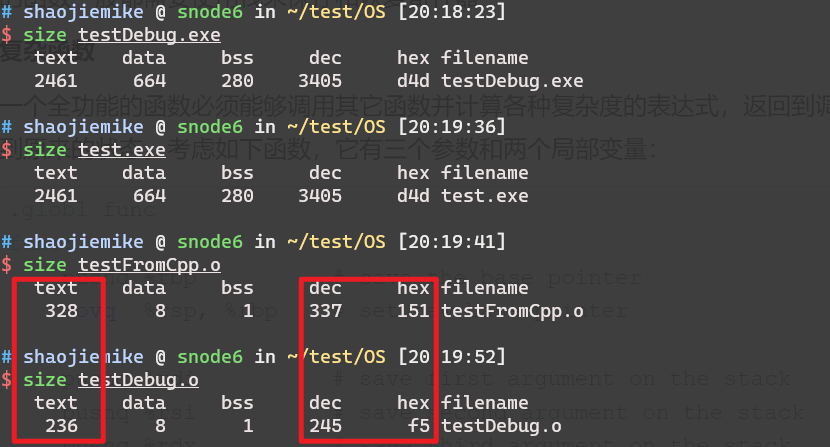
| size | 列出目标文件中节的名字和大小; |
| readelf | 显示一个目标文件的完整结构,包括ELF 头中编码的所有信息。 |
| objdump | 显示目标文件的所有信息,最有用的功能是反汇编.text节中的二进制指令。 |
| ldd | 列出可执行文件在运行时需要的共享库。 |
动态查看进程调用命令
ltrace 跟踪进程调用库函数过程
strace 系统调用的追踪或信号产生的情况
Relyze 图形化收费试用
debugging symbols
- 编译时加入
-g选项,可以生成调试信息,这样在gdb中可以查看源代码。 - 但是在复杂的编译过程中,最后可执行文件丢失了debugging symbols,所以研究一下怎么生成debugging symbols, 编译过程中的传递,以及如何查看。
debugging symbols的内容
1 | objdump -g <archive_file>.a |
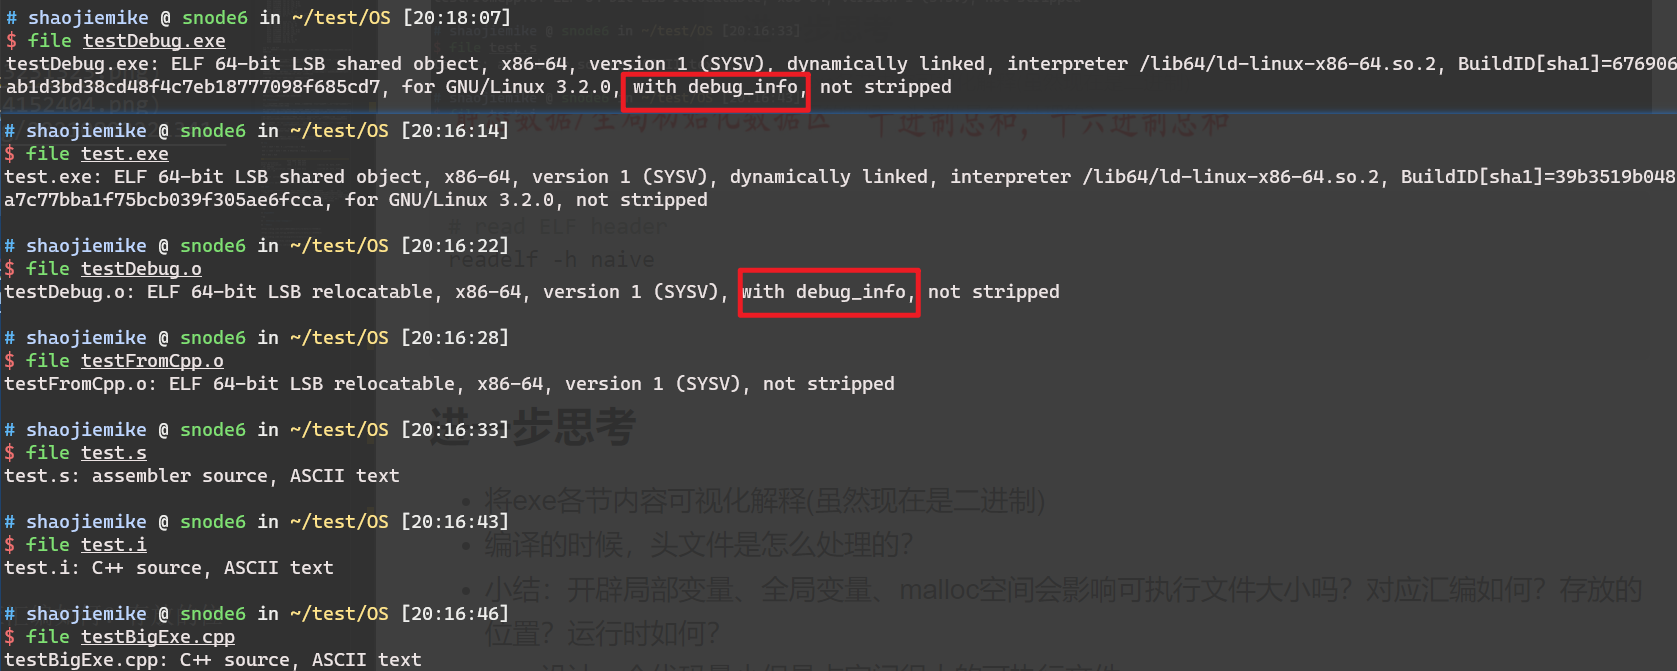
生成debugging symbols
- 预处理过程
- 应该会保留debugging symbols所需的信息,在实验后发现,执行
gcc -E -g testBigExe.cpp -o testDebug.i相对于无-g的命令,只会多一行信息# 1 "/staff/shaojiemike/test/OS//"
- 应该会保留debugging symbols所需的信息,在实验后发现,执行
- 编译过程
- 执行
gcc -S -g testBigExe.cpp -o testDebug.s,对比之前的汇编文件,由72行变成9760行。具体解析参考 GNU assembly file一文 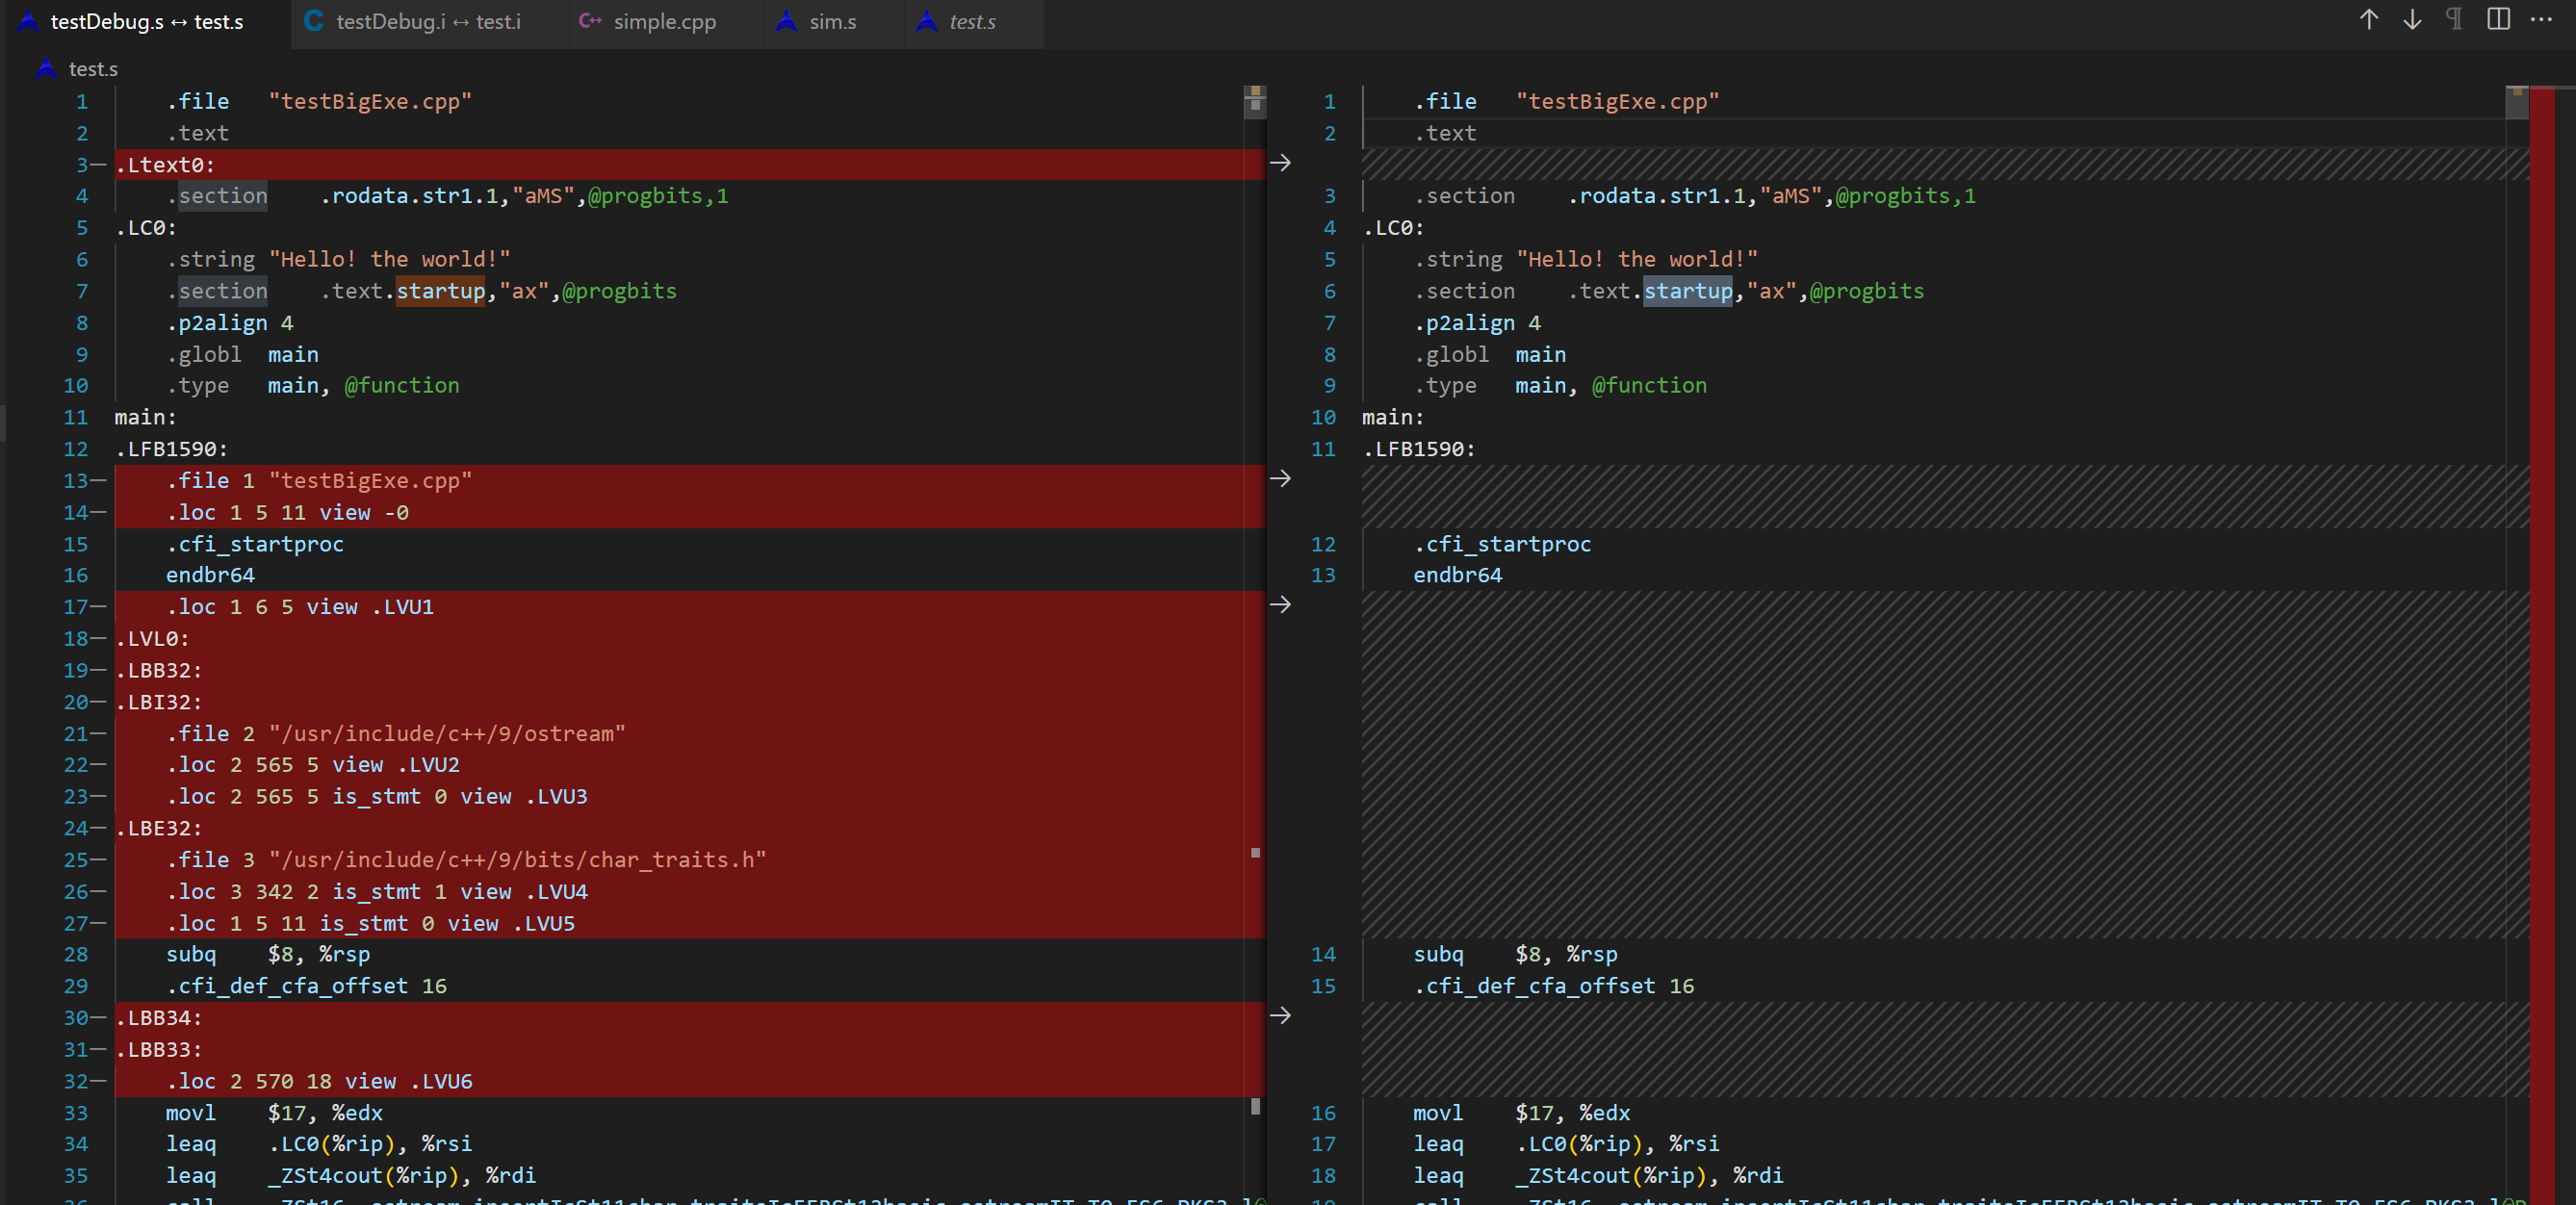
- 执行
- 汇编过程:保留了debug信息的汇编代码生成带debug信息的目标文件
- 链接(Linker)
编译代码中OpenMP实现
简单的#pragma omp for,编译后多出汇编代码如下。当前可以创建多少个线程默认汇编并没有显示的汇编指令。
1 | call omp_get_num_threads@PLT |
某些atomic的导语会变成对应汇编
需要进一步的研究学习
- chatGPT说:后端阶段(例如汇编器和连接器),则主要是对汇编代码和目标代码进行优化,例如指令调度、地址计算、代码缩减等。但是我持严重怀疑态度, 链接过程有这么多优化吗?
遇到的问题
暂无
开题缘由、总结、反思、吐槽~~
基础不牢,地动山摇。ya 了。
参考文献
https://www.cnblogs.com/LiuYanYGZ/p/5574601.html
https://hansimov.gitbook.io/csapp/part2/ch07-linking/7.5-symbols-and-symbol-tables