解释性语言 解释型语言没有严格编译汇编过程,由解释器将代码块按需要变运行边翻译给机器执行。因此解释型语言一度存在运行效率底,重复解释的问题。但是通过对解释器的优化!可以提高解释型语言的运行效率。
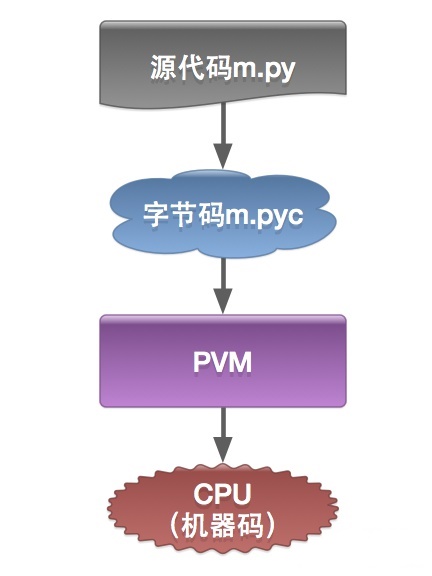
Python 与大多数解释型语言一样,确实是将源代码编译为一组虚拟机指令,并且 Python 解释器是针对相应的虚拟机实现的。这种中间格式被称为 “字节码”。
Python 字节码 Python 以 .pyc 结尾的 “ 字节码(bytecode)” 文件(二进制文件),一般位于__pycache__ 的子目录中,可以避免每次运行 Python 时去重新解析源代码。
1 python -m py_compile file.py
gpt3.5: Python字节码是由Python解释器在执行Python源代码之前生成的中间表示形式。它是将源代码翻译为机器可以理解的指令序列的一种形式。字节码文件的扩展名通常为.pyc(Python 3)或.pyo(Python 2)。
当你运行Python程序时,如果存在对应的字节码文件(.pyc或.pyo),解释器会首先检查字节码文件的时间戳。如果字节码文件的时间戳比源代码文件的时间戳更晚,且没有进行代码的修改,解释器会直接加载和执行字节码,跳过源代码的编译过程。
当你修改了Python源代码文件时,字节码文件不会立即更新。Python解释器会在下一次运行程序时,检测到源代码文件的修改,并重新编译生成新的字节码文件。这样,更新后的字节码文件将反映源代码的更改,并用于后续的执行。
经过编译的python文件可以提高程序的运行速度,一定程度上也对源代码起到了保护作用。然而如果我们只有编译过的python字节码文件,就给我们审查源码造成了一定的困难,这就引出了python字节码反编译的需求。
如果你想玩转字节码,那么,Python 标准库中的 dis 模块将对你有非常大的帮助;dis 模块 为 Python 字节码提供了一个 “反汇编”,它可以让你更容易地得到一个人类可读的版本,以及查找各种字节码指令。
知道如何去访问和阅读 Python 字节码将让你很容易回答为什么某些结构比其它结构运行的更快这样的问题(比如,为什么 {} 比 dict() 快)(尝试对比一下: dis.dis(“{}”) 与 dis.dis(“dict()”) 就会明白)。
pyo优化文件 pyo文件是源代码文件经过优化编译后生成的文件,是pyc文件的优化版本。编译时需要使用-O和-OO选项来生成pyo文件。在Python3.5之后,不再使用.pyo文件名,而是生成文件名类似“test.opt-n.pyc的文件。
1 python -O -m py_compile test.py
Python 虚拟机 CPython 使用一个基于栈的虚拟机。(你可以 “推入” 一个东西到栈 “顶”,或者,从栈 “顶” 上 “弹出” 一个东西来)。
CPython 使用三种类型的栈:
调用栈(call stack)。这是运行 Python 程序的主要结构。它为每个当前活动的函数 调用使用了一个东西 —— “ 帧(frame)”
在每个帧中,有一个 **计算栈(evaluation stack)**(也称为 数据栈(data stack))。这个栈就是 Python 函数运行的地方,运行的 Python 代码大多数是由推入到这个栈中的东西组成的,操作它们,然后在返回后销毁它们。
在每个帧中,还有一个**块栈(block stack)**。它被 Python 用于去跟踪某些类型的控制结构:循环、try / except 块、以及 with 块,全部推入到块栈中,当你退出这些控制结构时,块栈被销毁。
C vs Python 运行流程区别
python的传统运行执行模式:录入的源代码转换为字节码,之后字节码在python虚拟机中运行。代码自动被编译,之后再解释成机器码在CPU中执行。
c编译器直接把c源代码编译成机器码。过程比python执行过程少了字节码生成和虚拟机执行字节码过程。所以自然比python快。
深、浅拷贝 Python append() 与深拷贝、浅拷贝
python赋值只是引用,别名
1 2 3 4 5 6 7 8 list .append('Google' ) alist.append( num ) import copyalist.append( copy.deepcopy( num ) ) del list [2 ]
1 2 3 4 5 6 7 8 9 10 11 12 13 14 15 16 original_list = [1 , 2 , 3 ] for item in original_list: item *= 2 print (original_list) original_list = [[1 ,2 ,3 ], [2 ], [3 ]] for item in original_list: item.append("xxx" ) print (original_list)
参数的传递
传递不可变对象的引用(起到其他语言值传递 的效果) 数字,字符串,元组,function等
传递可变对象的引用(起到其他语言引用传递 的效果) 字典,列表,集合,自定义的对象等
1 2 3 4 5 6 7 8 9 10 11 12 13 14 15 16 17 18 19 20 def fun0 (a ): a = [0 ,0 ] def fun (a ): a[0 ] = [1 ,2 ] def fun2 (a ): a[:] = [10 ,20 ] b = [3 ,4 ] fun0(b) print (b)fun(b) print (b)fun2(b) print (b)
1 2 3 4 5 6 7 8 9 10 11 12 13 14 15 16 17 18 19 def fun1 (l ): l.append("0" ) return l def fun2 (l ): return l if __name__=="__main__" : l = [1 ,2 ,3 ,4 ,5 ] rel2 = fun2(l) print (rel2) rel1 = fun1(l) print (rel1) print (rel2)
逻辑 setup setup安装包的过程,请看pip package一文。
__init__.py__init__.py文件在 Python 包结构中扮演着重要角色,但是否必须存在取决于你使用的 Python 版本和具体的使用场景。
Python 2 :
__init__.py 是必需的。它标志着一个目录是一个 Python 包,允许该目录中的模块被导入。
Python 3 :
隐式命名空间包 :从 Python 3.3 开始,__init__.py 不再是必需的。Python 3 支持隐式命名空间包(Implicit Namespace Packages),这意味着即使没有 __init__.py 文件,目录也可以被视为包并进行导入。显式初始化逻辑 :尽管 __init__.py 不再是必需的,但它仍然是推荐的做法,特别是在需要执行包级别的初始化逻辑时。
即使在 Python 3 中,__init__.py 文件仍然有许多用途:
包初始化 :
可以包含包级别的初始化代码,例如设置全局变量、注册插件等。
控制导出内容 :
使用 __all__ 列表来控制哪些符号可以被 from package import * 导入。
定义包级别的函数和类 :
可以直接在 __init__.py 中定义函数和类,这些函数和类可以直接通过包名访问。
子模块导入 :
可以在 __init__.py 中导入子模块,使得用户可以通过包名直接访问子模块的内容。
假设你有以下文件结构:
mindspeed_mm/__init__.pymodels/
__init__.pyinternvl_model.py
mindspeed_mm/__init__.py
1 2 3 print ("Initializing mindspeed_mm package." )
mindspeed_mm/models/__init__.py
1 2 3 4 5 from .internvl_model import InternVLModelprint ("Initializing models package." )
mindspeed_mm/models/internvl_model.py
1 2 3 4 5 class InternVLModel : def __init__ (self ): print ("InternVLModel instance created." )
pretrain_internvl.py
1 2 3 4 5 from mindspeed_mm.models import InternVLModelmodel = InternVLModel()
在这个例子中:
mindspeed_mm/__init__.py 和 mindspeed_mm/models/__init__.py 中的代码会在导入时执行。mindspeed_mm/models/__init__.py 中的 from .internvl_model import InternVLModel 使得你可以通过 from mindspeed_mm.models import InternVLModel 直接导入 InternVLModel 类。
import 命名空间(namespace)可以基本理解成每个文件是一个,通过import来使用
触发 __init__.py
当你导入一个包时,Python 会执行该包目录下的 __init__.py 文件。如果没有这个文件,Python 会认为这个目录不是一个包,因此 import 语句会失败。
__init__.py
行为 :
每次导入包时,__init__.py 文件只会在第一次导入时被执行一次。如果模块已经被导入到当前的命名空间,再次 import 不会重新执行 __init__.py,除非你强制重新加载(比如用 importlib.reload())。
import 的执行会触发模块的初始化,类似于 C++ 中构造函数的概念,但不是在对象级别,而是在模块级别。
1 2 3 4 5 print ("Initializing the package" )def hello (): print ("Hello from the package" )
1 2 3 4 import exampleexample.hello()
python 会优先导入本地目录的同名文件夹先于安装包。
优先级
当前工作目录
PYTHONPATH 查看 env|grep PYTHONPATH
site-packages/*.pth
site-packages
绝对导入与相对导入
场景 导入方式 示例
导入标准库/第三方库
绝对导入
import numpy as np
导入项目根目录下的模块
绝对导入
from my_project import config
包内模块互相引用
相对导入
from . import helper
直接运行脚本
绝对导入
python script.py
作为包的一部分运行
相对导入或绝对导入
python -m package.module
在 Python 中,import 语句是否使用点号(.)取决于你使用的是 相对导入 还是 绝对导入 ,以及代码所处的上下文环境。以下是详细的解释:
语法 :import package.module 或 from package import module适用场景 :
从项目的根目录或已安装的包开始导入。
模块位于 sys.path 中的路径下(例如:标准库、第三方包、已添加到环境变量中的自定义模块)。
示例 :
1 2 3 4 5 6 import osfrom datetime import datetimefrom my_project.utils import helper
关键点 :
不需要点号,路径从顶级包开始。
适用于大部分情况,尤其是模块作为独立脚本运行时。
语法 :from . import module 或 from ..subpackage import module适用场景 :
在包(Package)内部 的模块之间互相引用。
使用点号表示当前模块的位置(. 表示当前目录,.. 表示父目录)。
示例 :
1 2 3 4 5 6 7 8 my_package/ ├── __init__.py ├── utils/ │ ├── __init__.py │ └── helper.py └── core/ ├── __init__.py └── main.py
在 main.py 中导入同级的 utils/helper.py:
1 2 from ..utils import helper
关键点 :
必须存在于包中 (目录必须有 __init__.py)。不能作为脚本直接运行 (如 python main.py),否则会报错:1 ImportError: attempted relative import with no known parent package
适用于包内部的模块间引用,避免硬编码绝对路径。
入口
在Python中,if __name__ == "__main__"这种写法通常出现在模块中,它的作用是控制模块的执行流程。
当一个模块被导入时,Python解释器会自动将这个模块的__name__属性设置为模块名称。但是如果模块是被直接运行的,则__name__属性会被设置为字符串__main__。
所以if name == “main”可以用来区分模块是被导入运行还是被直接运行:
如果模块是被导入的,if语句不会执行。因为模块的__name__不等于__main__。
如果模块是被直接运行的,if语句会执行。因为模块的__name__等于__main__。
清理与释放 程序结束时的清理行为(类似析构函数的操作)
在 Python 中,并没有像 C++ 那样显式的析构函数。模块或对象的清理一般通过以下方式实现:
对象的析构 :当一个 Python 对象的引用计数降为零时,Python 会自动调用该对象的 __del__ 方法进行资源清理。这个机制类似于 C++ 的析构函数,但触发时机取决于 Python 的垃圾回收机制。
1 2 3 4 5 6 7 8 9 class MyClass : def __init__ (self ): print ("Object created" ) def __del__ (self ): print ("Object destroyed" ) obj = MyClass()
模块的清理 :当程序结束时,Python 会尝试清理已加载的模块。这个过程会调用模块内一些特殊的钩子函数来进行必要的清理工作。虽然 Python 没有直接为模块提供析构函数,但是你可以使用 atexit 模块来注册一个函数,确保在程序结束时执行。
示例:使用 atexit 实现模块级别的清理操作
1 2 3 4 5 6 7 8 9 import atexitdef cleanup (): print ("Cleaning up resources before program exit" ) atexit.register(cleanup) print ("Program is running" )
输出 :
1 2 Program is running Cleaning up resources before program exit
atexit 模块允许你注册多个函数,它们会在解释器关闭之前按注册顺序依次执行。这种机制相当于 C++ 中的全局或静态对象析构函数的功能,确保在程序结束时执行一些清理工作。
模块的生命周期总结
初始化 :当模块被导入时,Python 会执行模块的顶层代码,包括 __init__.py 文件。这相当于模块的 “构造” 过程。对象的析构 :在 Python 中,通过垃圾回收机制和 __del__ 方法来管理对象的生命周期。通常情况下,当对象不再被引用时,会自动触发清理。程序结束时的清理 :Python 提供了 atexit 模块来执行程序结束时的资源清理操作。你可以在模块中注册一些函数,确保在程序退出时执行清理任务。
Python 的模块和包机制 类似于 C++ 中的构造函数,但它的作用范围是模块级别的,而不是对象级别的。Python 通过垃圾回收和 __del__ 方法 来处理对象的清理,而不是像 C++ 中的显式析构函数。
Python 提供了 atexit 模块来实现程序级别的清理操作 ,这类似于 C++ 中全局/静态对象的析构行为,但更加灵活。
语法 常见运算符 以下是 Python 和 C++ 中一些常见的运算符及其差异:
基本算术运算符
运算符
描述
Python 示例
C++ 示例
//整数除法
a // ba / b (整数除法)
%取模
a % ba % b
**幂
a ** bpow(a, b)
位运算符
运算符
描述
Python 示例
C++ 示例
&按位与
a & ba & b
`
`
按位或
`a
^按位异或
a ^ ba ^ b
~按位取反
~a~a
<<左移
a << ba << b
>>右移
a >> ba >> b
赋值运算符
运算符
描述
Python 示例
C++ 示例
//=整数除法赋值
a //= ba /= b (整数除法)
%=取模赋值
a %= ba %= b
**=幂赋值
a **= ba = pow(a, b)
&=按位与赋值
a &= ba &= b
`
=`
按位或赋值
`a
^=按位异或赋值
a ^= ba ^= b
<<=左移赋值
a <<= ba <<= b
>>=右移赋值
a >>= ba >>= b
逻辑运算符
运算符
描述
Python 示例
C++ 示例
and逻辑与
a and ba && b
or逻辑或
a or b`a
not逻辑非
not a!a
成员运算符
运算符
描述
Python 示例
C++ 示例
in成员
a in b无直接等价
not in非成员
a not in b无直接等价
身份运算符
运算符
描述
Python 示例
C++ 示例
is身份相同
a is b无直接等价
is not身份不同
a is not b无直接等价
装饰器 decorator @能在最小改变函数的情况下,包装新的功能。^1
1 2 3 4 5 6 7 8 9 10 11 12 def use_logging (func ): def wrapper (): logging.warn("%s is running" % func.__name__) return func() return wrapper @use_logging def foo (): print ("i am foo" ) foo()
问题:但是上面的代码会导致函数名被修改,所以不能再使用 foo.__name__变成了use_logging
解决办法:加上@wraps(func)
1 2 3 4 5 6 7 def use_logging (func ): @wraps(func ) def wrapper (): logging.warn("%s is running" % func.__name__) return func() return wrapper
下划线 单下划线、双下划线、头尾双下划线说明:
__foo__: 定义的是特殊方法,一般是系统定义名字 ,类似 init () 之类的。_foo: 以单下划线开头的表示的是 protected 类型的变量,即保护类型只能允许其本身与子类进行访问,不能用于 from module import *__foo: 双下划线的表示的是私有类型(private)的变量, 只能是允许这个类本身进行访问了。
函数传参 解包
解包 是指将一个容器(如列表、元组或字典)的内容拆分并分配给多个变量或作为参数传递给函数。Python 提供了简洁的语法来实现这一点,使用 * 和 ** 分别解包可迭代对象和字典。
在 Python 中,*args 和 **kwargs 是非常强大的工具,用于处理可变数量的参数。它们使得函数可以接收任意数量的位置参数和关键字参数,并将这些参数传递给其他函数或方法。让我们详细解释一下你提供的代码片段:
1 2 3 4 5 6 7 8 9 10 def __call__ (self, *input , **kwargs ): result = self .forward(*input , **kwargs) key1_value = kwargs.get('key1' , None ) if key1_value is not None : print (f"The value of key1 is: {key1_value} " ) else : print ("key1 is not provided in the arguments." )
为什么使用 * 和 ** 可以传递参数
收集参数 :
*input:收集所有未命名的位置参数(非关键字参数),并将它们打包成一个元组。**kwargs:收集所有未明确列出的关键字参数,并将它们打包成一个字典。
解包参数 :
在调用 self.forward 时,*input 将之前收集的位置参数解包为单独的参数传递给 forward 方法。
同样,**kwargs 将之前收集的关键字参数解包为单独的关键字参数传递给 forward 方法。
具体工作原理
当你调用 __call__ 方法时,你可以传递任意数量的位置参数和关键字参数。例如:
1 2 3 4 5 6 obj = SomeClass() obj(1 , 2 , 3 , key1='value1' , key2='value2' ) params = {'key1' : value1, 'key2' : value2} obj(**params)
在这个例子中:
1, 2, 3 被收集到 *input 中,形成元组 (1, 2, 3)。key1='value1', key2='value2' 被收集到 **kwargs 中,形成字典 {'key1': 'value1', 'key2': 'value2'}。
解包可迭代对象
示例
1 2 3 4 5 def example_function (a, b, *args ): print (f"a: {a} , b: {b} " ) print ("Additional positional arguments:" , args) example_function(1 , 2 , 3 , 4 , 5 )
输出:
1 2 a: 1, b: 2 Additional positional arguments: (3, 4, 5)
强制关键字参数
1 2 3 4 5 6 7 8 def another_function (a, b, *, x, y ): print (f"a: {a} , b: {b} , x: {x} , y: {y} " ) another_function(1 , 2 , x=3 , y=4 )
输出:
1 2 3 4 5 6 def sum_three_numbers (x, y, z ): return x + y + z numbers = [1 , 2 , 3 ] result = sum_three_numbers(*numbers) print (result)
解包字典
在函数定义中,** 用于将传入的关键字参数打包成一个字典;
而在函数调用中,** 则用于将字典解包为关键字参数。
当你在函数定义中使用 **kwargs 时,所有未明确列出的关键字参数都会被收集到一个名为 kwargs 的字典中。
1 2 3 4 5 def example_function (a, b, **kwargs ): print (f"a: {a} , b: {b} " ) print ("Additional arguments:" , kwargs) example_function(1 , 2 , x=3 , y=4 )
输出:
1 2 a: 1, b: 2 Additional arguments: {'x': 3, 'y': 4}
当你在函数调用中使用 ** 时,它会将字典中的键值对解包为关键字参数传递给函数。这意味着字典的键会成为参数名,对应的值会成为参数值。
1 2 3 4 5 def another_function (a, b, x, y ): print (f"a: {a} , b: {b} , x: {x} , y: {y} " ) args_dict = {'x' : 3 , 'y' : 4 } another_function(1 , 2 , **args_dict)
输出:
在这个例子中,args_dict 是一个字典,包含键 x 和 y 及其对应的值。通过 **args_dict,这些键值对被解包为关键字参数传递给 another_function。
DEBUG breakpoint() python 能很轻易的
段错误
开启 Python 的调试模式 :
1 export PYTHONMALLOC=debug
使用 faulthandler 模块 :faulthandler 模块,可以用来捕获段错误并打印堆栈信息。你可以在程序的开头添加以下代码来启用它:
1 2 import faulthandlerfaulthandler.enable()
这将会在段错误发生时输出堆栈跟踪。
查看 Python 调试输出 :faulthandler 打印堆栈信息,或通过 GDB 调试 Python 解释器。如果 Python 解释器发生崩溃,faulthandler 会帮助你定位错误。
卡住任务 pstack remote pid , 虽然官方没说,但是可以pip install pystack 或者 pip install pstack安装
py-spy dump –pid 831568
INFO torch.profiler 如果程序能正常运行,优先推荐profiling理解程序逻辑。
打印当前堆栈 traceback.print_stack()
VizTracer时间性能分析 1 2 3 4 5 6 7 8 9 10 from viztracer import VizTracertracer = VizTracer(max_stack_depth=2 ) tracer.start() your_function() tracer.stop() tracer.save("result.json" )
或者
1 2 3 from viztracer import VizTracerwith VizTracer(output_file="xxx.json" , tracer_entries=20000000 ) as tracer: xxx
VizTracer 知道“我现在进了一个新函数”,但它并不会、也无法在这一刻完整扫描“是谁调用了我”。
logevent 弥补了一点能力。
1 2 3 4 from viztracer import get_tracerwith get_tracer().log_event("my event name" ):
可以尝试 火焰图 py-spy record -o profile.svg --rate 100 your_script
mstx 逻辑监控工具
torch_npu.mstx.mark range_start等参考putils
mstt NPU vs GPU 性能对比工具 能实现到excel的输出,参考文档 。
msprobe 精度对比工具 msprobe是MindStudio Training Tools工具链下精度调试部分的工具包,主要包括精度预检、溢出检测、精度比对和梯度监控等功能,目前适配PyTorch和MindSpore框架。具体参考文档 。
两种dump方式 1 2 3 4 5 6 7 8 9 10 11 12 13 from msprobe.pytorch import PrecisionDebugger, seed_allseed_all() debugger = PrecisionDebugger(config_path='./config.json' ) debugger.start(model=module) debugger.stop()
另一种方式直接save任意数据对象,参考文档
1 2 3 4 5 6 7 8 from msprobe.pytorch import PrecisionDebuggerdebugger = PrecisionDebugger(dump_path="dump_path" , level="debug" ) debugger.save(x2, "x2" , save_backward=True ) debugger.step()
可视化为excel 参考mstt文档
创建对比文件
1 2 3 4 { "npu_path" : "./npu_dump/debug.json" , "bench_path" : "./bench_dump/debug.json" }
执行 msprobe -f pytorch compare -i ./compare.json -o ./output
可视化为图节点 参考vllm文档
安装tensorborad插件 pip install tb-graph-ascend
创建compare.json
1 2 3 4 5 { "npu_path" : "./npu_dump" , "bench_path" : "./bench_dump" , "is_print_compare_log" : true }
转换成对比图
1 msprobe -f pytorch graph -i ./compare.json -o ./output
启动tensorboard
1 tensorboard --logdir output --host localhost --port 6501
icecream for debug
rich:功能更全:支持任意对象的详细信息,包括method; 支持log;支持进度条;支持打印堆栈。
rich:打印更华丽
pprint 是 Python 的 pprint 模块中的一个函数,全称是 pretty-print(漂亮打印)。它用于以更易读的格式打印数据结构,如字典、列表等。
1 2 from pprint import pprintpprint(obj)
优雅打印对象:函数名,结构体
打印行号和栈(没用输入时
允许嵌套(会将输入传递到输出
允许带颜色ic.format(*args)获得ic打印的文本
debug ic.disable()and ic.enable()
允许统一前缀 ic.configureOutput(prefix='Debug | ')
不用每个文件import
1 2 3 4 5 6 7 from icecream import icic(STH) from icecream import installinstall() ic.configureOutput(prefix='Debug -> ' , outputFunction=yellowPrint)
普通print不是实时的,可能会出现,代码顺序在后面的ic反而打印在print前面。为此需要print(xxx,flush=True)
1 2 3 4 5 6 7 8 9 10 11 12 13 14 15 16 17 18 19 20 import datetimeimport inspectfrom icecream import icdef ic_with_timestamp (*args ): frame = inspect.currentframe().f_back filename = frame.f_code.co_filename lineno = frame.f_lineno timestamp = datetime.datetime.now().strftime("%Y-%m-%d %H:%M:%S" ) return '\n\n%s %s:%d shaojieLog >| ' % (timestamp, filename, lineno) ic.configureOutput(prefix=ic_with_timestamp) ic("This is a test message." )
1 2 3 4 5 import datetimedef ic_with_timestamp (*args ): return '\n\n%s shaojieLog >| ' % datetime.datetime.now().strftime("%Y-%m-%d %H:%M:%S" ) ic.configureOutput(prefix=ic_with_timestamp)
打印ic间时间间隔
1 2 3 4 5 6 7 8 9 10 11 12 13 14 15 16 17 18 19 20 21 22 23 24 25 26 27 28 29 import datetimeimport inspectfrom icecream import iclast_ic_time = None initial_ic_time = datetime.datetime.now() def ic_with_timestamp (*args ): global last_ic_time current_time = datetime.datetime.now() if last_ic_time is not None : time_diff = current_time - last_ic_time time_diff_str = f" (+{time_diff.total_seconds():.2 f} s)" else : time_diff_str = "" time_since_initial = current_time - initial_ic_time time_since_initial_str = f" [Total time: {time_since_initial.total_seconds():.2 f} s]" last_ic_time = current_time return f'\n\n{current_time.strftime("%Y-%m-%d %H:%M:%S" )} {time_diff_str} {time_since_initial_str} shaojieLog |> ' ic.configureOutput(prefix=ic_with_timestamp)
1 2 3 4 5 6 7 8 ic.disable() ic("This message will NOT be shown" ) ic.enable()
这个问题与 icecream 库的 ic() 函数的默认输出机制有关。icecream 默认将输出发送到标准错误(stderr),而 tee 命令的默认行为是只捕获标准输出(stdout)。因此,ic() 的输出不会被 tee 捕获到。
要解决这个问题,你可以采取以下几种方式:
使用 ic() 输出到标准输出
你可以配置 icecream 的输出流,使其输出到标准输出,而不是默认的标准错误。这样,tee 就可以捕获 ic() 的输出。
1 2 3 4 from icecream import icimport sysic.configureOutput(outputFunction=sys.stdout.write)
这样,ic() 的输出就会被发送到标准输出,然后可以被 tee 命令捕获到。
让 tee 捕获标准错误和标准输出
你也可以让 tee 捕获标准错误(stderr)和标准输出(stdout),这样无需修改 icecream 的配置。
在你的命令中,可以使用如下方式:
1 python3.8 setup.py build bdist_wheel 2>&1 | tee compile.log
在这个命令中,2>&1 将标准错误重定向到标准输出,因此 tee 可以同时捕获两者。
使用 tee 捕获标准错误单独输出
如果你只想捕获标准错误的输出,并将其保存到日志文件,可以使用以下命令:
1 python3.8 setup.py build bdist_wheel 1>&2 | tee compile.log
1 python3.8 setup.py build bdist_wheel 2>compile.log
性能优化 与 可视化 定位 Python 中 setup.py 脚本运行缓慢的 热点 ,可以通过多种方式进行性能分析,具体步骤取决于你想了解的性能细节。以下是几种常见的方法来定位性能瓶颈。
方法 1: 使用 cProfile 进行性能分析 cProfile 是 Python 标准库中用于进行性能分析的工具。你可以用它来跟踪 setup.py 执行时的函数调用并找到性能瓶颈。
cProfile + snakeviz + gprof2dot
1 ./gprof2dot.py -f pstats Diff.status | dot -Tpng -o ./output/Diff.png
1.1 使用 cProfile 分析 setup.py
你可以通过 cProfile 运行 setup.py 并生成分析报告:
1 python -m cProfile -o setup.prof setup.py install
这将运行 setup.py 并将性能分析结果保存到 setup.prof 文件中。
1.2 可视化分析报告
使用 pstats 或者第三方工具 snakeviz 来分析 setup.prof:
使用 pstats 来查看分析结果:
1 python -m pstats setup.prof
然后,你可以在 pstats 交互式界面中输入命令,比如:
sort cumtime 按总耗时排序。stats 查看函数调用的分析结果。
安装 snakeviz 来生成Web图形化报告:
运行 snakeviz 来可视化分析结果:
这样可以生成一个图形化的界面,显示每个函数的执行时间以及调用关系,让你更直观地看到性能瓶颈。
使用 gprof2dot 生成调用关系图片:
安装 gprof2dot 工具:pip install gprof2dot
使用 gprof2dot 将 cProfile 生成的 output.prof 转换为 .dot 文件:gprof2dot -f pstats output.prof | dot -Tsvg -o output.svg
这里的 -f pstats 表示输入的格式是 cProfile 生成的 pstats 文件。这个命令会将结果转换为 SVG 格式的火焰图,保存为 output.svg。
打开生成的 SVG 文件,查看火焰图。
生成火焰图: flameprof
正常的火焰图说明了上到下的调用关系,倒置火焰图说明了底层最耗时的元素。
python flameprof.py input.prof > output.svg
生成火焰图(有详细文件路径): flamegraph
flameprof --format=log requests.prof | xxx_path/flamegraph.pl > requests-flamegraph.svg
方法 3: 使用 line_profiler 进行逐行性能分析 如果你想深入了解 setup.py 的某个函数或一组函数的逐行性能,可以使用 line_profiler 工具来分析代码的逐行执行时间。
3.1 安装 line_profiler
1 pip install line_profiler
3.2 添加装饰器
首先,在 setup.py 中找到你想要分析的函数,添加 @profile 装饰器(在 line_profiler 中的分析模式下使用):
1 2 3 @profile def some_function ():
3.3 运行 line_profiler
你可以使用 kernprof.py 来运行 setup.py 并生成逐行性能报告:
1 kernprof -l -v setup.py install
这将运行 setup.py 并生成一份逐行性能分析报告,显示每一行代码的耗时。
方法 4: 使用 Py-Spy 进行实时 性能分析(推荐!!!) Py-Spy 是一个 Python 的取样分析器,它可以在不修改代码的情况下对 Python 程序进行性能分析,并生成实时的性能报告。
4.1 安装 Py-Spy
4.2 运行 Py-Spy 对 setup.py 进行分析
你可以在执行 setup.py 的同时运行 Py-Spy 进行取样分析:
1 py-spy top -- python setup.py install
这会生成一个实时的报告,类似于 top 命令,显示当前正在运行的 Python 函数以及其消耗的 CPU 时间。
4.3 生成火焰图
如果你希望生成一个更直观的火焰图,可以使用 py-spy 生成火焰图文件:
1 py-spy record -o profile.svg -- python setup.py install
然后你可以打开 profile.svg 文件,查看一个交互式的火焰图,清晰展示函数调用的时间分布。
方法 5: 使用 strace 分析系统调用 如果 setup.py 涉及大量的 I/O 操作(比如读写文件或安装依赖包),可能是这些操作导致了性能瓶颈。你可以使用 strace 来分析 setup.py 的系统调用,找到 I/O 操作的瓶颈。
1 strace -tt -T -o strace.log python setup.py install
-tt 选项会显示每个系统调用的时间戳。-T 会显示每个系统调用耗时。-o 将结果输出到 strace.log 文件中。
通过查看 strace.log,你可以找出系统调用中哪些操作耗时过长。
总结
使用 cProfile 或 Py-Spy 进行函数级别的性能分析,找出执行慢的函数。
如果需要更细粒度的逐行分析,使用 line_profiler 来分析慢的部分。
如果怀疑是 I/O 问题,用 strace 来检查系统调用。
使用 time 在脚本中插入计时代码,快速定位长时间的执行步骤。
这些工具可以帮助你定位和修复 setup.py 运行缓慢的热点。
CI doctest 函数的单元测试
虚拟环境venv 1 2 3 4 5 6 7 8 python3 -m venv name # 在Windows上,运行: name\Scripts\activate.bat # poweshell运行activate.ps1 # 在Unix或MacOS上,运行: source name/bin/activate # (这个脚本是为bash shell编写的。如果你使用 csh 或 fish shell,你应该改用 activate.csh 或 activate.fish 脚本。) python3 setup.py install
实践
并行调用shell命令,超时kill 基于Pipe的自定义多进程进度条
数据快速写入和读取文件 任意变量使用pickle
1 2 3 4 5 with open ('my_dict.json' , 'wb' ) as f: pickle.dump(my_dict, f) with open ('my_dict.json' , 'rb' ) as f: loaded_dict = pickle.load(f)
可以序列化的使用json
1 2 3 4 5 6 7 8 import jsonwith open ('my_dict.json' , 'w' ) as f: json.dump(my_dict, f) with open ('my_dict.json' , 'r' ) as f: loaded_dict = json.load(f)
多个变量
1 2 3 4 5 6 7 8 9 10 11 12 13 14 15 16 17 18 19 20 21 data = { "scaAvgTime" : scaAvgTime, "var2" : var2, "var3" : var3 } result_file = "result.json" with open (result_file, "w" ) as f: json.dump(data, f) with open (result_file, "r" ) as f: data = json.load(f) scaAvgTime = data["scaAvgTime" ] var2 = data["var2" ] var3 = data["var3" ]
参考文献 https://zhuanlan.zhihu.com/p/39259061