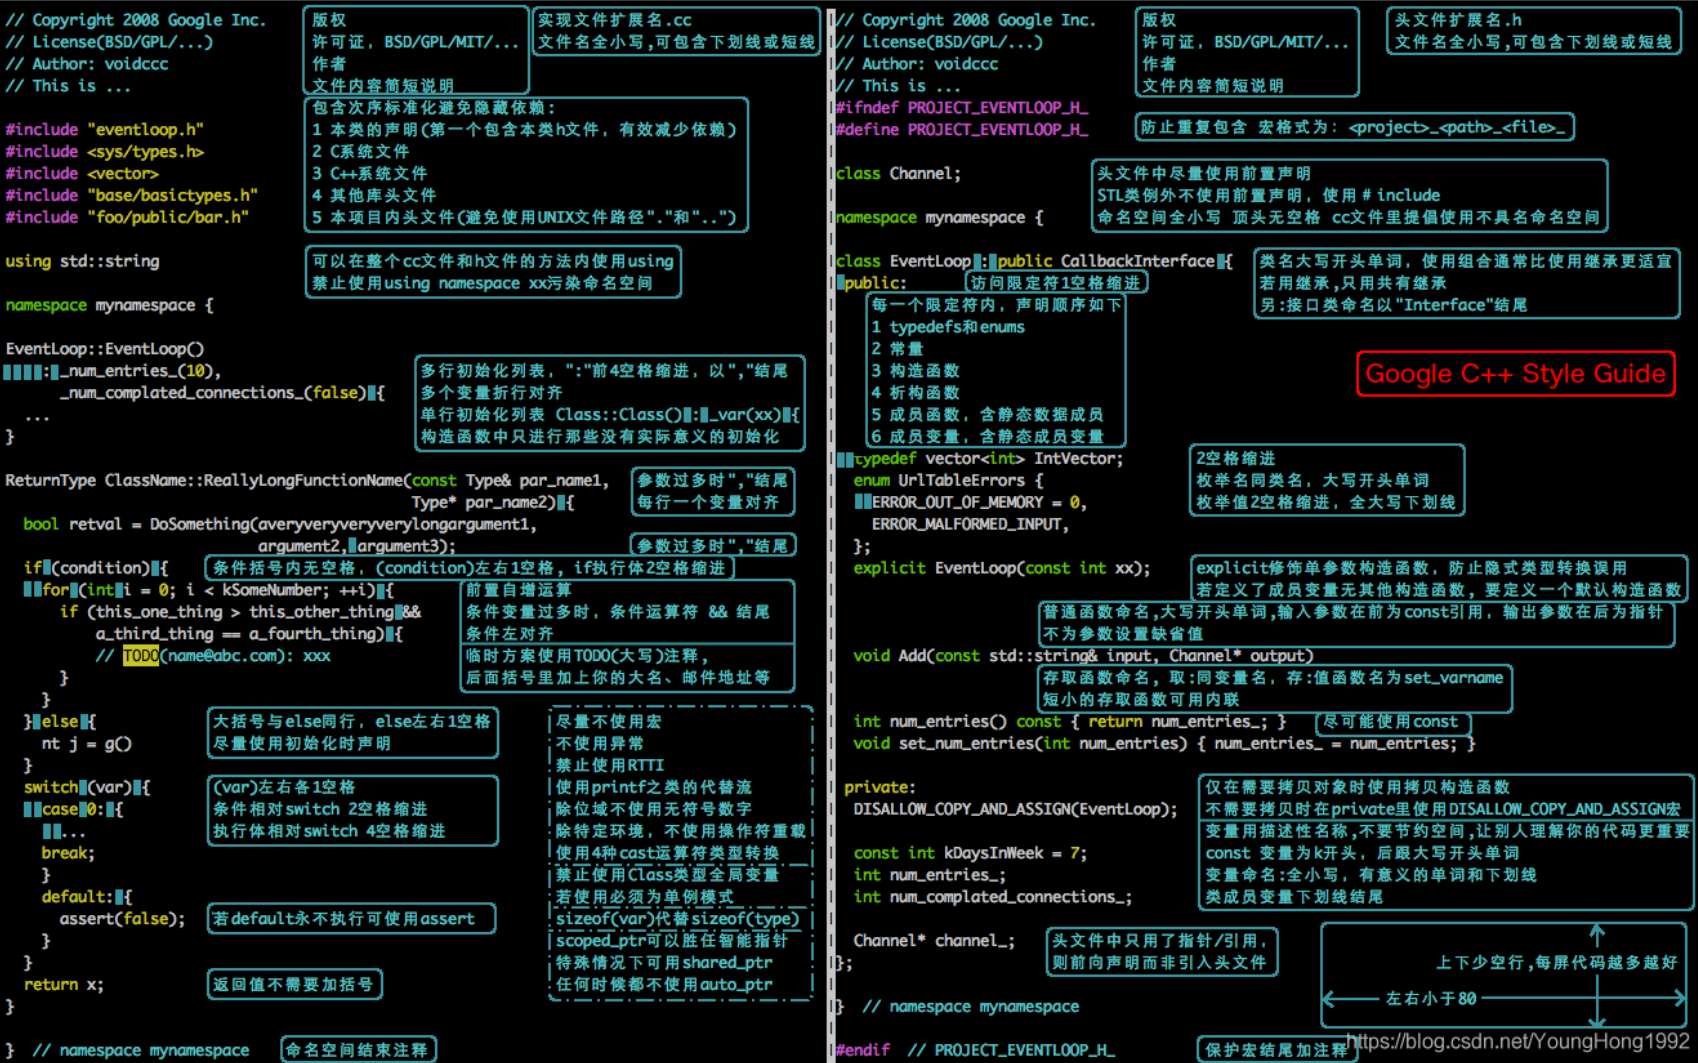
线程在核间切换的开销是极小的(Java uses lots of threads but threads have become significantly faster and cheaper with the NPTL in Linux 2.6.),与其考虑切换开销,不如注意不同优先级线程同一个核竞争的问题。
The error message “userauth_pubkey: key type ssh-rsa not in PubkeyAcceptedAlgorithms [preauth]” indicates that the SSH server is configured to accept specific public key algorithms, and the client attempted to use the “ssh-rsa” algorithm, which is not included in the accepted algorithms list.
To resolve this issue, you have a few options:
Update SSH Key Algorithm: If you are generating a new key pair, consider using a more secure algorithm such as Ed25519 instead of the older RSA algorithm.
Update Server Configuration: If you don’t have control over the client’s key type, you may need to update the server’s SSH configuration to include support for the “ssh-rsa” algorithm. Open the SSH server configuration file (usually located at /etc/ssh/sshd_config), and add or modify the following line:
1
PubkeyAcceptedAlgorithms +ssh-rsa
After making the change, restart the SSH server.
1
sudo service ssh restart
Note: Adding “ssh-rsa” might reduce the security of your SSH server, as RSA is considered less secure than some newer algorithms.
Check Key Types: Ensure that you are using the correct key type when attempting to authenticate. If you are using an existing key, make sure it’s the right type (e.g., Ed25519) and not RSA.
Choose the option that best fits your security requirements and constraints. If possible, it’s generally recommended to use more modern and secure key algorithms like Ed25519 over older ones like RSA.
Unpacking libc6:i386 (2.35-0ubuntu3) over (2.31-0ubuntu9.9) ... Preparing to unpack .../6-libselinux1_3.3-1build2_amd64.deb ... De-configuring libselinux1:i386 (3.0-1build2) ... Unpacking libselinux1:amd64 (3.3-1build2) over (3.0-1build2) ... tar: /lib/x86_64-linux-gnu/libc.so.6: version `GLIBC_2.33' not found (required by /lib/x86_64-linux-gnu/libselinux.so.1) tar: /lib/x86_64-linux-gnu/libc.so.6: version `GLIBC_2.34' not found (required by /lib/x86_64-linux-gnu/libselinux.so.1) dpkg-deb: error: tar subprocess returned error exit status 1 dpkg: error processing archive /tmp/apt-dpkg-install-b0waQ0/7-libselinux1_3.3-1build2_i386.deb (--unpack): dpkg-deb --control subprocess returned error exit status 2 tar: /lib/x86_64-linux-gnu/libc.so.6: version `GLIBC_2.33' not found (required by /lib/x86_64-linux-gnu/libselinux.so.1) tar: /lib/x86_64-linux-gnu/libc.so.6: version `GLIBC_2.34' not found (required by /lib/x86_64-linux-gnu/libselinux.so.1) dpkg-deb: error: tar subprocess returned error exit status 1 dpkg: error processing archive /tmp/apt-dpkg-install-b0waQ0/8-libc-bin_2.35-0ubuntu3_amd64.deb (--unpack): dpkg-deb --control subprocess returned error exit status 2 Errors were encountered while processing: /tmp/apt-dpkg-install-b0waQ0/4-libc6_2.35-0ubuntu3_amd64.deb /tmp/apt-dpkg-install-b0waQ0/7-libselinux1_3.3-1build2_i386.deb /tmp/apt-dpkg-install-b0waQ0/8-libc-bin_2.35-0ubuntu3_amd64.deb /usr/bin/dpkg: /lib/x86_64-linux-gnu/libc.so.6: version `GLIBC_2.33' not found (required by /lib/x86_64-linux-gnu/libselinux.so.1) /usr/bin/dpkg: /lib/x86_64-linux-gnu/libc.so.6: version `GLIBC_2.34' not found (required by /lib/x86_64-linux-gnu/libselinux.so.1) /usr/bin/gdbus: /lib/x86_64-linux-gnu/libc.so.6: version `GLIBC_2.33' not found (required by /lib/x86_64-linux-gnu/libselinux.so.1) /usr/bin/gdbus: /lib/x86_64-linux-gnu/libc.so.6: version `GLIBC_2.34' not found (required by /lib/x86_64-linux-gnu/libselinux.so.1) E: Sub-process /usr/bin/dpkg returned an error code (1) E: Sub-process dpkg --set-selections returned an error code (1) E: Couldn't revert dpkg selection for approved remove/purge after an error was encountered!
This was the reason why you could reach proxy but couldn’t get past it, since there is no username password information. So just put that info into it.
TIP: More better add these lines in another file, /etc/apt/apt.conf.d/80proxy. This will ensure that after a version upgrade changes won’t be lost.
Could not handshake
1 2
Err:3 https://swupdate.openvpn.net/community/openvpn3/repos focal Release Could not handshake: The TLS connection was non-properly terminated. [IP: 127.0.0.1 7233]
See "systemctl status etcd.service" and "journalctl -xe"for details. invoke-rc.d: initscript etcd, action "start" failed. ● etcd.service - etcd - highly-available key value store Loaded: loaded (/lib/systemd/system/etcd.service; disabled; vendor preset: enabled) Active: failed (Result: exit-code) since Thu 2024-09-05 22:21:44 EDT; 10ms ago Docs: https://github.com/coreos/etcd man:etcd Process: 71732 ExecStart=/usr/bin/etcd $DAEMON_ARGS (code=exited, status=1/FAILURE) Main PID: 71732 (code=exited, status=1/FAILURE)
Sep 05 22:21:43 huawei systemd[1]: Starting etcd - highly-available key value store... Sep 05 22:21:44 huawei etcd[71732]: etcd on unsupported platform without ETCD_UNSUPPORTED_ARCH=arm64 set. Sep 05 22:21:44 huawei systemd[1]: etcd.service: Main process exited, code=exited, status=1/FAILURE Sep 05 22:21:44 huawei systemd[1]: etcd.service: Failed with result 'exit-code'. Sep 05 22:21:44 huawei systemd[1]: Failed to start etcd - highly-available key value store. dpkg: error processing package etcd-server (--configure): installed etcd-server package post-installation script subprocess returned error exit status 1 dpkg: dependency problems prevent configuration of etcd: etcd depends on etcd-server; however: Package etcd-server is not configured yet.
dpkg: error processing package etcd (--configure): dependency problems - leaving unconfigured Setting up zsh (5.4.2-3ubuntu3.2) ... No apport report written because the error message indicates its a followup error from a previous failure. Processing triggers for man-db (2.8.3-2ubuntu0.1) ... Errors were encountered while processing: etcd-server etcd E: Sub-process /usr/bin/dpkg returned an error code (1)
In the output of the lsblk command, nvme2n1 refers to a Non-Volatile Memory Express (NVMe) device. Here’s a breakdown of the naming convention:
nvme: This prefix indicates that the device is an NVMe storage device, which is a type of high-performance, solid-state drive (SSD) that connects directly to the motherboard via the PCIe bus.
# /home was on /dev/md0p1 during curtin installation /dev/disk/by-id/md-uuid-2d900913:d0a44a15:7bd846dd:a015c95e-part1 /home ext4 defaults 0 0 # /usr was on /dev/md0p2 during curtin installation /dev/disk/by-id/md-uuid-2d900913:d0a44a15:7bd846dd:a015c95e-part2 /usr ext4 defaults 0 0 # /boot was on /dev/md0p3 during curtin installation /dev/disk/by-id/md-uuid-2d900913:d0a44a15:7bd846dd:a015c95e-part3 /boot ext4 defaults 0 0 # /var was on /dev/md0p4 during curtin installation /dev/disk/by-id/md-uuid-2d900913:d0a44a15:7bd846dd:a015c95e-part4 /var ext4 defaults 0 0 # /srv was on /dev/md0p5 during curtin installation /dev/disk/by-id/md-uuid-2d900913:d0a44a15:7bd846dd:a015c95e-part5 /srv ext4 defaults 0 0
# fdisk /dev/sdb p #打印分区表 d #因为此磁盘只有一个分区sdb1,所以按d删除时候默认不会让选择要删除的分区,如果有多个分区会提示要删除的分区。 p #打印分区表,再次查看分区表,发现/dev/sdb1已经被删除 Command (m forhelp): n #新建分区 Partition type: p primary (0 primary, 0 extended, 4 free) #主分区 e extended #扩展分区 Select (default p): p #选择新建主分区 Partition number (1-4, default 1): #主分区号,会生成/dev/sdb1 First sector (2048-2097151, default 2048): #开始扇区,回车默认从2048开始 Using default value 2048 Last sector, +sectors or +size{K,M,G} (2048-2097151, default 2097151): +50M #分配主分区大小,在此为50M Partition 1 of type Linux and of size 50 MiB is set
Command (m forhelp): n #新建分区 Partition type: p primary (1 primary, 0 extended, 3 free) e extended Select (default p): e #选择创建扩展分区 Partition number (2-4, default 2): #扩展分区编号,在此我们直接回车,默认为/dev/sdb2 First sector (104448-2097151, default 104448): #默认回车,从当前扇区开始 Using default value 104448 Last sector, +sectors or +size{K,M,G} (104448-2097151, default 2097151): +500M #分配扩展分区大小,在此为500M Partition 2 of type Extended and of size 500 MiB is set
Command (m forhelp): n Partition type: p primary (1 primary, 1 extended, 2 free) l logical (numbered from 5) Select (default p): l #新建逻辑分区 Adding logical partition 5 #默认逻辑分区编号为5 First sector (106496-1128447, default 106496): #逻辑分区起始位置 Using default value 106496 Last sector, +sectors or +size{K,M,G} (106496-1128447, default 1128447): +200M #分配逻辑分区大小,在此为200M Partition 5 of type Linux and of size 200 MiB is set
Command (m forhelp): n Partition type: p primary (1 primary, 1 extended, 2 free) l logical (numbered from 5) Select (default p): l #新建第二个逻辑分区 Adding logical partition 6 First sector (518144-1128447, default 518144): Using default value 518144 Last sector, +sectors or +size{K,M,G} (518144-1128447, default 1128447): #直接回车,默认分配剩余空间 Using default value 1128447 Partition 6 of type Linux and of size 298 MiB is set
Command (m forhelp): p ... Disk label type: dos
Device Boot Start End Blocks Id System /dev/sdb1 2048 104447 51200 83 Linux /dev/sdb2 104448 1128447 512000 5 Extended /dev/sdb5 106496 516095 204800 83 Linux /dev/sdb6 518144 1128447 305152 83 Linux
# /addDisk/DiskNo1 was on /dev/sdi1 during curtin installation /dev/disk/by-uuid/0ae289c5-51f7-4ef2-a07c-6ec8d123e065 /addDisk/DiskNo1 ext4 defaults 0 0 # /addDisk/DiskNo2 was on /dev/sdl1 during curtin installation /dev/disk/by-uuid/5c2e1324-ecc5-40dd-a668-4ec682065d9f /addDisk/DiskNo2 ext4 defaults 0 0 # /addDisk/DiskNo3 was on /dev/sdj1 during curtin installation /dev/disk/by-uuid/8258b393-2e8e-41d1-9b84-0a7f88986443 /addDisk/DiskNo3 ext4 defaults 0 0 # /addDisk/DiskNo4 was on /dev/sdk1 during curtin installation /dev/disk/by-uuid/ac862e68-9c6f-424a-b4ec-e44e62f7a330 /addDisk/DiskNo4 ext4 defaults 0 0