Git Submodule: Data & Code Repository Separate
Read more
timedatectl 是一个管理日期和时间的工具,可以用来永久设置系统时间和时区。
1 | sudo timedatectl set-time "2024-10-26 19:12:19" |
如果发现时区也不正确,可以用下面的命令设置时区:
1 | sudo timedatectl set-timezone "Asia/Shanghai" |
例如,将时区设置为中国标准时间 (CST, UTC+8),时区名称需要使用 timedatectl list-timezones 查看可用的时区列表。
1 | df -h . |
deep为1
1 | du -h -d . |
1 | # thi |
ps aux linux command whill show no zero cpu usage when the process is sleeping beacuse of its snapshots mechanism
1 | dpkg: 处理归档 /var/cache/apt/archives/bat_0.12.1-1build1_arm64.deb (--unpack)时出错: |
1 | sudo apt-get purge -h |
tree -L DepthSIze Folder_Path
1 | #分析symbols |
综合来看,使用 nm -gDC <filename> 命令可以查看一个二进制可执行文件或者共享库中的全局符号表和动态符号表,并将包含其中的 C++ 符号名还原成源代码中的名称。
1 | shaojiemike@snode6 ~/github/gem5 [10:49:56] |
It is all started with two confusing situation.
ps aux | grep -v process_name, the process is in Sl+ state. But the cpu usage is not zero.watch "ps aux |grep 3496617" always show the same cpu usage percentage, which is very confusing beacause htop always show up-down value. and pidstat -p 3516617 show cpu% less than 100%.隐藏文件夹 .github , 里面放两个文件:
ISSUE_TEMPLATE.md
PULL_REQUEST_TEMPLATE.md
仓库有两个基础分支:
dev(默认分支)
master(用于发布)
通过pull request来合并新的代码:
协作者的代码通过pr合并到dev
dev通过pr合并到master
注意点:
merge 到 dev,使用squash merge
merge 到 master,使用普通的merge
永远不向master直接commit代码
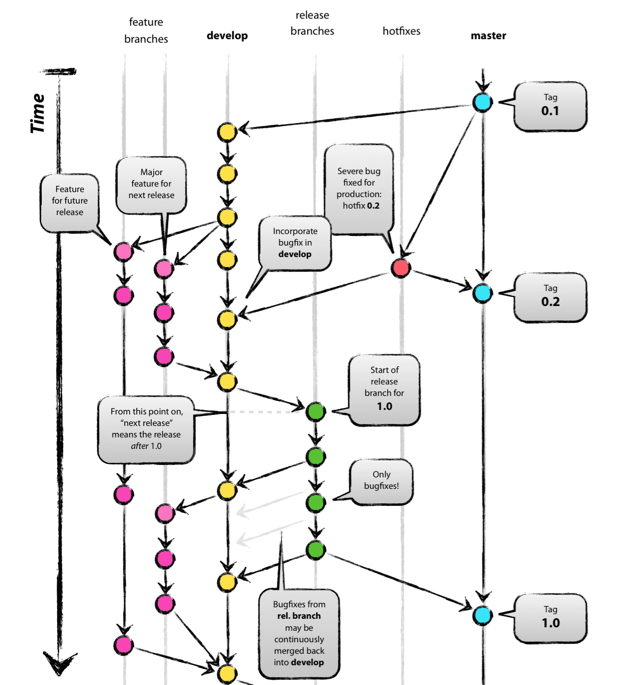
只有一个长期分支 master ,而且 master 分支上的代码,永远是可发布状态,
to do
github自带的,貌似比Travis CI好用
ctest 怎么写
Travis CI 提供的是持续集成服务(Continuous Integration,简称 CI)。它绑定 Github 上面的项目,只要有新的代码,就会自动抓取。然后,提供一个运行环境,执行测试,完成构建,还能部署到服务器。
持续集成的好处在于,每次代码的小幅变更,就能看到运行结果,从而不断累积小的变更,而不是在开发周期结束时,一下子合并一大块代码。
使用准备
.travis.yml
运行流程
可选部分
1 | before_install:install 阶段之前执行 |
运行状态
1 | passed:运行成功,所有步骤的退出码都是0 |
可选加密环境变量
Angular规范
1 | <type>(<scope>): <subject> |
| name | description | 实例 |
|---|---|---|
| feat: | 新功能(feature)。 | 打印函数 feat: Add print function for enhanced runtime information |
| fix/to: | 修复bug,可以是QA发现的BUG,也可以是研发自己发现的BUG。 | |
| fix: | 产生diff并自动修复此问题。适合于一次提交直接修复问题 | |
| to: | 只产生diff不自动修复此问题。适合于多次提交。最终修复问题提交时使用fix | |
| docs: | 文档(documentation)。 | |
| style: | 格式(不影响代码运行的变动)。 | |
| refactor: | 重构(即不是新增功能,也不是修改bug的代码变动)。 | |
| perf: | 优化相关,比如提升性能、体验。 | |
| test: | 增加测试。 | |
| chore: | 构建过程或辅助工具的变动。 | |
| revert: | 回滚到上一个版本。 | |
| merge: | 代码合并。 | |
| sync: | 同步主线或分支的Bug。 |
格式为:
1 | <type>(<scope>): <subject> |
revert:, followed by the header of the reverted commit. In the body it should say: This reverts commit <hash>., where the hash is the SHA of the commit being reverted.*.结尾BREAKING CHANGE: with a space or two newlines. The rest of the commit message is then used for this.插件 vscode插件git-commit-plugin
命令行 husky + commitlint
Standard Version
1 | npm cache clean --force #npm指令清除npm缓存 |
1 | "scripts": { |
CHANGELOG.md 记录内容的配置
1 | { |
使用Standard Version
1 | // 初次发布版本 |

Commitizen for contributors
Visual Studio Code Commitizen Support
vscode的插件
conventional-changelog/commitlint
阻止不规范的提交
github-release-notes,以下简称 gren ,是用来一键向 github 发布 release notes 的工具。
https://zhuanlan.zhihu.com/p/99499246
https://blog.csdn.net/weixin_39586683/article/details/110643111
版本格式:主版本号.次版本号.修订号,版本号递增规则如下:
主版本号:当你做了不兼容的 API 修改,
次版本号:当你做了向下兼容的功能性新增,
修订号:当你做了向下兼容的问题修正。
先行版本号及版本编译信息可以加到“主版本号.次版本号.修订号”的后面,作为延伸。
写个github模板
set(Boost_USE_STATIC_LIBS ON)
set(Boost_DEBUG ON)
Boost_INCLUDE_DIR: 含有boost头文件的目录
Boost_LIBRARYDIR: 偏好的含有boost库的库目录
https://stackoverflow.com/questions/3897839/how-to-link-c-program-with-boost-using-cmake
http://c.biancheng.net/view/7772.html cache?
cmake boost install path
https://cloud.tencent.com/developer/ask/107360
设置boost-root 查看安装位置
Travis-CI 依赖软件包每次都要重新安装吗
https://stackoverflow.com/questions/57982945/how-to-apt-get-install-in-a-github-actions-workflow
Actions may have no Boost, where
Ctest add build/bin to test
Ctest https://www.cnblogs.com/hustcpp/p/12922998.html
暂无
还是ipcc的github组织的太烂了,需要学习一下
https://zhuanlan.zhihu.com/p/67620599
http://www.ruanyifeng.com/blog/2017/12/travis_ci_tutorial.html
Linux Executable file: Structure & Running 2
要运行可执行目标文件 prog,我们可以在 Linux shell 的命令行中输入它的名字:linux> ./prog
因为 prog 不是一个内置的 shell 命令,所以 shell 会认为 prog 是一个可执行目标文件。
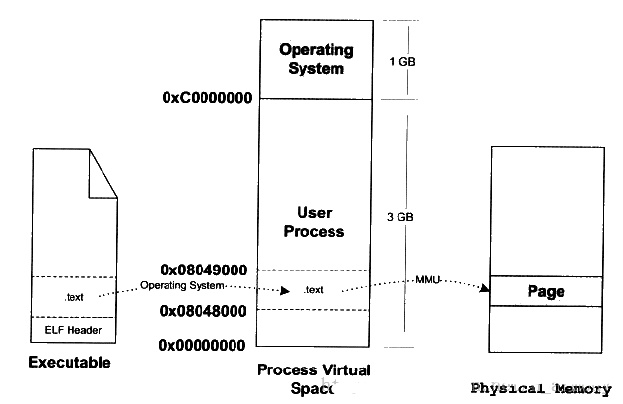
执行完上述操作后,其实可执行文件的真正指令和数据都没有别装入内存中。操作系统只是通过可执行文件头部的信息建立起可执行文件和进程虚拟内存之间的映射关系而已。

除了一些头部信息,在加载过程中没有任何从磁盘到内存的数据复制。直到 CPU 引用一个被映射的虚拟页时才会进行复制,此时,操作系统利用它的页面调度机制自动将页面从磁盘传送到内存。
比如,现在程序的入口地址为 0x08048000 ,刚好是代码段的起始地址。当CPU打算执行这个地址的指令时,发现页面 0x8048000 ~ 0x08049000 (一个页面一般是4K)是个空页面,于是它就认为是个页错误。此时操作系统根据虚拟地址空间与可执行文件间的映射关系找到页面在可执行文件中的偏移,然后在物理内存中分配一个物理页面,并在虚拟地址页面与物理页面间建立映射,最后把EXE文件中页面拷贝到内存的物理页面,进程重新开始执行。该过程如下图所示:
接下来,加载器跳转到程序的入口点,也就是 _start函数的地址。这个函数是在系统目标文件 ctrl.o 中定义的,对所有的 C 程序都是一样的。_start 函数调用系统启动函数 __libc_start_main,该函数定义在 libc.so 中。它初始化执行环境,调用用户层的 main 函数,处理 main 函数的返回值,并且在需要的时候把控制返回给内核。
1 | # shaojiemike @ snode6 in ~/github/sniper_PIMProf/PIMProf/gapbs on git:dev o [15:15:29] |
是一种用于管理计算机内存的算法,旨在有效地分配和释放内存块,以防止碎片化并提高内存的使用效率。这种算法通常用于操作系统中,以管理系统内核和进程的内存分配。
Buddy 内存分配算法的基本思想是将物理内存划分为大小相等的块,每个块大小都是 2 的幂次方。每个块可以分配给一个正在运行的进程或内核。当内存被分配出去后,它可以被分割成更小的块,或者合并成更大的块,以适应不同大小的内存需求。
算法的名称 “Buddy” 来自于分配的块之间的关系,其中一个块被称为 “buddy”,它是另一个块的大小相等的邻居。这种关系使得在释放内存时,可以尝试将相邻的空闲块合并成更大的块,从而减少内存碎片。
Buddy 内存分配算法的工作流程大致如下:
初始时,整个可用内存被视为一个大块,大小是 2 的幂次方。
当一个进程请求内存分配时,算法会搜索可用的块,找到大小合适的块来满足请求。如果找到的块比所需的稍大,它可以被分割成两个相等大小的 “buddy” 块,其中一个分配给请求的进程。
当一个进程释放内存时,该块会与其 “buddy” 块合并,形成一个更大的块。然后,这个更大的块可以与其它相邻的块继续合并,直到达到较大的块。
Buddy 内存分配算法在一些操作系统中用于管理内核和进程的物理内存,尤其在嵌入式系统和实时操作系统中,以提高内存使用效率和避免碎片化问题。
是一个用于教育目的的微内核操作系统
我们可window写程序占满16G内存
但是linux,用了3GB就会seg fault
猜想是不是有单进程内存限制 https://www.imooc.com/wenda/detail/570992
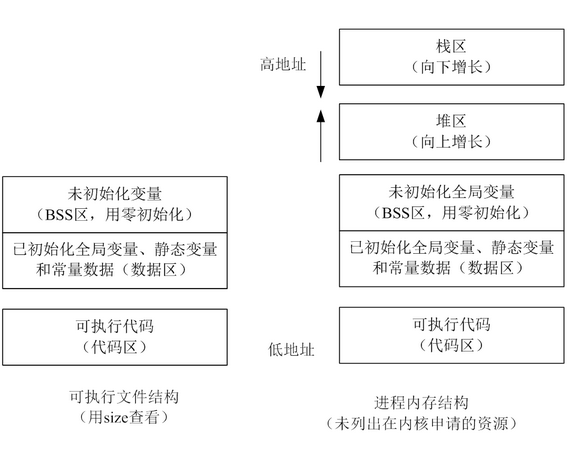
而且malloc alloc的空间在堆区,我们可以明显的发现这个空间是被栈区包住的,有限的。windows是如何解决这个问题的呢?
动态数据区一般就是“堆栈”。“栈 (stack)”和“堆(heap)”是两种不同的动态数据区,栈是一种线性结构,堆是一种链式结构。进程的每个线程都有私有的“栈”,所以每个线程虽然 代码一样,但本地变量的数据都是互不干扰。一个堆栈可以通过“基地址”和“栈顶”地址来描述。全局变量和静态变量分配在静态数据区,本地变量分配在动态数 据区,即堆栈中。程序通过堆栈的基地址和偏移量来访问本地变量。
当进程初始化时,系统会自动为进程创建一个默认堆,这个堆默认所占内存的大小为1M。堆对象由系统进行管理,它在内存中以链式结构存在。
1 | /etc/security/limits.conf |
文件描述符
文件句柄数
这些限制一般不会限制内存。
调用malloc(size_t size)函数分配内存成功,总会分配size字节VM(再次强调不是RAM),并返回一个指向刚才所分配内存区域的开端地址。分配的内存会为进程一直保留着,直到你显示地调用free()释放它(当然,整个进程结束,静态和动态分配的内存都会被系统回收)。
GNU libc库提供了二个内存分配函数,分别是malloc()和calloc()。glibc函数malloc()总是通过brk()或mmap()系统调用来满足内存分配需求。函数malloc(),根据不同大小内存要求来选择brk(),还是mmap(),阈值 MMAP_THRESHOLD=128Kbytes是临界值。小块内存(<=128kbytes),会调用brk(),它将数据段的最高地址往更高处推(堆从底部向上增长)。大块内存,则使用mmap()进行匿名映射(设置标志MAP_ANONYMOUS)来分配内存,与堆无关,在堆之外。
malloc不是直接分配内存的,是第一次访问的时候才分配的?
https://www.zhihu.com/question/20836462
暂无
暂无
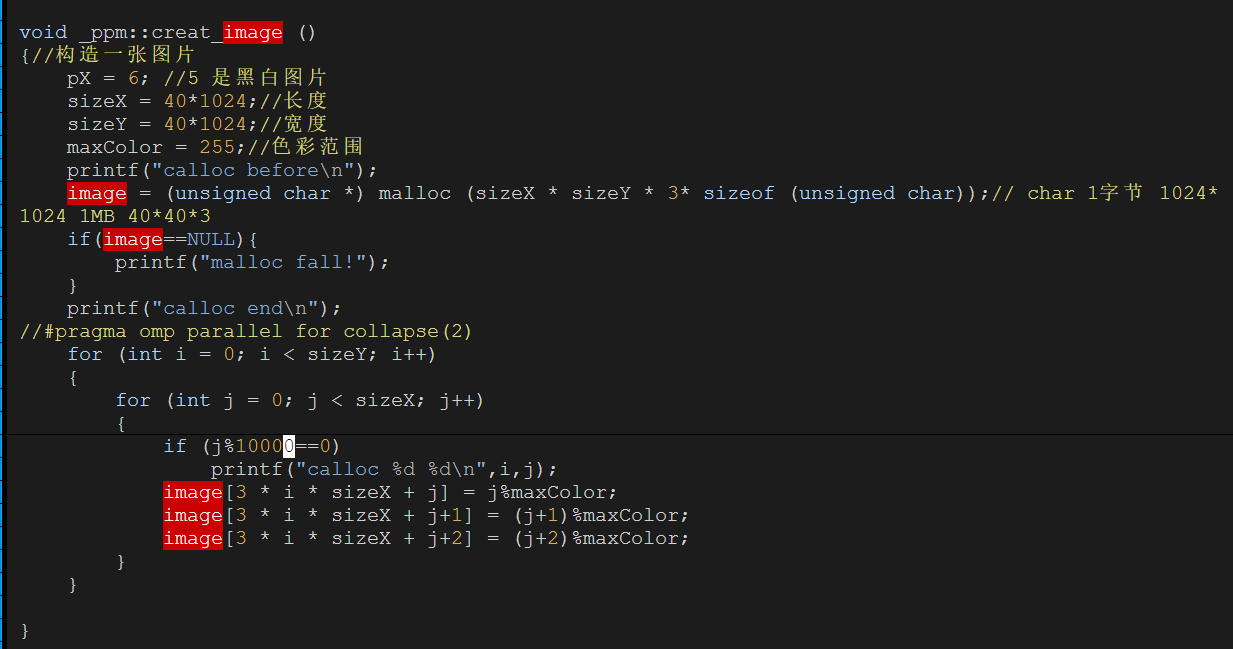
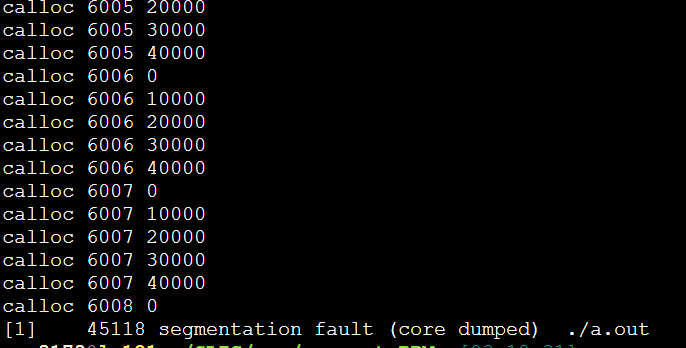
每次都是6008这里,40000*6008*3/1024/1024=687MB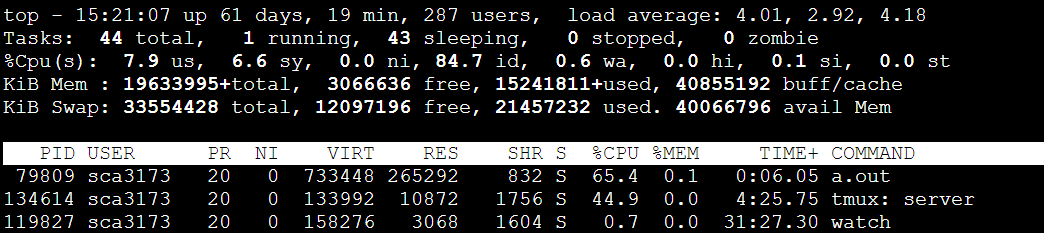
733448/1024=716MB
问了大师兄,问题竟然是malloc的传入参数错误的类型是int,导致存不下3*40*1024*40*1024。应该用size_t类型。(size_t是跨平台的非负整数安全类型)
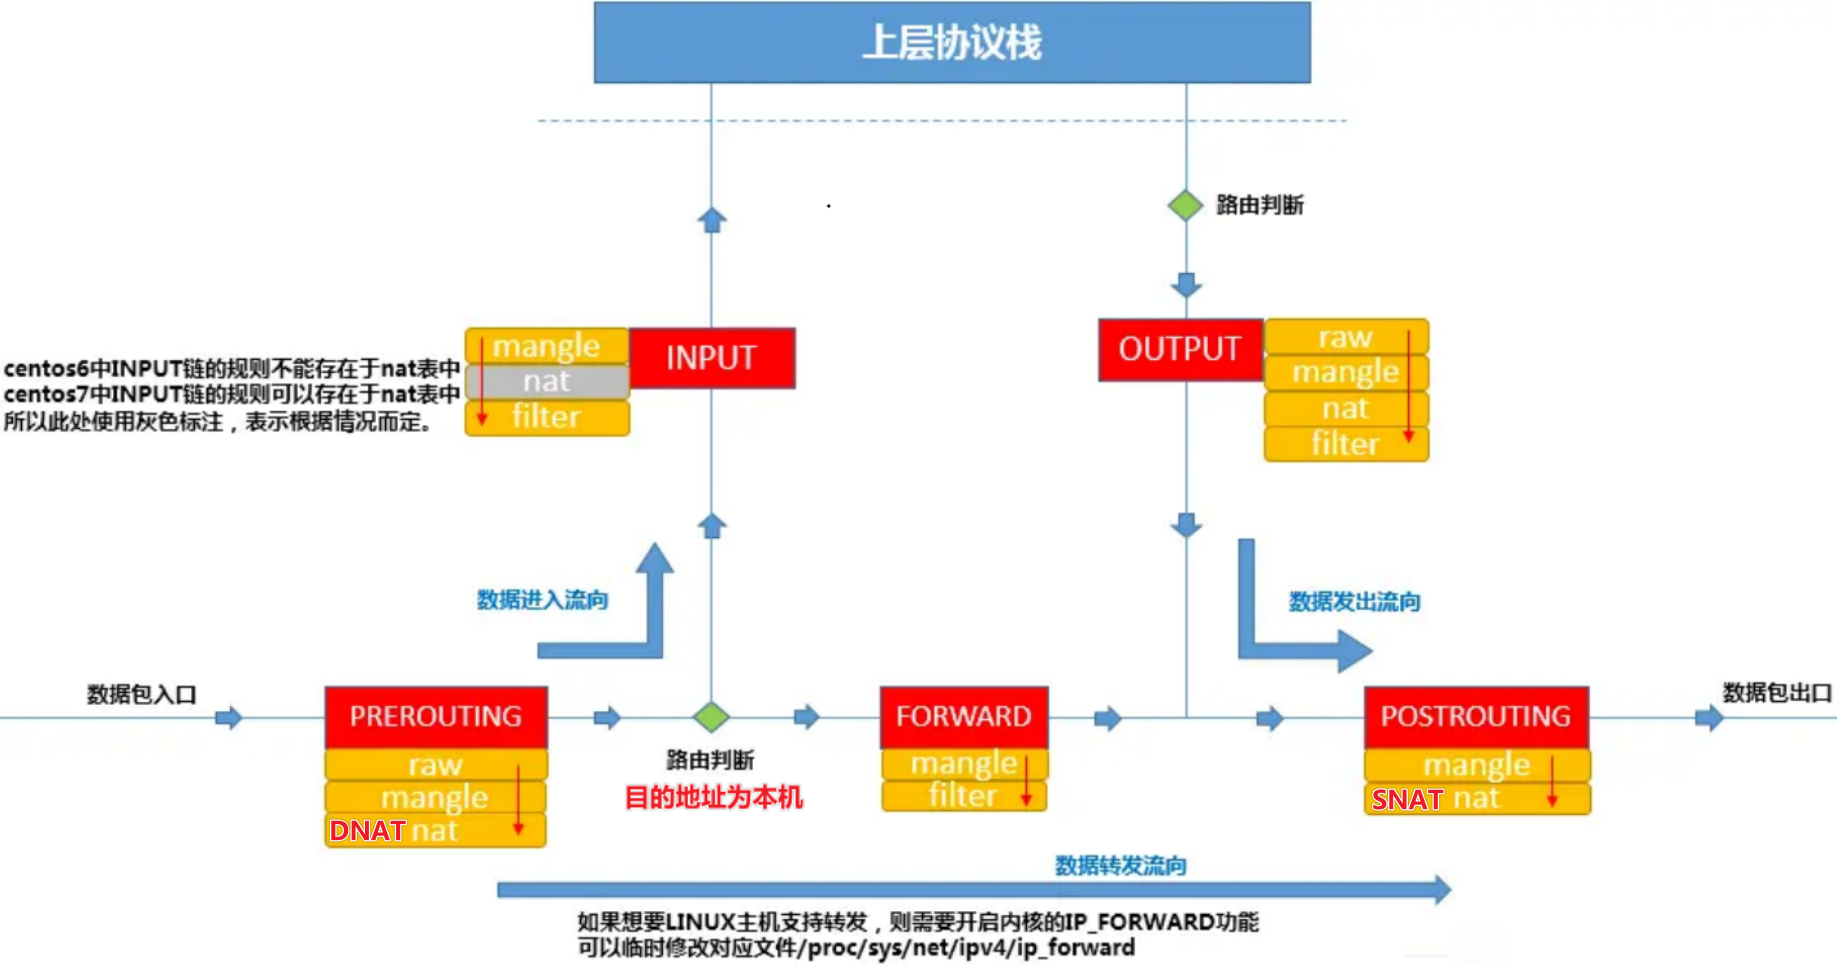
防火墙是一种网络安全设备,主要是通过硬件和软件的作用于内部和外部网络的环境间产生一种保护的屏障,从而实现对计算机不安全网络因素的阻断。
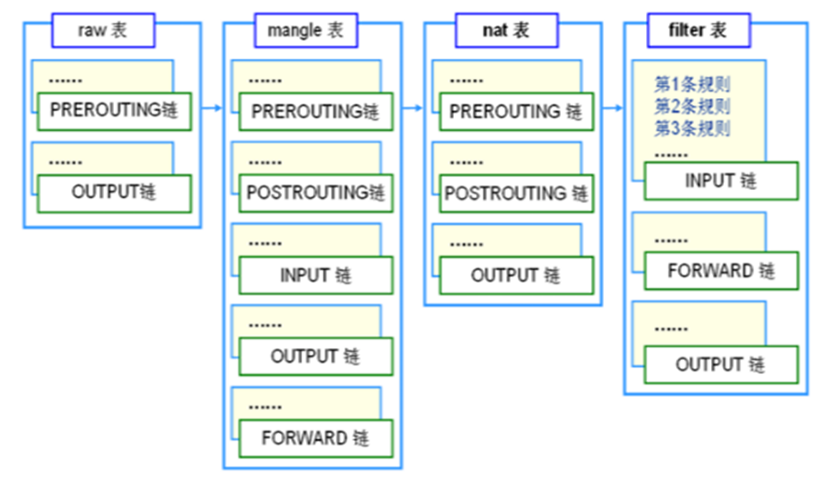
POSTROUTING链发挥作用。PREROUTING链中发挥作用,以便让包进入FORWARD表。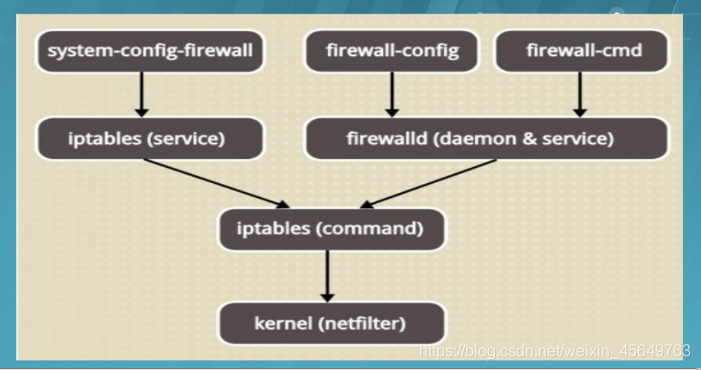
与iptables表的对应关系
| nftables簇 | iptables实用程序 |
|---|---|
| ip | iptables |
| ip6 | ip6tables |
| inet | iptables和ip6tables |
| arp | arptables |
| bridge | ebtables |
ip(即IPv4)是默认簇,如果未指定簇,则使用该簇。inet。inet允许统一ip和ip6簇,以便更容易地定义规则。1 | table inet warp { |
type 可以是filter、route或者nat。hook 在IPv4/IPv6/Inet地址簇中,可以是prerouting、input、forward、output或者postrouting。其他地址簇中的钩子列表请参见nft(8)。对于每条链,内核会按照顺序依次检查 iptables 防火墙规则,如果发现有匹配的规则目录,则立刻执行相关动作,停止继续向下查找规则目录;如果所有的防火墙规则都未能匹配成功,则按照默认策略处理。
1 | $ sudo iptables -vnL |
-t filter -v 显示详细信息,-n显示具体ip和端口数值policy ACCEPT 当前链的默认策略 ACCEPTpkts:对应规则匹配到的报文的个数。命令部分:-j + 如下动作
MASQUERADE:是SNAT的一种特殊形式,适用于动态的、临时会变的ip上。Add a NAT rule to translate all traffic from the 192.168.0.0/24 subnet to the host’s public IP:
1 | $sudo iptables -t nat -A POSTROUTING -s 192.168.0.0/24 -j MASQUERADE |
to finished
暂无
暂无
https://blog.csdn.net/weixin_45649763/article/details/103338747
Jupyter是一个开源的、交互式的计算环境,可以让用户创建和共享包含实时代码、可视化和文本的文档。
Jupyter最显著的特点:用户可以通过Web浏览器打开Jupyter笔记本,然后在其中编写代码、运行代码并直接查看代码的输出结果。笔记本中的代码和文本可以交叉编排,使得写作、数据分析和可视化变得非常直观和便捷。
主要的Jupyter组件包括:
Jupyter在教育、数据科学、机器学习、数据分析等领域得到广泛应用。它提供了一个方便、实用的平台,帮助用户探索数据、实验算法、展示结果,并通过共享笔记本方便地与其他人交流和合作。
Jupyter 的核心在于 数据分析的 计算-分析-可视化 的快速迭代。
如果不是数据科学,就不太需要Jupyter
远程访问服务器
暂无
暂无
上面回答部分来自ChatGPT-3.5,没有进行正确性的交叉校验。
https://jupyter-ai.readthedocs.io/en/latest/users/index.html#installation