Podman

导言

Victima 需要使用Podman。先简单学习一下

Read more

Docker On Nas

导言

DX4600 has a Intel N5101 which has ability to support docker software.

Read more

BitTorrent

BT简述

BitTorrent (简称 BT) 协议是和点对点(point-to-point)的协议程序不同,它是用户群对用户群(peer-to-peer, 或简写为 P2P) 传输协议, 它被设计用来高效地分发文件 (尤其是对于大文件、多人同时下载时效率非常高)。该协议基于HTTP协议,属于TCP/IP应用层。

将文件划分成多块(默认256Kb一块),每块可以从网络中不同的用户的BT客户端处并行下载。

1
2
3
BT 下载的文件都是别人上传给你的。
BT 下载速度均来自其他下载同一资源的用户上传速度。
上传的用户越多,你的下载速度越快,相反没用户上传你就没有下载速度。

比特彗星,包括其他 BT 软件(迅雷除外,迅雷不是会员会限速,高速通道下载提高的速度一部分就是接触限速后获得的)都不会限制下载速度。

BT分享规则

与迅雷不同,BT旨在“人人为我,我为人人”。用户和用户之间对等交换自己手中已有的资源。如果任何一方试图白嫖另外一方的资源,而自己不愿意上传自己的资源,那么那方就会被人视作吸血者而被踢出这个交换,下场是没有人会愿意和你交换数据,你的下载速度也就归零。

如果把上传速度限制为了10KB/s,10KB/s是BitComet上传最低限速,很大时候就这10KB会被包含DHT查询、向Tracker服务器注册,连接用户所产生的上传全部占满。在下载种子的时候,其他用户连上你是只能拿到1~2KB/s甚至一点都没有的。

现在的BT下载客户端都可以做到智能反吸血,所以基本想和交换数据的用户都把你当作Leecher(吸血鬼)Ban(封禁)处理了,故没有下载速度不足为奇。

一般来说,只要预留50KB/s的上传给其他网页浏览、聊天就可以了,在下载时应该尽量把上传留给那些和你交换资源的用户,这样才不会被他们视作你在吸血进而屏蔽你。

如果上传不足,就应该主动限制自己的下载速度,否则单位时间下载量远超过上传量反而会遭来更多的屏蔽,对下载速度提升更加不利。

BT基本流程

.torrent 种子文件本质上是文本文件,包含Tracker信息和文件信息两部分。Tracker信息主要是BT下载中需要用到的Tracker服务器的地址和针对Tracker服务器的设置。

  1. 下载时,BT客户端首先解析种子文件得到Tracker地址,然后连接Tracker服务器。
  2. Tracker服务器回应下载者的请求,提供下载者其他下载者(包括发布者)的IP。
  3. 下载者再连接其他下载者,根据种子文件,两者分别告知对方自己已经有的块,然后交换对方所没有的数据。
    1. 此时不需要其他服务器参与,分散了单个线路上的数据流量,因此减轻了服务器负担。
  4. 下载者每得到一个块,需要算出下载块的Hash验证码与种子文件中的对比,如果一样则说明块正确,不一样则需要重新下载这个块。这种规定是为了解决下载内容准确性的问题。

常规部署

  • 安装qBittorrent-nox, tmux下运行,在8080端口挂载WebUI
  • 安装qbittorrent, 用户运行qbittorrent, x11弹出应用窗口
    • 问题:
      • 怎么维持窗口?sudo XAUTHORITY=/home/qcjiang/.Xauthority qbittorrent
      • 关于写文件权限,如何写网络硬盘
      • node5 上传很快, 网络原因?种子原因?(不是,是因为网络硬盘,所以下载多少要占用多少上传)

docker部署

以qBit的docker为例,参考linuxsever的docker-compose如下:(qBit相对于Transmission有多线程IO的优势) 也可以使用其余docker镜像

1
2
3
4
5
6
7
8
9
10
11
12
13
14
15
16
17
---
version: "2.1"
services:
qbittorrent:
image: lscr.io/linuxserver/qbittorrent:latest
container_name: qbittorrent
environment:
- PUID=0 # 这里是root 如果想以其他用戶A修改文件,可以改成其他用户的UID。通過id A 查看
- PGID=0
- TZ=Etc/UTC
- WEBUI_PORT=8080
volumes:
- /addDisk/DiskNo4/qBit:/config
- /addDisk/DiskNo4/bt:/downloads

network_mode: host
restart: unless-stopped

默认账号 admin 默认密码 adminadmin
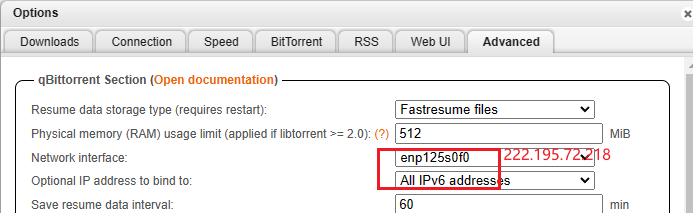
然后通过webUI http://222.195.72.218:8080/管理。

如果不想网络通过wireguard,而是本地可以如下设置

同一台机器实现两个账号做种

  • 思路:两个docker,同一个网络出口
  • 問題:
    • qBit要有权限写文件
    • 两个docker兼容性:
      • WebUI有bug,不一定会显示。重启刷新即可
      • 其次有一个docker会没有网络。
        • 这是由于端口随机错误导致的,会导致下面连接状态显示火焰。换端口刷新即可解决。
  • 关于封号
    • 由于国内环境下载一般都是大内网。同一个网络出去应该没有问题。
    • 大多数做种是通过ipv6,会被检测出同一个机器多个账户做种,导致封号
    • 还有关于盒子刷上传,一方面通过速度,另一方面由于盒子的ip是固定的,所以会被检测出重复导致封号。

测速

  1. 先用 https://www.speedtest.net 测速
  2. 考虑热门种子测试 http://releases.ubuntu.com/19.10/ubuntu-19.10-desktop-amd64.iso.torrent
    1. 没通过代理能找到的用户变少,速度也变慢了。
  3. 如果跑不到网络上限,可能和软件设置有关

上传速度

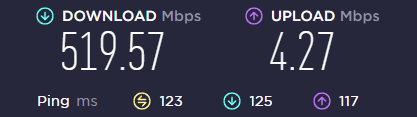
m站刷上传的时候,发现基本都是对方基本都是通过ipv6下载

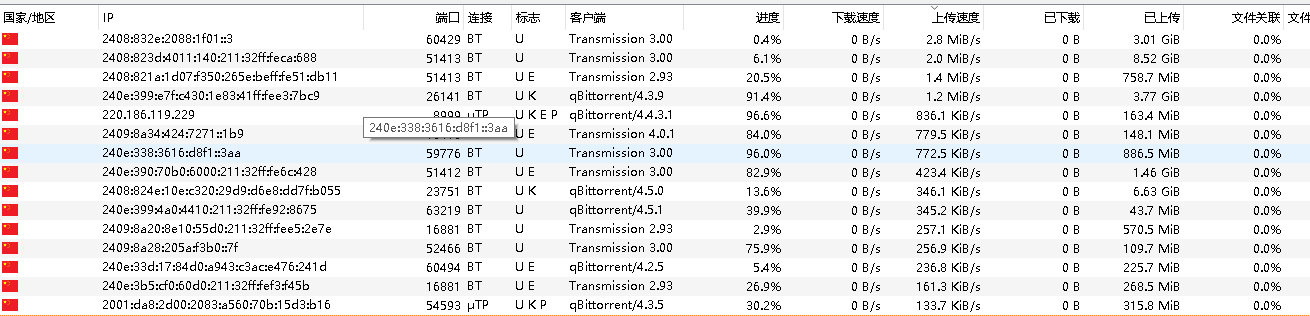
uTP是一种基于UDP的协议,它可以根据网络拥塞情况自动调节传输速度,从而减少对其他网络应用的影响。

BT连接是一种基于TCP的协议,它可以保证数据的完整性和可靠性,但是可能会占用较多的网络带宽和资源。

在qBittorrent中,标志U K E P分别表示以下含义:

1
2
3
4
U:表示你正在上传数据给对方,或者对方正在从你那里下载数据。
K:表示对方支持uTP协议,即基于UDP的传输协议。
E:表示对方使用了加密连接,即通过加密算法保护数据的安全性。
P:表示对方使用了代理服务器或VPN服务,即通过第三方网络隐藏自己的真实IP地址。

PT设置

  • 虽然说PT下载,客户端要关闭DHT,PeX, LSD。
  • 但是其实种子是默认关闭的,无序额外设置,北洋和M站一样。

基本概念

Tracker

收集下载者信息的服务器,并将此信息提供给其他下载者,使下载者们相互连接起来,传输数据。

种子

指一个下载任务中所有文件都被某下载者完整的下载,此时下载者成为一个种子。发布者本身发布的文件就是原始种子。

做种

发布者提供下载任务的全部内容的行为;下载者下载完成后继续提供给他人下载的行为。

分享率

上傳資料量 / 下傳資料量的比率,是一種BT的良心度,沒實際作用.(一般为了良心,至少大于1)

长期种子

BitComet的概念,相对于种子任务的上传能够控制。

长效种子就是你不开启任务做种,只要你启动了比特彗星,软件挂后台,当有其他用户也是用比特彗星下载你列表里的存在的文件时候就会被认为是长效种子 。

DHT

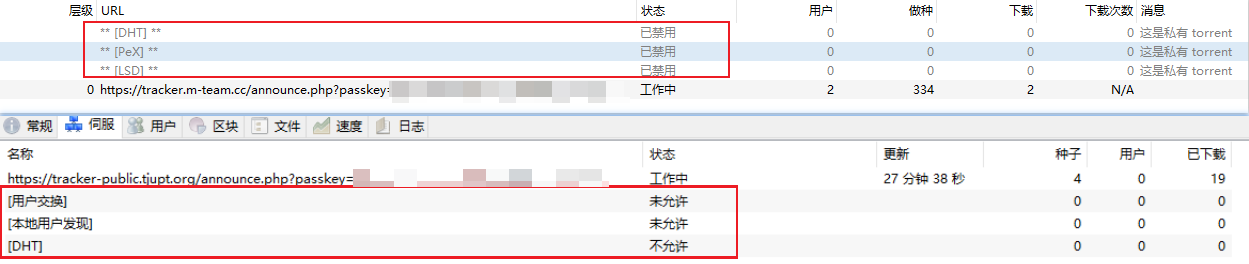
.DHT全称叫分布式哈希表(Distributed Hash Table),是一种分布式存储方法。在不需要服务器的情况下,每个客户端负责一个小范围的路由,并负责存储一小部分数据,从而实现整个DHT网络的寻址和存储。新版BitComet允许同行连接DHT网络和Tracker,也就是说在完全不连上Tracker服务器的情况下,也可以很好的下载,因为它可以在DHT网络中寻找下载同一文件的其他用户。

类似Tracker的根据种子特征码返回种子信息的网络。

在BitComet中,无须作任何设置即可自动连接并使用DHT网络,完全不需要用户干预。

用户交换Pex

Peer Exchange (PEX), 每个peer客户端的用户列表,可以互相交换通用。可以将其理解为“节点信息交换”。前面说到了 DHT 网络是没有中心服务器的,那么我们的客户端总不能满世界去喊:“我在下载这个文件,快来连我吧.”(很大声)。所以就通过各个 BT 客户端自带的节点去同步路由表实现 DHT 网络连接。

本地用户发现

LSD(LPD)就是本地网络资源,内网下载,没什么几把用的东西,可能学校等私有网络好使

ISP

網絡業務提供商(Internet Service Provider,簡稱ISP),互聯網服務提供商,即向廣大用户綜合提供互聯網接入業務、信息業務、和增值業務的電信運營商。

反吸血机制

基本原理

  1. 根据流量: 默认设置为120秒,持续对某个peer产生上传,并且从该peer用户获取的下载流量没有超过1KB文件(1024字节)大小,即拉黑该peer,预警颜色为黄色,合法为绿色,红色为封禁。
  2. 可组合检测指定客户端进行反吸血,比如说指定屏蔽qbittorrent、utorrent等吸血客户端选择(可多选客户端,可对下载任务和做种任务生效)
  3. 可组合检测客户端连接端口号进行反吸血,比如说指定屏蔽15000迅雷X版本客户端等吸血端口(可多选端口号,可对下载任务和做种任务生效)
  4. 可组合检测客户端连接peer_id标志符进行反吸血屏蔽,例如屏蔽XL0018客户端等吸血标志符(可多选标志符,可对下载任务和做种任务生效)

高级设置

1
2
3
4
5
bittorrent.anti_leech_min_byte
设定反吸血保护流量:要求对方在指定时间(秒)内需要上传的最少流量(byte), 取值范围:1-10000。

bittorrent.anti_leech_min_stable_sec
设定反吸血保护时间:指定与对方连接多长时间(秒)后开始检查流量(byte),取值范围:1-10000。

常见问题

需要软件开着吗?

需要

原文件改名或者移动,还会上传吗?

文件下载后不能移动,不能删除,不能重命名(但可以在软件内改)。 一但BT 软件找不到文件,或删除了任务,就无法做种上传了。

晚上避免上传

可以在Bitcomet高级设置里设置时段限速

对硬盘损害大吗?

分享上传也需要频繁读取硬盘。

以Bitcomet为例,该软件就是通过磁盘缓存技术减小频繁随机读写对硬盘的损伤。

磁盘缓存就是利用物理内存作为缓冲,将下载下的数据先存放于内存中,然后定期的一次性写入硬盘,以减少对硬盘的写入操作,很大的程度上降低了磁盘碎片。

因为通常我们设置内存(磁盘缓存)为每任务XX兆,意味着,这个缓冲区可以存放数兆甚至几十兆的“块”,基本上可以杜绝碎片了。

现在BT软件都是自动设置缓存的,它是根据你物理内存的大小分配的。

注意设置

  1. 设置了“反吸血”,应对迅雷
  2. 校园网设置9,不限制P2P
    1. 国内各省份不同运营商限速策略(QOS)

需要进一步的研究学习

路由器下载?

参考文献

Docker

简介

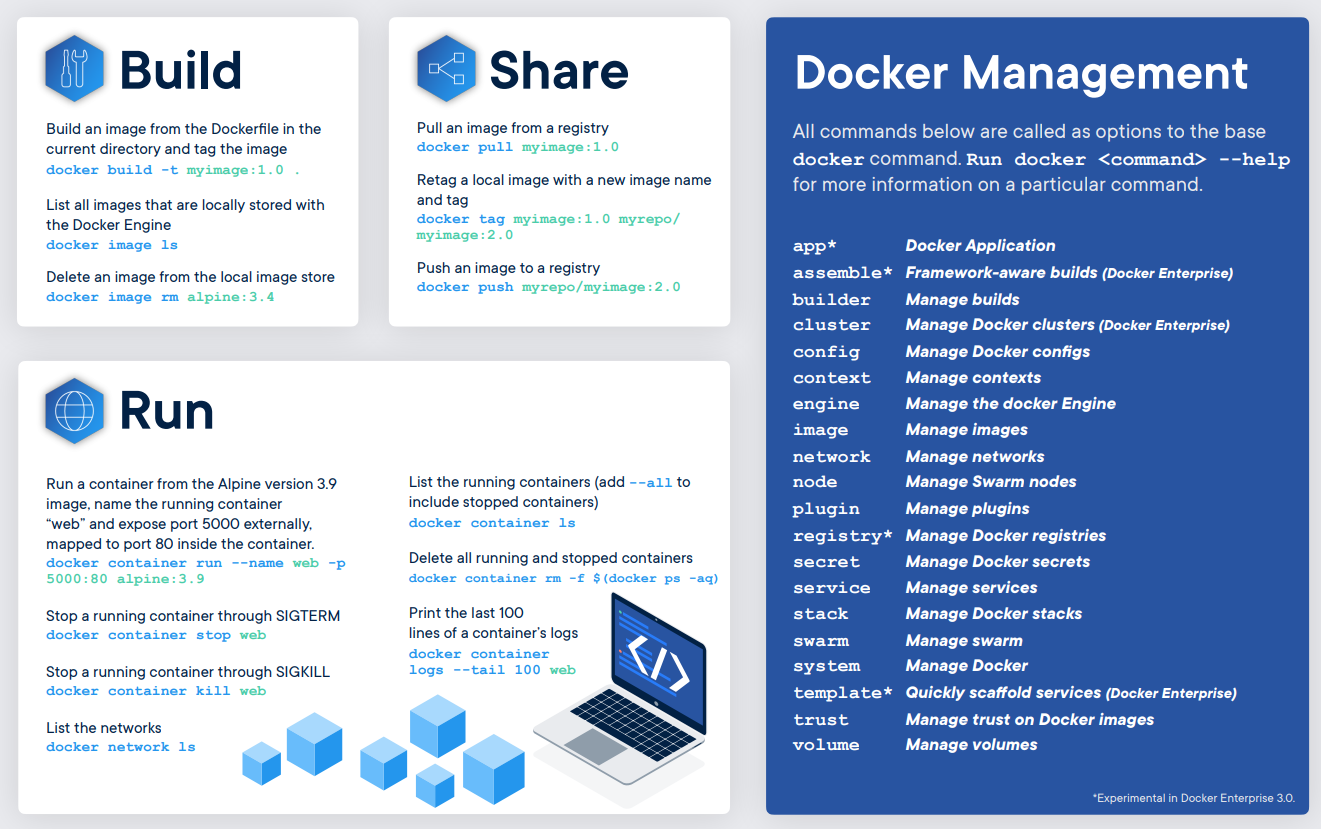
基于 Go 语言 并遵从 Apache2.0 协议开源。Docker 可以让开发者打包他们的应用以及依赖包到一个轻量级、可移植的容器中,然后发布到任何流行的 Linux 机器上。

structure

Docker vs VMWare

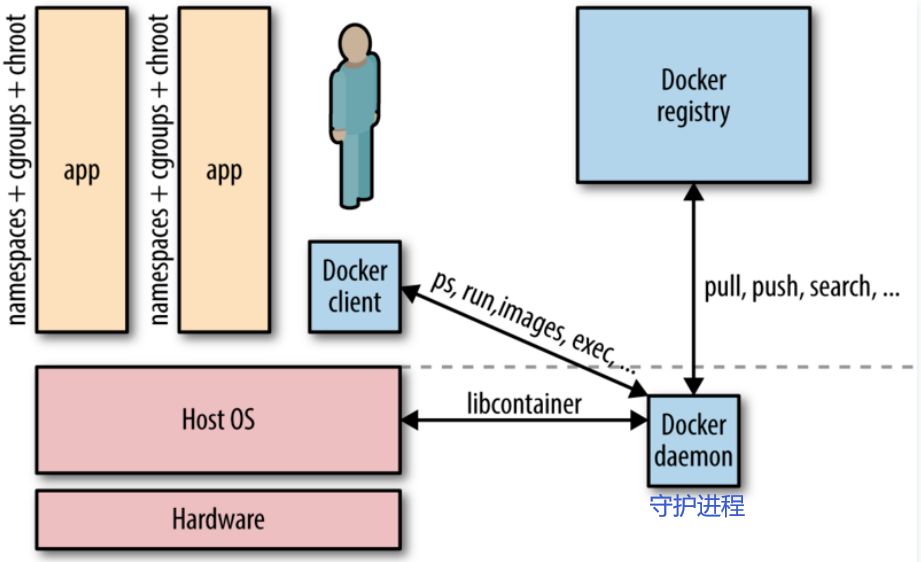
相对于传统虚拟机,Docker 没有硬件虚拟化/hypervisor,可以运行在物理机、虚拟机, 甚至嵌套运行在 Docker 容器内,并且其不携带操作系统的,会轻巧很多。而且调用资源时利用 Docker Engine 去调用宿主的的资源,这时候过程是虚拟内存->真正物理内存。

Image title{ align=left }

Image title2{ align=right }

Linux内核的潜在兼容性问题

how docker run different ubuntu version Sharing the same running kernel? no SW conficts?

If your host kernel is “compatible enough“ with the software in the container you want to run it will work; otherwise, it won’t.[^1] So what does “compatible enough” mean? It depends on what requests the program makes of the kernel (system calls) and** what features it expects the kernel to support**. Some programs make requests that will break things; others don’t.

Compatibility

on an Ubuntu 18.04 (kernel 4.19) or similar host:[^1]
docker run centos:7 bash works fine.
docker run centos:6 bash fails with exit code 139, meaning it terminated with a segmentation violation signal; this is because the 4.19 kernel doesn’t support something that that build of bash tried to do.
docker run centos:6 ls works fine because it’s not making a request the kernel can’t handle, as bash was.
If you try docker run centos:6 bash on an older kernel, say 4.9 or earlier, you’ll find it will work fine.

Portainer 统一管理

  • 安装Portainer Community Edition (CE)而不是Portainer Business Edition (BE)
  • WSL的安装和linux类似
    1
    2
    3
    4
    5
    # 创建 Portainer Server 将用于存储其数据库的卷
    docker volume create portainer_data

    # 下载并安装 Portainer Server 容器, 9000为WebUI端口, 8000 是可选的,仅当您计划将边缘计算功能与边缘代理一起使用时才需要。
    docker run -d -p 8000:8000 -p 9000:9000 --name portainer --restart=always -v /var/run/docker.sock:/var/run/docker.sock -v /portainer_data:/data portainer/portainer-ce:2.11.1
  • Portainer里的docker部署: 建议使用 Stacks 下的 docker-compose 来进行

端口映射

2333:8000 为 容器内部端口8000,宿主机端口为2333

远程WebUI访问

默认部署在 http://localhost:9000, 可以如下操作来部署 http://222.195.72.218:9000/#!/home

1
2
3
# docker在服务器上时,可以关闭防火墙访问,也可以ssh代理到本地
brainiac1# ufw status
Status: inactive

Install

1
2
3
4
5
6
7
8
# 安裝 docker
curl -sSL get.docker.com | sh
# 將目前使用者新增到 docker 群組內,需要重新登入才會生效
sudo usermod -aG docker $USER

# 安裝 docker-compose
sudo curl -L "https://github.com/docker/compose/releases/download/$(curl -sL https://api.github.com/repos/docker/compose/releases/latest | grep tag_name | cut -d'"' -f 4)/docker-compose-$(uname -s)-$(uname -m)" -o /usr/local/bin/docker-compose
sudo chmod +x /usr/local/bin/docker-compose

Relationship

![dockerTripleThing](https://www.markbuckler.com/img/docker_high_level.png)
Dockerfile & Image & Container
  • Image like a static configed/compiled software using dockerfile/gcc.
  • And container is a running process that we can control.

Dockerfile

First, write an installation script for all of your dependencies. This script is written with Docker specific syntax and is called a Dockerfile(1).
{ .annotate }

  1. A Dockerfile is a script used to create a Docker image, which is a lightweight, standalone, and executable package that includes everything needed to run a piece of software, including the code, runtime, system tools, system libraries, and settings.
![Building image using Dockerfile](https://iximiuz.com/you-need-containers-to-build-an-image/kdpv.png)
Building image using Dockerfile

Using dockerfile in portainer

`Images > Build image`

Dockerfile

Here’s a simple Dockerfile code snippet(it’s usually built on official base image):

1
2
3
4
5
6
7
8
9
10
11
12
13
14
15
16
17
18
19
20
21
22
23
# Use an official base image
FROM ubuntu:20.04

# Set environment variables
ENV MY_ENV_VARIABLE my_value

# Run commands to install packages and set up the environment
RUN apt-get update && apt-get install -y \
package1 \
package2 \
&& rm -rf /var/lib/apt/lists/*

# Copy files from your local machine to the container
COPY local_directory /container_directory

# Set the working directory
WORKDIR /app

# Expose a port
EXPOSE 8080

# Define the command to run when the container starts
CMD ["command_to_start_application"]

In this example, and more options:

  • FROM specifies the base image, in this case, Ubuntu 20.04.
  • ENV sets an environment variable.
  • RUN executes commands to install packages.
  • COPY copies files from your local machine to the container.
  • WORKDIR sets the working directory within the container.
  • EXPOSE specifies that the container will listen on port 8080.
  • CMD defines the command that will be executed when the container starts.

Cheat Sheet

查看容器出错日志:docker logs --tail 1000 1fed0d4782cf最后一项是容器ID

换源

24年6月后国内镜像站按照国家要求已经陆续关闭,还是只能挂代理

使用docker info可以查看到文件保存路径,和是否有换源:

1
2
root@UGREEN-A0E9:~# docker info|grep Registry
Registry: https://index.docker.io/v1/

nano /etc/docker/daemon.json 把以下内容复制进去:

1
2
3
4
5
6
7
8
9
{
"registry-mirrors": [
"https://y0xk2hg9.mirror.aliyuncs.com",
"https://registry.hub.docker.com",
"http://hub-mirror.c.163.com",
"https://docker.mirrors.ustc.edu.cn",
"https://registry.docker-cn.com"
]
}

重启systemctl restart docker, 检查docker info

代理

在构建 Docker 镜像时,如果需要通过代理访问外部网络资源(例如,安装软件包或依赖项),你可以通过以下几种方式设置代理:

docker search ubuntu验证

单个Dockerfile

使用 –build-arg

docker build 命令中使用 --build-arg 选项,传递代理相关的环境变量。

1
2
3
4
docker build \
--build-arg http_proxy=http://your.proxy.server:port \
--build-arg https_proxy=http://your.proxy.server:port \
-t your-image-name .

在 Dockerfile 中,你需要使用 ARG 指令来声明这些构建参数,以便 Docker 在构建过程中能够使用它们:

1
2
3
4
5
6
7
ARG http_proxy
ARG https_proxy

# 继续其他 Dockerfile 指令..., 但是不能代理 From 指令
RUN xxx
COPY xxx
ADD xxx

Dockerfile 中直接设置

1
2
3
4
ENV http_proxy=http://your.proxy.server:port
ENV https_proxy=http://your.proxy.server:port

# 继续其他 Dockerfile 指令...

全局配置

在 Docker 守护进程中配置全局代理

通过配置 Docker 守护进程,在全局范围内使用代理。具体操作步骤如下:

  1. 创建或编辑 /etc/systemd/system/docker.service.d/{任意名字 e.g.,proxy}.conf 文件(对于 HTTP 代理):

    1
    2
    3
    4
    [Service]
    Environment="HTTP_PROXY=http://your.proxy.server:port"
    Environment="HTTPS_PROXY=https://your.proxy.server:port"
    Environment="NO_PROXY=localhost,127.0.0.1"
  2. 重新加载守护进程配置,并重启 Docker:

    1
    2
    sudo systemctl daemon-reload
    sudo systemctl restart docker
  3. 通过 docker build 命令构建镜像时,Docker 守护进程会自动使用配置的代理。

  4. 验证代理设置:systemctl show docker --property Environmentdocker info会显示 如下:

1
2
3
4
5
6
7
(base) root@localhost /etc/systemd/system/docker.service.d  [04:47:18]
> sudo systemctl show docker --property Environment
Environment=GOTRACEBACK=crash HTTP_PROXY=http://p_atlas:proxy%[email protected]:8080 HTTPS_PROXY=http://p_atlas:proxy%[email protected]:8080 NO_PROXY=localhost,127.0.0.1
(base) root@localhost /etc/systemd/system/docker.service.d [05:02:04]
> docker info |grep HTTP
HTTP Proxy: http://xxxxx:[email protected]:8080
HTTPS Proxy: http://xxxxx:[email protected]:8080

docker show没有 HTTP_PROXY, 看日志

sudo journalctl -u docker.service 检查 代理环境变量为什么没生效

1
2
3
Dec 30 16:32:59 localhost.localdomain systemd[1]: Started Docker Application Container Engine.
Dec 30 16:33:12 localhost.localdomain systemd[1]: /etc/systemd/system/docker.service.d/http-proxy.conf:2: Failed to resolve specifiers in HTTP_PROXY=http://p_atlas:proxy%[email protected]:6688, ignoring: Invalid slot
Dec 30 16:33:12 localhost.localdomain systemd[1]: /etc/systemd/system/docker.service.d/http-proxy.conf:3: Failed to resolve specifiers in HTTPS_PROXY=http://p_atlas:proxy%[email protected]:6688, ignoring: Invalid slot

发现还是转义符的问题,%40123 要写成 %%40123

使用 ~/.docker/config.json

你还可以在 ~/.docker/config.json 文件中配置代理:

1
2
3
4
5
6
7
8
9
{
"proxies": {
"default": {
"httpProxy": "http://your.proxy.server:port",
"httpsProxy": "https://your.proxy.server:port",
"noProxy": "localhost,127.0.0.1"
}
}
}

通过这些方法,你可以在 docker build 命令中使用代理,从而在需要外部网络资源的场景下顺利构建 Docker 镜像。

证书问题

Error response from daemon

https://ghcr.io/v2/“: x509: certificate signed by unknown authority”

编辑 Docker 配置文件 /etc/docker/daemon.json,添加以下内容:

1
2
3
{
"insecure-registries": ["ghcr.io"]
}
重启 Docker 服务:
1
sudo systemctl restart docker

docker push/pull

  • It is in these containers that you will run or develop your code.
  • If you would like other people to be able to use your Docker image you can push to DockerHub (with docker push),
  • and if you want to use someone else’s image you can pull from DockerHub (with docker pull).[^4]

网络问题

1
2
3
root@UGREEN-A0E9:~# docker pull dreamacro/clash
Using default tag: latest
Error response from daemon: Get "https://registry-1.docker.io/v2/": net/http: request canceled (Client.Timeout exceeded while awaiting headers)

需要换源

docker build

Then, run these commands to build a Docker image of your environment by using docker build.

Dockfile Path

docker build 基本的格式为 docker build [ 选项 ] 路径,该命令将读取指定路径下(包括子目录)的 Dockerfile,并将该路径下所有内容发送给 Docker 服务端,由服务端来创建镜像。因此一般建议放置 Dockerfile 的目录为空目录。也可以通过 .dockerignore 文件(每一行添加一条匹配模式)来让 Docker 忽略路径下的目录和文件。

option

option like

1
2
$ sudo docker build -t myrepo/myapp /tmp/test1/
$ docker build -t username/image_name:tag_name .

docker build use proxy

1
2
3
4
5
docker build --network=host\
--build-arg http_proxy=http://127.0.0.1:7890 \
--build-arg https_proxy=http://127.0.0.1:7890 \
--build-arg "NO_PROXY=localhost,127.0.0.1,.example.com" \
-t ithemal:latest .

You also can set the proxy in the Dockerfile.[^6]

1
2
ENV http_proxy "http://127.0.0.1:7890"
ENV https_proxy "https://127.0.0.1:7890"

docker 内代理经常导致网络异常

通过下面验证代理:

  1. docker exec -it windmill-caddy-1 /bin/sh 进去 curl(受到全小写环境变量http_proxy影响) and wget
  2. docker inspect windmill-windmill_worker-1 | grep -i proxy

docker tag

镜像的完整 tag 不仅包含镜像名字, 还指明了镜像从哪里来, 要到哪里去, 就像一个 URL。可以通过 -t 选项指定镜像的标签信息,譬如:

1
$ docker tag SOURCE_IMAGE[:TAG] TARGET_IMAGE[:TAG]

docker run

Once successfully built, you can instantiate copies of this image as many times as you would like by using docker run to create Docker containers.

Container Lifecycle[^2]

option

1
2
3
4
# 使用镜像nginx:latest以交互模式启动一个容器,在容器内执行/bin/bash命令。
$ docker run -it nginx:latest /bin/bash
# remove all stop container
$ docker container prune
  • -i: 以交互模式运行容器,通常与 -t 同时使用;
  • -t: 为容器重新分配一个伪输入终端,通常与 -i 同时使用;
  • -d: 后台运行容器,并返回容器ID;
  • -P: 随机端口映射,容器内部端口随机映射到主机的端口
  • -p: 指定端口映射,格式为:主机(宿主)端口:容器端口
  • --name="nginx-lb": 为容器指定一个名称;
  • -e username="ritchie": 设置环境变量;
  • -v <path to datasets>:/datasets 挂载本地目录

Volumes 挂载

volumes allow me to interact with data outside of the docker container.

Volumes is better than bind mounts

  1. Volumes are easier to back up or migrate than bind mounts.
  2. Volumes work on both Linux and Windows containers.
    So option -v is better than --mount

options

1
2
3
4
5
docker run \
-v <path to datasets>:/datasets \
-v <path to approx-vision>:/approx-vision \
-it mbuckler/approx-vision \
/bin/bash

docker-compose

  • Compose 是用于定义和运行多容器 Docker 应用程序的工具。需要额外安装。通过 Compose,您可以使用 YML 文件来配置应用程序需要的所有服务。然后,使用一个命令,就可以从 YML 文件配置中创建并启动所有服务。
  • 和docker共用代理配置,docker info |grep HTTP查看。

十分不建议使用docker-compose命令

使用root用户执行docker-compose up -d,不然会有文件权限问题。各种问题,软件版本问题等,十分折磨。

compose file

1
2
3
4
5
6
7
8
9
10
11
12
13
14
version: "3"

services:
mihoyo-bbs:
image: darkatse/mihoyo-bbs
environment:
- CRON_SIGNIN=30 9 * * *
- MULTI=TRUE
volumes: # 将主机的数据卷或着文件挂载到容器里。
- .:/var/app
logging: # driver:指定服务容器的日志记录驱动程序,默认值为json-file
driver: "json-file"
options:
max-size: "1m" # 最多1m个文件,当达到文件限制上限,会自动删除旧得文件。

AutoMihoyoBBS[^5] 将上述 YAML 文件保存为 docker-compose.yml,然后在包含该文件的目录中运行以下命令:

deploy

docker-compose logs -f命令来查看程序输出。 -f, --follow Follow log output

1
2
3
4
5
6
7
8
9
10
11
12
13
14
15
16
17
18
19
20
# docker-compose up 命令来启动并运行整个应用程序。
# docker-compose down 可以将整个应用停止并删除相关资源。
$ docker-compose up -d
# 在后台执行该服务可以加上 -d 参数
Creating network "automihoyobbs_default" with the default driver
Pulling mihoyo-bbs (darkatse/mihoyo-bbs:)...
latest: Pulling from darkatse/mihoyo-bbs
df9b9388f04a: Pull complete
a1ef3e6b7a02: Pull complete
7a687728470e: Pull complete
4ecf30de1710: Pull complete
a1f99e431609: Pull complete
7e9141a60a66: Pull complete
7aa39aec04ec: Pull complete
a75b4b3d5690: Pull complete
dee0a6b07871: Pull complete
abed80702fed: Pull complete
Digest: sha256:10958801df87675c390a8cdcc153c2f87a41af92d35f9f2cf9b7758aa3e10d1b
Status: Downloaded newer image for darkatse/mihoyo-bbs:latest
Creating automihoyobbs_mihoyo-bbs_1 ... done

实例

提供高版本GCC

宿主机往往因为OS的原因,提供不了合适的GCC版本,为此在docker里编译是一种便捷的选择。

AllForOne 脚本

1
2
3
4
5
6
7
8
9
10
11
12
13
14
15
16
17
18
#!/bin/bash
docker_name="mihoyo-bbs"
docker stop ${docker_name}
docker rm ${docker_name}
echo -e "\033[5;36mOrz 旧容器(镜像)已清理\033[0m"

time_now=$(date "+%m%d%H")
docker build -f dockerfile --tag ${docker_name}:"${time_now}" .
echo -e "\033[5;36mOrz 镜像重建完成\033[0m"

docker run -itd \
--name ${docker_name} \
--log-opt max-size=1m \
-v $(pwd):/var/app \
${docker_name}:"${time_now}"
echo -e "\033[5;36mOrz 镜像启动完成\033[0m"
docker ps -a #顯示目前的 container 及狀態
docker logs ${docker_name} -f # -f, --follow Follow log output

hackergame2020 的源码的dockerfile

奇怪的使用

启动docker并通过xhost保持tmux连接

Docker of VNC

在Linux服务器上使用Docker运行图形化界面的应用程序。为了实现这一点,您需要使用一个特别配置的Docker镜像,该镜像支持图形用户界面(GUI)。这通常涉及到安装一个桌面环境和任何必要的图形驱动程序。

以下是实现这一目的的基本步骤:

  1. 选择一个合适的基础镜像:您可以从一个已经包含了桌面环境的基础镜像开始,例如Ubuntu或Fedora。
  2. 安装图形界面:在Dockerfile中,您可以安装一个桌面环境,如GNOME、KDE或Xfce,以及任何其他必需的软件。
  3. 配置X11或其他显示服务器:为了让图形界面能够显示,您需要配置X11或类似的显示服务器。这可能涉及到暴露和映射一些端口,以及安装和配置VNC服务器或其他远程桌面软件。
  4. 运行容器并连接到图形界面:一旦容器运行起来,您需要通过VNC客户端或其他远程桌面工具连接到它。

这里是一个示例的Dockerfile,用于创建一个带有图形界面的Ubuntu容器:

1
2
3
4
5
6
7
8
9
10
11
12
13
14
15
16
17
18
19
20
21
FROM ubuntu:latest

# 安装必要的软件包
RUN apt-get update && apt-get install -y \
ubuntu-desktop \
vnc4server \
xterm

# 设置VNC服务器
RUN mkdir /root/.vnc
RUN echo "your-password" | vncpasswd -f > /root/.vnc/passwd
RUN chmod 600 /root/.vnc/passwd

# 设置VNC启动脚本
COPY vnc_startup.sh /root/vnc_startup.sh
RUN chmod +x /root/vnc_startup.sh

# 暴露VNC端口
EXPOSE 5900

CMD ["/root/vnc_startup.sh"]

在这个Dockerfile中,ubuntu-desktopvnc4server被安装,以便提供图形界面和VNC访问。您需要创建一个VNC启动脚本(vnc_startup.sh),以启动VNC服务器并运行桌面环境。

请注意,运行图形界面的容器通常比标准的、无GUI的容器更加资源密集,并且可能需要更多的存储空间和内存。此外,确保遵循最佳安全实践,特别是在暴露VNC或其他远程访问服务时。

常见问题

Got permission denied while trying to connect to the Docker daemon socket

  1. sudo 运行
  2. 加入docker用户组
1
2
3
4
5
6
sudo groupadd docker     #添加docker用户组
sudo usermod -aG docker $USER #将登陆用户加入到docker用户组中
sudo gpasswd -a $USER docker # or
groups # 重新登录查看是否生效
newgrp docker #更新用户组
docker ps #测试docker命令是否可以使用sudo正常使用

failed to create endpoint portainer on network bridge

gpt’s solution的无效答案

这个错误表明 Docker 在创建容器时遇到了问题,具体原因是无法将网络接口 veth2c573cd 添加到 Docker 网络桥 docker0,并且提示设备不存在。

查看 Docker 网络列表,确保相关的网络(可能是 bridge)存在:

1
docker network ls

如果不存在,你可以尝试删除并重新创建:

1
2
docker network rm yyy
docker network create yyy

然后再次运行你的 Docker 容器。

sudo password in docker image

link 1 2 3

参考文献

https://cloud.tencent.com/developer/article/1395434

[^1]: How can Docker run distros with different kernels?

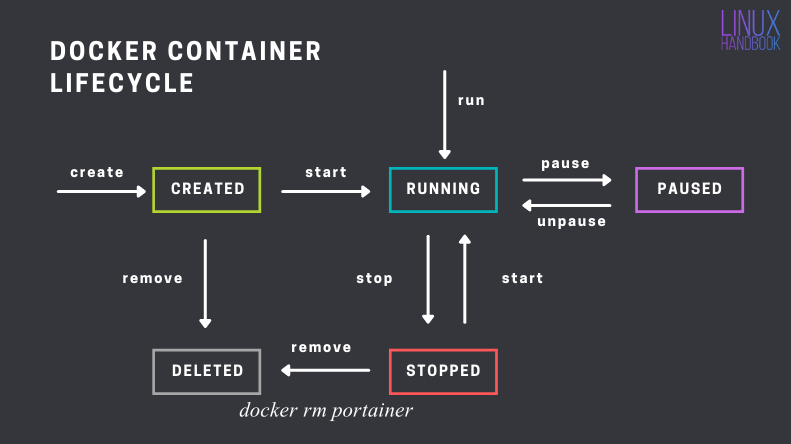
[^2]: Docker Commands for Managing Container Lifecycle (Definitive Guide)

[^4]: Developing in Docker

[^6]: https://cloud.tencent.com/developer/article/1806455 & http://www.debugself.com/2018/01/17/docker_network/

Docker On Win10

简介

  • WSL 2 是对WSL基础体系结构的一次重大改造,它使用虚拟化技术和 Linux 内核来实现其新功能。
  • docker是基于linux内核运行
  • WSL 2 加入了linux内核为docker在windows上运行铺平了道路

系统要求

开启虚拟化 + Hyper-V

  • BIOS开启虚拟化
    • 查看是否开启:任务管理器 -> 性能 -> CPU 虚拟化:开启
  • Control Panel(控制面板) -> Programs and Features(程序和功能) -> Turn Windows Features on or off(启用或关闭Widnows功能)勾选三项
    • Windows Hypervisor Platform(Windows虚拟机监控程序平台)
    • Hyper-V
    • 虚拟机平台
  • 管理员Powershell运行 bcdedit /set hypervisorlaunchtype auto
  • 重启

WSL 2

参考教程安装 WSL旧版 WSL 的手动安装步骤

1
2
3
4
5
6
7
8
9
10
11
12
13
# 查看当前版本
❯ wsl -l -v
NAME STATE VERSION
* Ubuntu-20.04 Stopped 1

❯ wsl --set-version Ubuntu-20.04 2
正在进行转换,这可能需要几分钟时间。
操作成功完成。

E:/PowerShell via  v14.17.3 via 🐍 v3.9.7 took 59s
❯ wsl -l -v
NAME STATE VERSION
* Ubuntu-20.04 Stopped 2

docker on Windows

注意:用命令行运行来修改默认安装路径(重命名install.exe),参考教程

1
.\Docker.exe install --installation-dir="E:\commonSoftware\Docker"

安装完之后运行设置

  • 开启开机启动
  • 在Resources里修改image保存路径

使用问题

1: read-only file system

1
Error response from daemon: container df6ee73697883e8e09edd65404e1fcc19a2b4bfb49212c754a8b3ef9741d7bda: driver "overlay2" failed to remove root filesystem: unlinkat /var/lib/docker/overlay2/475c350b02589ce2cb5ef30f0619ed3aeaba409c56d87191b8cbbd00ef618fe3: read-only file system

需要管理员运行docker

C盘没空间

WSL还是超级占用C盘

需要进一步的研究学习

暂无

遇到的问题

暂无

开题缘由、总结、反思、吐槽~~

参考文献

https://blog.csdn.net/Antarctic_Bear/article/details/123489609

OpenVPN in Docker

在接触wireguard之前,网络返校的方案是自己在有公网IP的机器上搭建OpenVPN。而使用docker比裸机配置OpenVPN方便多了。

OpenVPN Image

ARM

我們使用 kylemanna/docker-openvpn 來實作,因為 dockerhub 上只有 x86 image,如果是 arm 平台則需要自己 build(x86 可跳過)

clone repo 後,直接 build

1
2
3
$ git clone https://github.com/kylemanna/docker-openvpn
$ cd docker-openvpn
$ docker build -t kylemanna/openvpn -f Dockerfile.aarch64 .

如果發生找不到 aarch64/alpine:3.5 的錯誤,修改 Dockerfile 中的 base image 為

1
FROM alpine:3.15.4

或更新的 alpine 版本即可

相关的中文教程

http://blog.gdb.wiki/2020/03/19/Docker-OpenVPN%E9%95%9C%E5%83%8F%E9%85%8D%E7%BD%AE/#kylemanna-openvpn%E8%BF%99%E4%B8%AA%E9%95%9C%E5%83%8F%E5%B0%86%E5%A4%A7%E9%83%A8%E5%88%86%E7%9A%84%E4%B8%80%E9%94%AE%E5%8C%96%E8%87%AA%E5%8A%A8%E8%84%9A%E6%9C%AC%E8%BF%9B%E8%A1%8C%E6%95%B4%E5%90%88%EF%BC%8C%E9%80%9A%E8%BF%87docker-run%E4%B8%80%E6%AD%A5%E4%B8%80%E6%AD%A5%E8%BF%9B%E8%A1%8C%E9%85%8D%E7%BD%AE

https://koding.work/10-minutes-build-open-vpn-server/

https://taichunmin.idv.tw/blog/2018-05-23-docker-openvpn.html

Quick Start

以README为主

1
2
3
4
5
6
7
8
9
10
11
12
13
14
15
16
17
18
19
20
21
22
23
24
25
# shaojiemike @ node5 in ~ [23:53:42] C:125
$ export OVPN_DATA="ovpn-data-tsj"

# shaojiemike @ node5 in ~ [23:54:10]
$ docker volume create --name $OVPN_DATA
ovpn-data-example

# shaojiemike @ node5 in ~ [23:54:11]
$ docker run -v $OVPN_DATA:/etc/openvpn --rm kylemanna/openvpn ovpn_genconfig -u udp://node5.xydustc.me
Unable to find image 'kylemanna/openvpn:latest' locally
latest: Pulling from kylemanna/openvpn
188c0c94c7c5: Pull complete
e470f824352c: Pull complete
d6ed0c7c142e: Pull complete
74586f3c5cd4: Pull complete
cb26244a2b2a: Pull complete
Digest: sha256:643531abb010a088f1e23a1c99d44f0bd417a3dbb483f809caf4396b5c9829a0
Status: Downloaded newer image for kylemanna/openvpn:latest
Processing PUSH Config: 'block-outside-dns'
Processing Route Config: '192.168.254.0/24'
Processing PUSH Config: 'dhcp-option DNS 8.8.8.8'
Processing PUSH Config: 'dhcp-option DNS 8.8.4.4'
Processing PUSH Config: 'comp-lzo no'
Successfully generated config
Cleaning up before Exit ...

CA(certificate authority.)的私钥密码

1
2
3
4
5
6
7
8
9
10
11
12
13
14
15
16
17
18
19
20
21
22
23
24
25
26
27
28
29
30
31
32
33
34
35
36
37
38
39
40
41
42
43
44
45
46
47
48
49
50
51
52
53
54
55
56
57
58
# shaojiemike @ node5 in ~ [23:55:47]
$ docker run -v $OVPN_DATA:/etc/openvpn --rm -it kylemanna/openvpn ovpn_initpki

init-pki complete; you may now create a CA or requests.
Your newly created PKI dir is: /etc/openvpn/pki


Using SSL: openssl OpenSSL 1.1.1g 21 Apr 2020

Enter New CA Key Passphrase:
Re-Enter New CA Key Passphrase:
Generating RSA private key, 2048 bit long modulus (2 primes)
.........+++++
...................+++++
e is 65537 (0x010001)
You are about to be asked to enter information that will be incorporated
into your certificate request.
What you are about to enter is what is called a Distinguished Name or a DN.
There are quite a few fields but you can leave some blank
For some fields there will be a default value,
If you enter '.', the field will be left blank.
-----
Common Name (eg: your user, host, or server name) [Easy-RSA CA]:tsj-node5

CA creation complete and you may now import and sign cert requests.
Your new CA certificate file for publishing is at:
/etc/openvpn/pki/ca.crt

Using SSL: openssl OpenSSL 1.1.1g 21 Apr 2020
Generating DH parameters, 2048 bit long safe prime, generator 2
This is going to take a long time
......................+.......................+..........................................................+........................................................................................................+........................................+...................................................................................................................................+.....................................................................................................................+......................................................................................................................................................................................................................................+......++*++*++*++*

DH parameters of size 2048 created at /etc/openvpn/pki/dh.pem


Using SSL: openssl OpenSSL 1.1.1g 21 Apr 2020
Generating a RSA private key
.......................................+++++
.........................................+++++
writing new private key to '/etc/openvpn/pki/easy-rsa-73.EeNnaB/tmp.jhHaaF'
-----
Using configuration from /etc/openvpn/pki/easy-rsa-73.EeNnaB/tmp.LGnDjB
Enter pass phrase for /etc/openvpn/pki/private/ca.key:
Check that the request matches the signature
Signature ok
The Subject's Distinguished Name is as follows
commonName :ASN.1 12:'node5.xydustc.me'
Certificate is to be certified until Jan 1 15:58:37 2025 GMT (825 days)

Write out database with 1 new entries
Data Base Updated

Using SSL: openssl OpenSSL 1.1.1g 21 Apr 2020
Using configuration from /etc/openvpn/pki/easy-rsa-148.CDCEmf/tmp.iJCIGL
Enter pass phrase for /etc/openvpn/pki/private/ca.key:

An updated CRL has been created.

1194貌似有人用了

1
2
3
4
5
6
7
8
9
10
11
12
13
14
15
16
17
18
19
20
21
22
23
24
25
26
27
28
29
# shaojiemike @ node5 in ~ [0:02:06]
$ sudo lsof -i UDP:1194
COMMAND PID USER FD TYPE DEVICE SIZE/OFF NODE NAME
openvpn 1834 nobody 6u IPv4 56802 0t0 UDP node5:openvpn

/usr/sbin/openvpn --status /run/openvpn-server/status-server.log --status-version 2 --suppress-timestamps --config server.conf

sudo vim /etc/openvpn/server/server.conf

改成7194等端口

# shaojiemike @ node5 in ~ [0:02:10]
$ sudo service openvpn status
● openvpn.service - OpenVPN service
Loaded: loaded (/lib/systemd/system/openvpn.service; enabled; vendor preset: enabled)
Active: active (exited) since Tue 2022-04-19 18:42:24 CST; 5 months 11 days ago
Main PID: 1715 (code=exited, status=0/SUCCESS)
Tasks: 0 (limit: 154181)
Memory: 0B
CGroup: /system.slice/openvpn.service

Apr 19 18:42:24 node5 systemd[1]: Starting OpenVPN service...
Apr 19 18:42:24 node5 systemd[1]: Finished OpenVPN service.

# shaojiemike @ node5 in ~ [0:15:49] C:125
$ sudo service openvpn stop

# shaojiemike @ node5 in ~ [0:16:30]
$ sudo kill -9 1834

在1195启动服务失败,还是1194

1
2
3
4
5
6
7
8
9
10
11
12
13
14
15
# shaojiemike @ node5 in ~ [0:16:46]
$ docker run -v $OVPN_DATA:/etc/openvpn -d -p 1194:1194/udp --cap-add=NET_ADMIN kylemanna/openvpn
cb0f7e78f389f112c3c3b230d20d2b50818f6cf59eea2edfaa076c7e8fad7128

# shaojiemike @ node5 in ~ [0:06:01]
$ docker container list
CONTAINER ID IMAGE COMMAND CREATED STATUS PORTS NAMES
6c716b27b3f1 kylemanna/openvpn "ovpn_run" 49 seconds ago Up 48 seconds 1194/udp, 0.0.0.0:1195->1195/udp, :::1195->1195/udp charming_zhukovsky

# 上面是错误的

# shaojiemike @ node5 in ~ [0:16:50]
$ docker ps
CONTAINER ID IMAGE COMMAND CREATED STATUS PORTS NAMES
cb0f7e78f389 kylemanna/openvpn "ovpn_run" About a minute ago Up About a minute 0.0.0.0:1194->1194/udp, :::1194->1194/udp pedantic_euler

产生客户端证书,和ovpn文件

1
2
3
4
5
6
7
8
9
10
11
12
13
14
15
16
17
18
19
20
21
22
23
24
25
26
27
28
# shaojiemike @ node5 in ~ [0:07:27] C:2
$ docker run -v $OVPN_DATA:/etc/openvpn --rm -it kylemanna/openvpn easyrsa build-client-full tsj-node5-client nopass
Using SSL: openssl OpenSSL 1.1.1g 21 Apr 2020
Generating a RSA private key
...............+++++
...............................+++++
writing new private key to '/etc/openvpn/pki/easy-rsa-1.olaINa/tmp.MfohAO'
-----
Using configuration from /etc/openvpn/pki/easy-rsa-1.olaINa/tmp.EMkEHF
Enter pass phrase for /etc/openvpn/pki/private/ca.key:
139775495048520:error:28078065:UI routines:UI_set_result_ex:result too small:crypto/ui/ui_lib.c:905:You must type in 4 to 1023 characters
Enter pass phrase for /etc/openvpn/pki/private/ca.key:
Check that the request matches the signature
Signature ok
The Subject's Distinguished Name is as follows
commonName :ASN.1 12:'tsj-node5-client'
Certificate is to be certified until Jan 1 16:08:23 2025 GMT (825 days)

Write out database with 1 new entries
Data Base Updated


# shaojiemike @ node5 in ~ [0:08:24]
$ docker run -v $OVPN_DATA:/etc/openvpn --rm kylemanna/openvpn ovpn_getclient tsj-node5-client > tsj-node5-client.ovpn

# shaojiemike @ node5 in ~ [0:09:20]
$ ls tsj-node5-client.ovpn
tsj-node5-client.ovpn

还是不行,奇怪

解决办法

ping不通的原因是,脚本默认是8号端口,改成0号教育网端口就行了。

1
2
3
4
5
6
7
8
9
10
11
12
13
D:\PowerShell> ping -r 9 -w 10000 222.195.72.114

Pinging 222.195.72.114 with 32 bytes of data:
Reply from 222.195.72.114: bytes=32 time=60ms TTL=60
Route: 172.17.0.3 -> (局域网)
202.38.73.217 -> (node5)
202.38.96.189 -> (北京教育网)
210.45.112.254 -> (合肥教育网)
222.195.72.114 -> (snode2)
222.195.72.114 ->
202.38.96.188 ->(北京教育网)
202.38.73.254 ->(合肥教育网)
172.17.0.1

OpenVPN 3 linux client

apt install

First ensure that your apt supports the https transport:

1
# apt install apt-transport-https

Install the OpenVPN repository key used by the OpenVPN 3 Linux packages

1
# curl -x http://$proxy_addr:$proxy_http_port -fsSL https://swupdate.openvpn.net/repos/openvpn-repo-pkg-key.pub | gpg --dearmor > /etc/apt/trusted.gpg.d/openvpn-repo-pkg-keyring.gpg

Then you need to install the proper repository. Replace $DISTRO with the release name depending on your Debian/Ubuntu distribution.

1
2
# curl -x http://$proxy_addr:$proxy_http_port -fsSL https://swupdate.openvpn.net/community/openvpn3/repos/openvpn3-$DISTRO.list >/etc/apt/sources.list.d/openvpn3.list
# apt update

Supported distributions:

Distribution Release Release name ($DISTRO) Architecture DCO support
Ubuntu 20.04 focal amd64, arm64* yes*
Ubuntu 21.10 impish amd64, arm64* yes*
Ubuntu 22.04 jammy amd64, arm64* yes*

And finally the openvpn3 package can be installed

1
# apt install openvpn3

apt需要代理看 apt-get install proxy

openvpn3使用

要提前保留ipv6, 没有设置“流量走当前机器”ssh会断联

Once you’ve moved the file to your Linux system, you can import it.

1
2
openvpn3 config-import --config ${client.ovpn}
Configuration imported. Configuration path: /net/openvpn/v3/configuration/1f475d5cx8d2fx4ef5x8feex25f2871f2642

You can start a new VPN session:

1
2
openvpn3 session-start --config ${client.ovpn}
Configuration imported. Configuration path: /net/openvpn/v3/configuration/1f475d5cx8d2fx4ef5x8feex25f2871f2642

You can manage a running VPN session:

1
2
3
4
5
6
7
8
9
10
11
12
13
14
15
openvpn3 sessions-list
-----------------------------------------------------------------------------
Path: /net/openvpn/v3/sessions/f83c75e4sd56cs4b27s85bcsc5c6e3ce074e
Created: Thu Oct 6 20:37:29 2022 PID: 1034954
Owner: shaojiemike Device: tun1
Config name: node5-client.ovpn
Session name: snode6.swangeese.fun
Status: Connection, Client connected
-----------------------------------------------------------------------------

$ openvpn3 session-manage
session-manage: ** ERROR ** One of --pause, --resume, --restart, --disconnect, --cleanup or --log-level must be present

$ openvpn3 session-manage --pause -c node5-client.ovpn
Initiated session pause: /net/openvpn/v3/sessions/f83c75e4sd56cs4b27s85bcsc5c6e3ce074e

需要进一步的研究学习

netplan 的 rule from to table

ip route

ip rule指令学习

iptables

遇到的问题

暂无

开题缘由、总结、反思、吐槽~~

参考文献

基于kylemanna/docker-openvpn

https://openvpn.net/vpn-server-resources/connecting-to-access-server-with-linux/

Clash on LAN/linux/Dockers

导言

在国内的linux服务器上,往往需要clash来代理访问github等外网资源。

有几种解决方案:

  1. 透明代理
  2. ssh 转发实现代理,类似ssh -fNgR 7333:127.0.0.1:7890 [email protected]
  3. Clash 的 Allow LAN功能
  4. Clash in Docker
  5. Clash in Linux

Clash的模式

  • 系统代理模式:只代理127.0.0.1:7890上的数据
  • TUN代理模式:虚拟网卡,并接管所有的网络层的数据
    • 无法封装网络层数据包,无法代理ping, fake-ip还会返回假ip
    • TUN与TAP是操作系统内核中的虚拟网络设备:
      • TAP等同于一个以太网设备,它操作第二层数据包如以太网数据帧。
      • TUN模拟了网络层设备,操作第三层数据包比如IP数据包。
  • 舍弃的redir-host模式由于必须返回一个真实ip,因此必需发起dns请求,存在dns泄露
  • 默认的fake-ip会对域名的DNS请求返回fake-ip,从而避免DNS泄露。然后根据域名分流将信包发送到对应的上游代理机器,把域名DNS解析工作留给上游机器。
    • fake-ip模式,将fake-ip-filter设置为+.*便等价于redir-host模式

Clash的配置文件

1
2
3
4
5
6
7
8
9
10
11
12
13
14
15
16
17
18
19
20
21
22
23
24
25
26
27
28
29
30
31
32
33
34
35
36
37
38
39
40
41
42
43
44
45
46
47
48
49
50
51
52
53
54
55
56
57
58
59
60
61
62
63
64
# RESTful web API listening address
external-controller: 127.0.0.1:9090


# DNS server settings
# This section is optional. When not present, the DNS server will be disabled.
dns:
enable: false
listen: 0.0.0.0:53
ipv6: false # when the false, response to AAAA questions will be empty

# These nameservers are used to resolve the DNS nameserver hostnames below.
# 默认只支持ip
default-nameserver:
- 8.8.8.8

# 对于下面的域名,fake-ip模式会返回真实ip
fake-ip-filter:
- '*.lan'
- localhost.ptlogin2.qq.com

# 支持 UDP, TCP, DoT, DoH. 和指定端口
# 所有DNS请求都会不经过代理被转发到这些服务器,Clash会选择一个最快的返回结果
nameserver:
- https://223.5.5.5/dns-query # 阿里云
- https://doh.pub/dns-query #腾讯云
- tls://dns.rubyfish.cn:853 # DNS over TLS
- https://1.1.1.1/dns-query # DNS over HTTPS
- dhcp://en0 # dns from dhcp

# 对于所有DNS请求,fallback和nameserver内的服务器都会同时查找
# 如果DNS结果为非国内IP(GEOIP country is not `CN`),会使用fallback内的服务器的结果
# 因为nameserver内为国内服务器,对国外域名可能有DNS污染。fallback内是国外服务器,能防止国外域名被DNS污染
fallback:
- https://162.159.36.1/dns-query
- https://dns.google/dns-query
- tls://8.8.8.8:853

# DNS污染攻击的对策
fallback-filter:
geoip: false # If geoip is true, when geoip matches geoip-code, clash will use nameserver results. Otherwise, Clash will only use fallback results.
# geoip-code: CN
ipcidr: # IPs in these subnets will be considered polluted, when nameserver results match these ip, clash will use fallback results.
- 0.0.0.0/8
- 10.0.0.0/8
- 100.64.0.0/10
- 127.0.0.0/8
- 169.254.0.0/16
- 172.16.0.0/12
- 192.0.0.0/24
- 192.0.2.0/24
- 192.88.99.0/24
- 192.168.0.0/16
- 198.18.0.0/15
- 198.51.100.0/24
- 203.0.113.0/24
- 224.0.0.0/4
- 240.0.0.0/4
- 255.255.255.255/32
domain: #Domains in these list will be considered polluted, when lookup these domains, clash will use fallback results.
- +.google.com
- +.facebook.com
- +.youtube.com
- +.githubusercontent.com

Clash use Allow LAN

假如服务器和笔记本在LAN下,笔记本的clash软件只需要打开LAN就可以给服务器代理了,是最简单方便的方式。

Clash in Docker

由于UGREEN NAS一直开机,作为代理节点很适合。

首先注意修改代理机场的文件config.yaml0.0.0.0:9090,以便haishanh/yacd使用。

1
2
3
4
5
6
mixed-port: 7890
allow-lan: true
bind-address: '*'
mode: rule
log-level: info
external-controller: '0.0.0.0:9090'
  • 使用dreamacro/clash^1
  • UI使用haishanh/yacd

Clash in Linux

下载

下载可执行文件

1
2
3
4
wget https://github.com/Dreamacro/clash/releases/download/v1.11.8/clash-linux-amd64-v1.11.8.gz
scp
gunzip clash-linux-amd64-v1.11.8.gz
chmod u+x clash-linux-amd64-v1.11.8
  • Clash 运行时需要 Country.mmdb 文件,Country.mmdb 文件利用 GeoIP2 服务能识别互联网用户的地点位置,以供规则分流时使用。
  • 当第一次启动 Clash 时(使用 ./clash 命令) 会自动下载(会下载至 /home/XXX/.config/clash 文件夹下)。自动下载可能会因网络原因较慢,可以访问该链接手动下载。

配置

根据订阅链接配置文件

1
2
cd ~/.config/clash
curl -o config.yaml 'longURL'

验证

成功结果

1
2
3
4
5
6
7
8
9
10
11
12
13
14
15
16
# shaojiemike @ node6 in ~/Download [10:22:54] C:130       
$set_proxy

# shaojiemike @ node6 in ~/Download [10:22:57]
$ curl -v www.google.com

# shaojiemike @ node6 in ~/Download [10:21:46]
$ ./clash-linux-amd64-v1.11.8
INFO[0000] Start initial compatible provider 🍃 Proxies
INFO[0000] Start initial compatible provider ☁️ Others
INFO[0000] Start initial compatible provider 🍂 Domestic
INFO[0000] Start initial compatible provider ⭐️ Auto
INFO[0000] Mixed(http+socks) proxy listening at: [::]:7890
INFO[0000] RESTful API listening at: [::]:9090
INFO[0000] DNS server listening at: [::]:5323
INFO[0070] [TCP] 127.0.0.1:52664 --> www.google.com:80 match DomainKeyword(google) using 🍃 Proxies[专线 日本 03]

图形化界面管理

http://clash.razord.top/#/proxies

输入

1
2
3
Host: node6.swangeese.fun
Port: 9090
Secret: 配置文件配置的 secret

查看config.yaml,发现是空

1
2
3
4
5
6
mixed-port: 7890                                      
allow-lan: true
mode: rule
log-level: info
external-controller: '0.0.0.0:9090'
secret: ''

常见问题

address already in use

1
2
3
4
5
6
7
8
9
# shaojiemike @ node6 in ~/Download [10:14:25]
$ ./clash-linux-amd64-v1.11.8
INFO[0000] Start initial compatible provider ⭐️ Auto
INFO[0000] Start initial compatible provider 🍃 Proxies
INFO[0000] Start initial compatible provider ☁️ Others
INFO[0000] Start initial compatible provider 🍂 Domestic
INFO[0000] RESTful API listening at: [::]:9090
INFO[0000] Mixed(http+socks) proxy listening at: [::]:7890
ERRO[0000] Start DNS server error: listen udp 0.0.0.0:5353: bind: address already in use

修改配置文件里的端口即可

参考文献

[^2]: Docker 安装 Clash 并对外提供代理服务

https://blog.iswiftai.com/posts/clash-linux/

https://einverne.github.io/post/2021/03/linux-use-clash.html