Git Standardization

workflow

内容模板

隐藏文件夹 .github , 里面放两个文件:

ISSUE_TEMPLATE.md

PULL_REQUEST_TEMPLATE.md

分支模型

Git Flow 分支模型

仓库有两个基础分支:

dev(默认分支)
master(用于发布)

通过pull request来合并新的代码:

协作者的代码通过pr合并到dev
dev通过pr合并到master

注意点:

merge 到 dev,使用squash merge
merge 到 master,使用普通的merge
永远不向master直接commit代码

GitHub Flow 分支模型

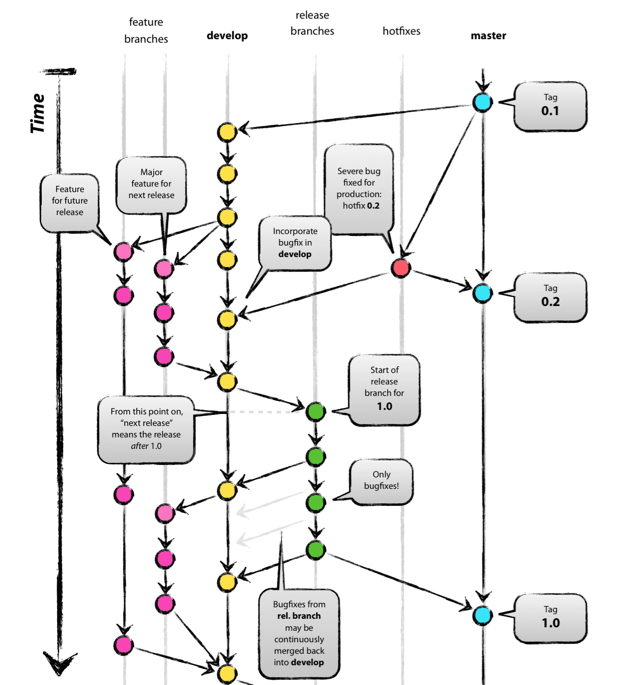
只有一个长期分支 master ,而且 master 分支上的代码,永远是可发布状态,

CI(Continuous Integration)集成

netlify

to do

github action

github自带的,貌似比Travis CI好用

ctest 怎么写

自动化生成TOC 目录

可以使用 toc-generator

  1. 在README里配置插入TOC的位置
1
2
<!-- START doctoc -->
<!-- END doctoc -->
  1. 配置GitHub Action, 需要在仓库的Settings > Actions > General里的Workflow permissions开启Read and write permissions
1
2
3
4
5
6
7
8
9
10
11
12
13
14
name: Generate TOC
on:
push:
branches:
- main

jobs:
toc:
runs-on: ubuntu-latest
steps:
- uses: actions/checkout@v2
- uses: technote-space/toc-generator@v4
with:
GITHUB_TOKEN: ${{ secrets.GITHUB_TOKEN }}

travis ci

Travis CI 提供的是持续集成服务(Continuous Integration,简称 CI)。它绑定 Github 上面的项目,只要有新的代码,就会自动抓取。然后,提供一个运行环境,执行测试,完成构建,还能部署到服务器。

持续集成的好处在于,每次代码的小幅变更,就能看到运行结果,从而不断累积小的变更,而不是在开发周期结束时,一下子合并一大块代码。

  1. 使用准备

    1. 登录 https://app.travis-ci.com/ ,绑定github,选择监听仓库.
    2. 项目里面有可运行的代码,项目还包含构建或测试脚本
  2. .travis.yml

    1. 在项目根目录下新建 .travis.yml 文件。参考官方文档编写 https://docs.travis-ci.com/user/languages/cpp/
  3. 运行流程

    1. install 阶段:安装依赖
    2. script 阶段:运行脚本
  4. 可选部分

    1
    2
    3
    4
    5
    6
    7
    before_install:install 阶段之前执行
    before_script:script 阶段之前执行
    after_failure:script 阶段失败时执行
    after_success:script 阶段成功时执行
    before_deploy:deploy 步骤之前执行
    after_deploy:deploy 步骤之后执行
    after_script:script 阶段之后执行
  5. 运行状态

    1
    2
    3
    4
    passed:运行成功,所有步骤的退出码都是0
    canceled:用户取消执行
    errored:before_install、install、before_script有非零退出码,运行会立即停止
    failed :script有非零状态码 ,会继续运行
  6. 可选加密环境变量

git commit 规范

Angular规范

1
<type>(<scope>): <subject>

type 必须

name description 实例
feat: 新功能(feature)。 打印函数 feat: Add print function for enhanced runtime information
fix/to: 修复bug,可以是QA发现的BUG,也可以是研发自己发现的BUG。
fix: 产生diff并自动修复此问题。适合于一次提交直接修复问题
to: 只产生diff不自动修复此问题。适合于多次提交。最终修复问题提交时使用fix
docs: 文档(documentation)。
style: 格式(不影响代码运行的变动)。
refactor: 重构(即不是新增功能,也不是修改bug的代码变动)。
perf: 优化相关,比如提升性能、体验。
test: 增加测试。
chore: 构建过程或辅助工具的变动。
revert: 回滚到上一个版本。
merge: 代码合并。
sync: 同步主线或分支的Bug。

规范化commit message

格式为:

1
2
3
4
5
<type>(<scope>): <subject>
<BLANK LINE>
<body>
<BLANK LINE>
<footer>
  1. 对于Revert:
    If the commit reverts a previous commit, it should begin with revert:, followed by the header of the reverted commit. In the body it should say: This reverts commit <hash>., where the hash is the SHA of the commit being reverted.
  2. type的类型有:
  • feat: A new feature
  • fix: A bug fix
  • docs: Documentation only changes
  • style: Changes that do not affect the meaning of the code (white-space, formatting, missing semi-colons, etc)空白、格式、缺少分号等
  • refactor:(重构) A code change that neither fixes a bug nor adds a feature
  • perf: A code change that improves performance
  • test: Adding missing or correcting existing tests
  • chore: (琐事)Changes to the build process or auxiliary tools(辅助工具) and libraries such as documentation generation
  1. scope:
    commit 改变的位置,如果是多处写*
  2. subject:
    简明的描述:
    1. 使用祈使句,现在时态
    2. 不要.结尾
    3. 第一个字母不要大写
  3. body:
    包括改变的动机,并将其与以前的行为进行对比。
  4. footer:
    Breaking Changes或者reference GitHub issues that this commit closes.
    Breaking Changes should start with the wordBREAKING CHANGE: with a space or two newlines. The rest of the commit message is then used for this.

自动生成Release Notes

规范化commit

插件 vscode插件git-commit-plugin

命令行 husky + commitlint

工具

  1. Standard Version

    1. 实现自动化版本控制,自动创建changelog, 创建 git tags
    2. 安装
    1
    2
    3
    4
    5
    6
    7
    8
    9
    10
    11
    npm cache clean --force #npm指令清除npm缓存
    # 删除node_module包
    npm install -g npm # npm 更新到最新
    npm install -g n
    n latest # node 更新
    Note: the node command changed location and the old location may be remembered in your current shell.
    old : /usr/bin/node
    new : /usr/local/bin/node
    To reset the command location hash either start a new shell, or execute PATH=$PATH"
    PATH=/usr/local/bin/:$PATH
    npm install -D standard-version
    1. 编写package.json
    1
    2
    3
    "scripts": {
    "release": "standard-version"
    }
    1. CHANGELOG.md 记录内容的配置

      1. 创建.versionrc
      1
      2
      3
      4
      5
      6
      7
      8
      9
      10
      11
      12
      13
      14
      15
      16
      {
      "types": [
      {"type": "chore", "section":"Others", "hidden": false},
      {"type": "revert", "section":"Reverts", "hidden": false},
      {"type": "feat", "section": "Features", "hidden": false},
      {"type": "fix", "section": "Bug Fixes", "hidden": false},
      {"type": "improvement", "section": "Feature Improvements", "hidden": false},
      {"type": "docs", "section":"Docs", "hidden": false},
      {"type": "style", "section":"Styling", "hidden": false},
      {"type": "refactor", "section":"Code Refactoring", "hidden": false},
      {"type": "perf", "section":"Performance Improvements", "hidden": false},
      {"type": "test", "section":"Tests", "hidden": false},
      {"type": "build", "section":"Build System", "hidden": false},
      {"type": "ci", "section":"CI", "hidden":false}
      ]
      }
    2. 使用Standard Version

    1
    2
    3
    4
    // 初次发布版本
    npm run release --first-release
    npm run release #(自动更新版本号,自动更新 CHANGELOG.md, 自动创建 git tag)
    git push --follow-tags origin master
    1. 寄
  2. Commitizen for contributors

    1. Linux下commit规范辅助,用来选择(没vscode的时候用)
    2. 用 git-cz 来提交文件
    3. https://www.jianshu.com/p/acfdd4ca0104
  3. Visual Studio Code Commitizen Support
    vscode的插件

  4. conventional-changelog/commitlint
    阻止不规范的提交

github-release-notes

github-release-notes,以下简称 gren ,是用来一键向 github 发布 release notes 的工具。
https://zhuanlan.zhihu.com/p/99499246

https://blog.csdn.net/weixin_39586683/article/details/110643111

release 语义化版本 semver

版本格式:主版本号.次版本号.修订号,版本号递增规则如下:

主版本号:当你做了不兼容的 API 修改,
次版本号:当你做了向下兼容的功能性新增,
修订号:当你做了向下兼容的问题修正。
先行版本号及版本编译信息可以加到“主版本号.次版本号.修订号”的后面,作为延伸。

Git auto-release requirements

  1. github Actions / travis-ci
    1. 自动化测试
  2. Commitizen / Visual Studio Code Commitizen Support
    1. 规范commit message
  3. standard-version
    1. 更新 package 版本并打 tag
  4. github-release-notes
    1. 生成 release-log

需要进一步的研究学习

写个github模板

  1. 明确文件结构
    1. src/include/build/Doc/Debug/test/example
  2. 清晰的README
    1. Intro/Install&Run/Features/Bugs/Acknowledge
    2. 图片和标签
      1. https://shields.io/category/build
  3. Release的自动发布
    1. 规范commit
  4. 其他自动化的轮子持续整合 (Continuous Integration, CI)
    1. travis ci
    2. github action
      1. ctest 怎么写?
    3. cmake.yml
    4. .github/workflow
      1. https://github.com/iBug/AWS-Lambda-webhook-py/tree/master/.github/workflows
      2. https://github.com/Kirrito-k423/github-stats
    5. 文档生成
      1. doxygen
      2. Doxygen主要解决说明书问题,可以在我们写代码的时候讲注释转化为说明书,Graphviz主要是用于图形展示
      3. 有项目,文件,函数三部分的书写要求 https://www.cnblogs.com/silencehuan/p/11169084.html
    6. Codecov
      1. 代码覆盖率,执行部分占比。因为未执行部分可能是错的
  5. projects/ bug fixs
  6. 设置为 template repository
  7. 查看 https://app.travis-ci.com/github/Kirrito-k423/githubTemplate

plus

将网站变成带名字的md格式参考文献的插件

Boost 设置

set(Boost_USE_STATIC_LIBS ON)

set(Boost_DEBUG ON)

Boost_INCLUDE_DIR: 含有boost头文件的目录
Boost_LIBRARYDIR: 偏好的含有boost库的库目录

https://stackoverflow.com/questions/3897839/how-to-link-c-program-with-boost-using-cmake

Boost Install

http://c.biancheng.net/view/7772.html cache?

cmake boost install path

https://cloud.tencent.com/developer/ask/107360

设置boost-root 查看安装位置

Travis-CI Install

Travis-CI 依赖软件包每次都要重新安装吗

apt-get install in a GitHub Actions workflow

https://stackoverflow.com/questions/57982945/how-to-apt-get-install-in-a-github-actions-workflow

Actions may have no Boost, where

ctest

Ctest add build/bin to test

Ctest https://www.cnblogs.com/hustcpp/p/12922998.html

https://blog.csdn.net/zcteo/article/details/117527823?utm_medium=distribute.pc_relevant.none-task-blog-2%7Edefault%7EOPENSEARCH%7Edefault-15.no_search_link&depth_1-utm_source=distribute.pc_relevant.none-task-blog-2%7Edefault%7EOPENSEARCH%7Edefault-15.no_search_link

遇到的问题

暂无

开题缘由、总结、反思、吐槽~~

还是ipcc的github组织的太烂了,需要学习一下

参考文献

https://zhuanlan.zhihu.com/p/67620599

http://www.ruanyifeng.com/blog/2017/12/travis_ci_tutorial.html

https://github.com/levy9527/blog/issues/1

Git Push 2 Homepage

ibug的网站部署思路

  1. 基于ibug.github.io
  2. 图片markdown两个仓库
  3. 对于acsa的网站
    1. 设置了action产生public/*.html
    2. 通过webhook来实现,服务器接收仓库的event信息。
      1. acsa的nginx接收location转发snode5
      2. snode5的nginx转发到127.0.0.2:9000上
      3. webhook.service接收到信息,然后git clone。并返回信息

hugo网站的action文件

根据公开的仓库,hugo的html文件会产生在gh-pages分支下

1
2
3
4
5
6
7
8
9
10
11
12
13
14
15
16
17
18
19
20
21
22
23
24
25
26
27
28
29
30
name: build

on:
push:
branches: [master]

jobs:
build:
runs-on: ubuntu-latest
steps:
- uses: actions/checkout@v2
with:
#submodules: true # Fetch Hugo themes (true OR recursive)
fetch-depth: 0 # Fetch all history for .GitInfo and .Lastmod

- name: Setup Hugo
uses: peaceiris/actions-hugo@v2
with:
hugo-version: 'latest'
#extended: true

- name: Build
run: hugo --minify

- name: Deploy
uses: peaceiris/actions-gh-pages@v3
if: github.ref == 'refs/heads/master'
with:
github_token: ${{ secrets.GITHUB_TOKEN }}
publish_dir: ./public

webhook的实现

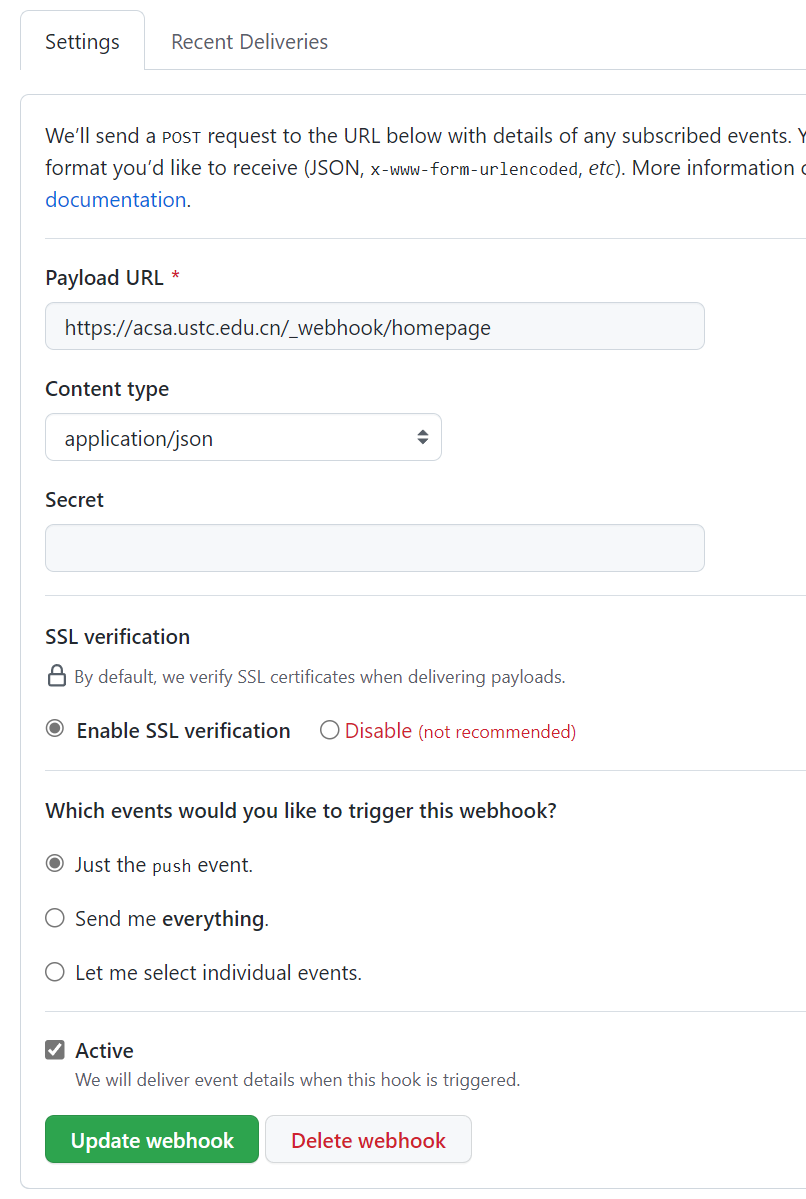
接收端转发到内网的机器上(通过修改vim /etc/nginx/sites-enabled/default

1
2
3
4
5
6
server{
location /_webhook/ {
proxy_pass http://snode5.swangeese.fun;
proxy_set_header Host $http_host;
}
}

记得reload systemctl reload nginx

Nginx中location的作用是根据Url来决定怎么处理用户请求(转发请求给其他服务器处理或者查找本地文件进行处理)。location支持正则表达式,配置十分灵活。我们可以在一个虚拟主机(nginx中的一个server节点)下配置多个location以满足如动静分离,防盗链等需求。

在snode5上nginx也需要转发

1
2
3
location /_webhook/ {
proxy_pass http://127.0.0.2:9000;
}

需要进一步的研究学习

暂无

遇到的问题

暂无

开题缘由、总结、反思、吐槽~~

参考文献

Git Lfs

安装

1
2
3
4
mkdir git-lfs | cd git-lfs 
wget https://github.com/git-lfs/git-lfs/releases/tag/v2.13.3
tar -zxvf git
sudo ./install.sh

使用

1
2
3
4
5
git lfs install
git lfs track “*.rar” # 这个是要指定的大文件
git lfs track "*.txt" # 对一批,然后正常add commit
git add .gitattributes # 关联这个文件
git commit -m “aaa”

git 恢复

  • 工作区修改了文件(add之前),但是发现文件是你不想修改的,或者修改错误的,执行git checkout - 文件名,在工作区把文件恢复到修改之前的状态;

  • 工作区修改了文件,并且已经添加到缓存区(add之后,承之前),执行git reset HEAD文件名(HEAD表示最新的版本),此操作是把缓存区修改的内容返回到工作区,如果此时你还是不想修改此文件的话,就再次执行第一步操作,就可以恢复到文件修改前的状态;

  • 已经把文件提交给了分支(commit之后,推之前),执行git reset - hard HEAD ^(HEAD ^表示上一个版本),或者先用git log查看已经提交的版本号,执行git reset - -hard版本号的ID,就可以恢复到之前的版本,此时工作区和缓存区也是干净的;

  • 推的时候忽略文件的操作:(忽略大文件操作.gitignore不好使的时候),在commit提交之后push推之前,输入命令:

    1
    2
    3
    4
    5
    git filter-branch --force --index-filter "git rm --cached --ignore-unmatch 有关文件"  --prune-empty --tag-name-filter cat -- --all # 如果git提示包含未提交的更改,需要再提交一下

    git commit --amend -CHEAD # 这个文件将会从你的提交记录里移除,并且以后commit都将不会再提交

    git push

需要进一步的研究学习

暂无

遇到的问题

很搞笑的是node5的IPCC/SLIC我就是弄不好,明明是按照步骤来的。

开题缘由、总结、反思、吐槽~~

大于100MB的文件上传不了github

参考文献