Wireguard Server 2 Server in OpenWRT
Read more
linux下通过按照如下修改.ssh/config设置账号密码,并 ssh -vT [email protected],成功后输出Hi Kirrito-k423! You've successfully authenticated, but GitHub does not provide shell access.。
1 | # .ssh/config |
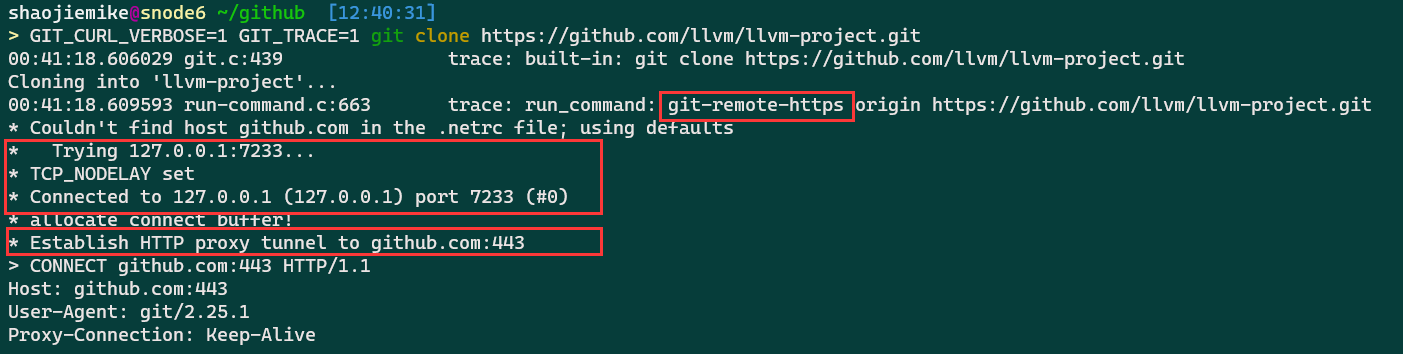
There are tons of identical solutions over the internet for defining proxy tunnel for git’s downloads like this one, which all is by setting git’s https.proxy & http.proxy config. but those answers are not working when you try to clone/push/pull etc. over the ssh protocol!
For example, by setting git config --global https.proxy socks5://127.0.0.1:9999 when you try to clone git clone [email protected]:user/repo.git it does not go through the defined sock5 tunnel!
1 | # Method 1. git http + proxy http |
%h %p 是host和post的意思
或者
After some visiting so many pages, I finally find the solution to my question:
1 | [step 1] create a ssh-proxy |
To install connect on Ubuntu:
1 | sudo apt install connect-proxy |
1 | ssh -vT -o "ProxyCommand connect -S 127.0.0.1:7890 %h %p" [email protected] |
post request forward is an all-in-one solution.
1 | interface: warp |
latest handshake: 89 days ago demonstrate wg is done for a long time. At the same time mtr github.com shows no output prove the bad situation.
STEP1: first try is to bring the wg-proxy up again
1 | python register.py #自动生成warp-op.conf,warp.conf和warp-helper |
and test brainiac machine is back online
Sometimes,it‘s the big log fault.
1 | # find file |
1 | t00906153@A2305023964 MINGW64 ~/github |

> nc -z -v -u 4.shaojiemike.top 51822,wg是udpAllowedIPs = 192.168.31.0/24,10.0.233.1/24.然后ping 192.168.31.1测试配置详解参考中文文档
[peer]里设定字段 PersistentKeepalive = 25,表示每隔 25 秒发送一次 ping 来检查连接。虽然AllowedIPs = 0.0.0.0/0与AllowedIPs = 0.0.0.0/1, 128.0.0.0/1包含的都是全部的ip。
但是前者在iptable里为default dev wg1,后者为两条0.0.0.0/1 dev wg1和128.0.0.0/1 dev wg1。
由于路由的ip匹配遵循最长前缀匹配规则,如果路由表里原本有一条efault dev eth0。使用前者会导致混乱。但是使用后者,由于两条的优先级会更高,会屏蔽掉原本的default规则。
前者的iptable修改如下:(macbook上)
1 | > ip route |
后者的iptable修改如下
1 | > ip route |
建议看WireGuard 教程:WireGuard 的工作原理 和WireGuard 基础教程:wg-quick 路由策略解读,详细解释了wg是如何修改路由表规则的。
默认会产生51840的路由table,ip rule优先级较高。可以通过配置文件中添加PostUp来修改最后一个default的路由规则。
1 | root@snode6:/etc/wireguard# cat wg0.conf |
PostUp会产生下面的规则
1 | root@snode6:/staff/shaojiemike# ip ro show table default |
OpenVPN原理通过在main添加all规则来实现
1 | # shaojiemike @ node5 in ~ [22:29:05] |
Macbook上的应用上的ClashX Pro的增强模式类似, 会添加如下配置,将基本所有流量代理(除开0.0.0.0/8)
1 | > ip route |
明显有代理死循环问题,如何解决???
1 | shaojiemike@shaojiemikedeMacBook-Air ~/github/hugoMinos (main*) [10:59:32] |
wireguard-go: 安装客户端 wg-quick up config
wireguard-tools: 安装服务端 wg
wg-quick up wg1wg-quick down wg1wg显示全部,或者wg show wg1显示wg11 | systemctl enable wg-quick@wg1 --now |
fd00::aaaa:5/128、1 | brainiac1# cat wg-tsj.conf |
修改sysctl.conf文件的net.ipv4.ip_forward参数。其值为0,说明禁止进行IP转发;如果是1,则说明IP转发功能已经打开。
需要执行指令sysctl -p 后新的配置才会生效。
注意中间需要NAT转换, 相当于把kunpeng机器的请求,隐藏成snode6的请求。在后一次wireguard转发时,就不会被过滤掉。
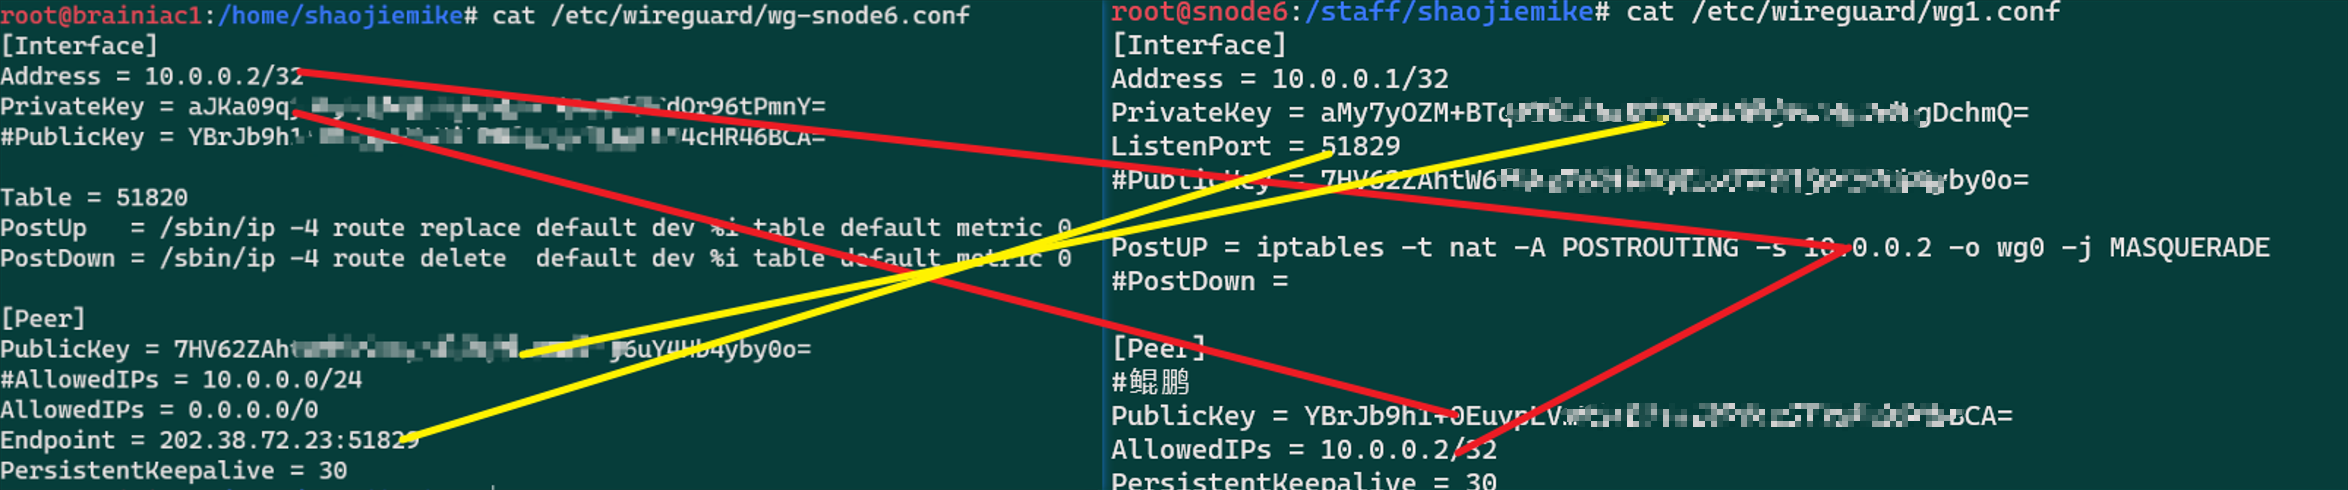
1 | PostUp = iptables -t nat -A POSTROUTING -s 10.1.0.0/24 ! -o %i -j MASQUERADE |
由于换了wg服务端,导致nas变成闭环的网络了。最后是通过群晖助手(Synology Assistant / Web Assistant)的设置静态ip才连接上机器,但是iptable被设置乱了。
静态连接上机器,首先在网页管理页面切换成DHCP(静态ip的DNS解析有误),iptable变成如下
1 | sh-4.4# ip ro |
注意iptable的修改是实时生效的。
为了让nas上网我们需要满足两点
1 | # 重要项如下 |
使用wg1配置如下:
1 | sh-4.4# cat /etc/wireguard/wg1.conf |
要保留没有wg的时候访问服务端的eth0(114.214.233.xxx)的通路
1 | sh-4.4# ip ro s t main |
目的:需要ssh和ping ipv4成功
修改netplan的配置文件
1 | # shaojiemike @ node5 in ~ [22:29:11] |
routing-policy会产生
1 | # shaojiemike @ node5 in ~ [22:30:33] |
由于2优先级高,使得ping和ssh的返回信包(源地址为自身机器IP的包)走table1 规则,而不是走
routes使得所有的table1都会走学校的路由器(202.38.73.254)
1 | $ ip route show table 1 |
开启wg后,网络请求源地址变成了10.0.33.2。不是202.38.73.217
1 | root@node5:/home/shaojiemike# ip ro |
但是外界ping的是202.38.73.217。返回包交换所以会产生源地址为202.38.73.217的包
暂无
暂无
WireGuard 基础教程:使用 Phantun 将 WireGuard 的 UDP 流量伪装成 TCP
原理在路由器的两个flash(firmware和firmware1)的两个系统里,写入一个支持图形化OpenWRT的新系统
查看系统型号[^1]:路由器默认是魔改的openwrt的系统:
1 | root@XiaoQiang:~# cat /etc/os-release |
刷入OpenWRT后:
1 | root@ax6s:~# cat /etc/os-release |
dropbear 是一种轻量级sshd服务
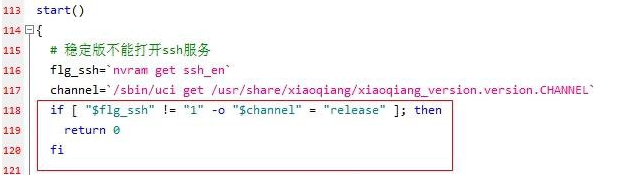
1 | nvram set ssh_en=1 # 不是1也退出1 |
修改/etc/dropbear/authorized_keys 来添加ssh公钥
修改/etc/opkg/distfeeds.conf的配置,参考
下面为x86软路由的源(由于是snapshot的安装不了,内核不匹配),如果是arm的需要看对应架构代号。
1 | src/gz openwrt_core https://mirrors.ustc.edu.cn/openwrt/releases/22.03.3/targets/x86/64/packages |
比如ax6s
1 | [root@ax6s ~]$ cat /etc/opkg/distfeeds.conf |
可以通过cat /etc/os-release查看, 上面的如下
1 | root@OpenWrt:~# cat /etc/os-release |
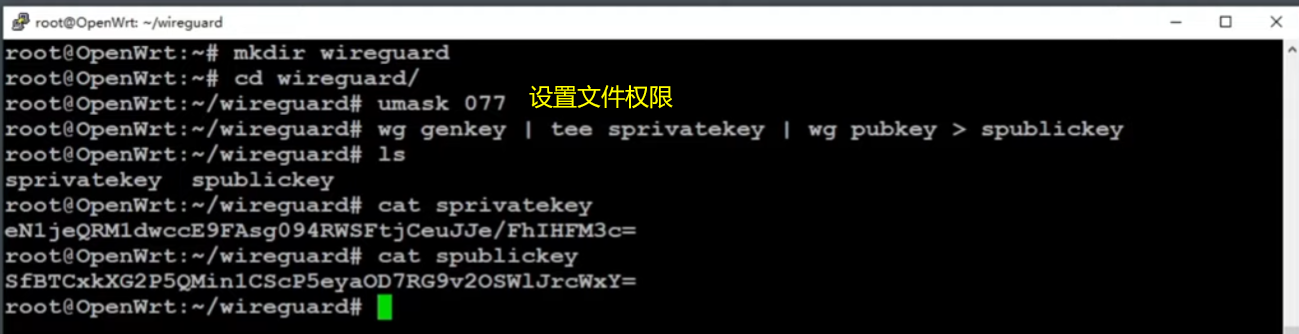
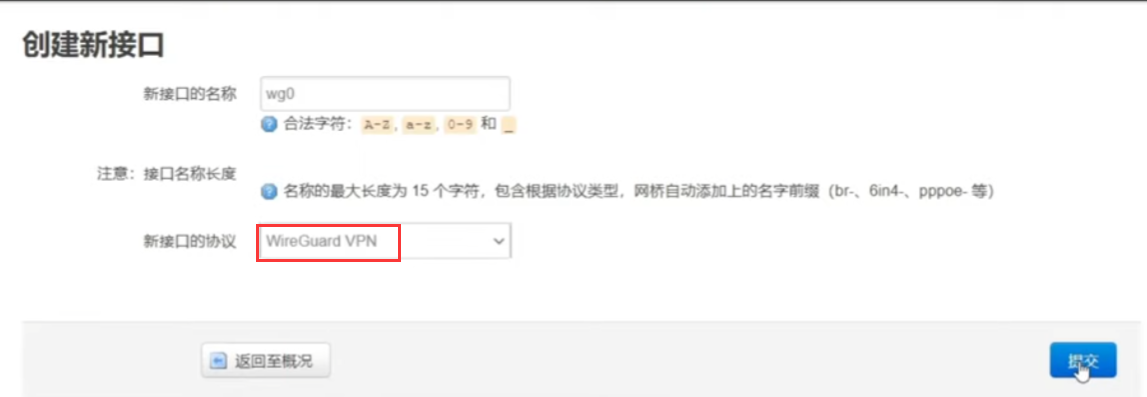
OpenWrt安装WireGuard命令(eSir精品小包已集成WireGuard,无需安装)
1 | opkg update |
客户端模板文件test.conf
1 | [Interface] |
"[Interface] Address" is the address that gets assigned to the (virtual) network interface (e.g. wg0).
简单来说客户端和服务器端约定的相同的虚拟地址来通信。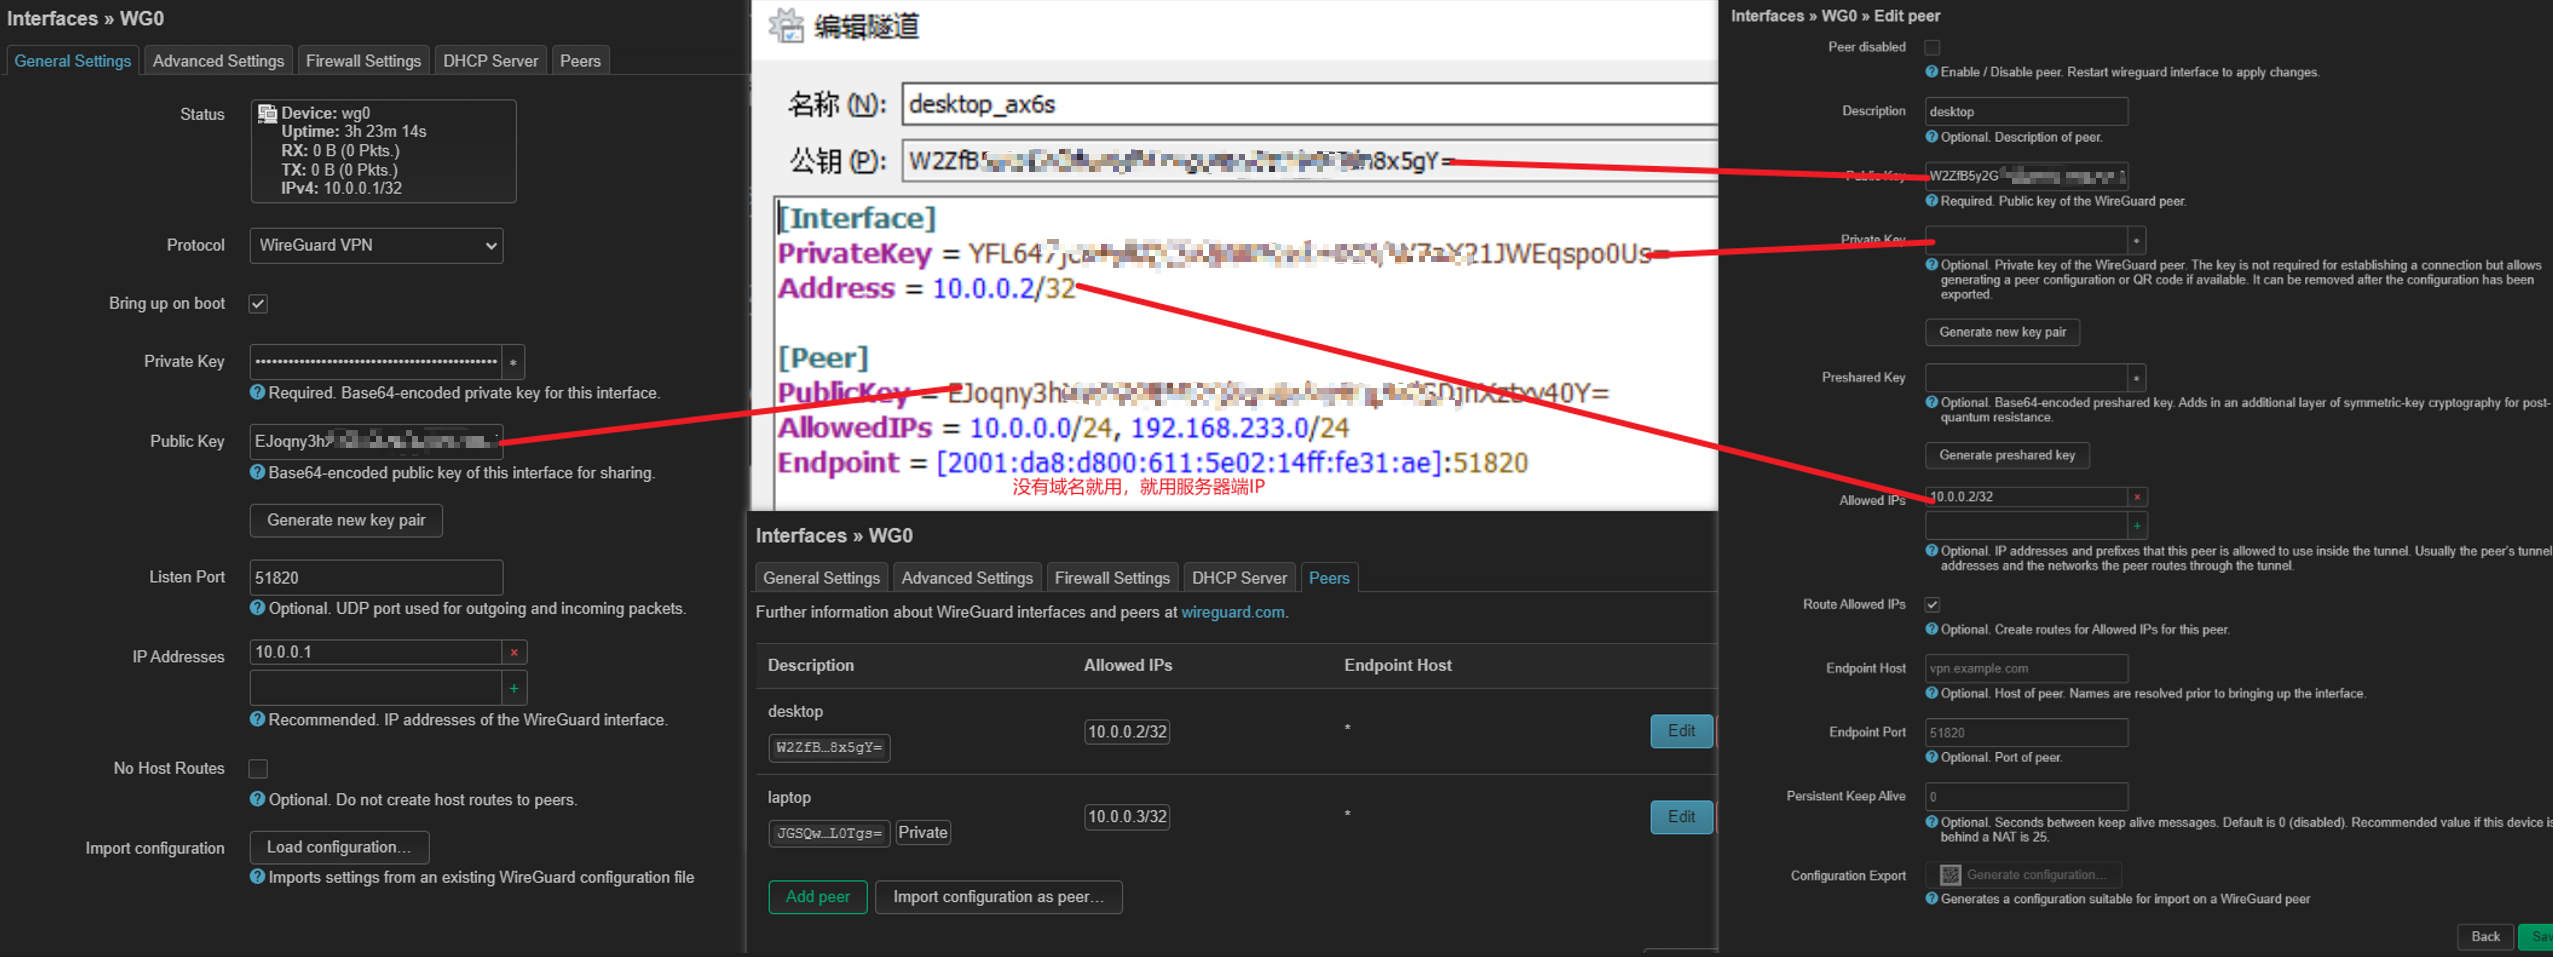
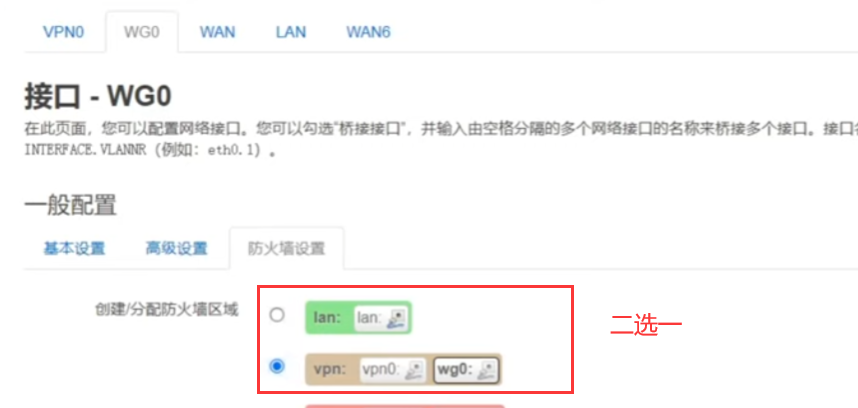
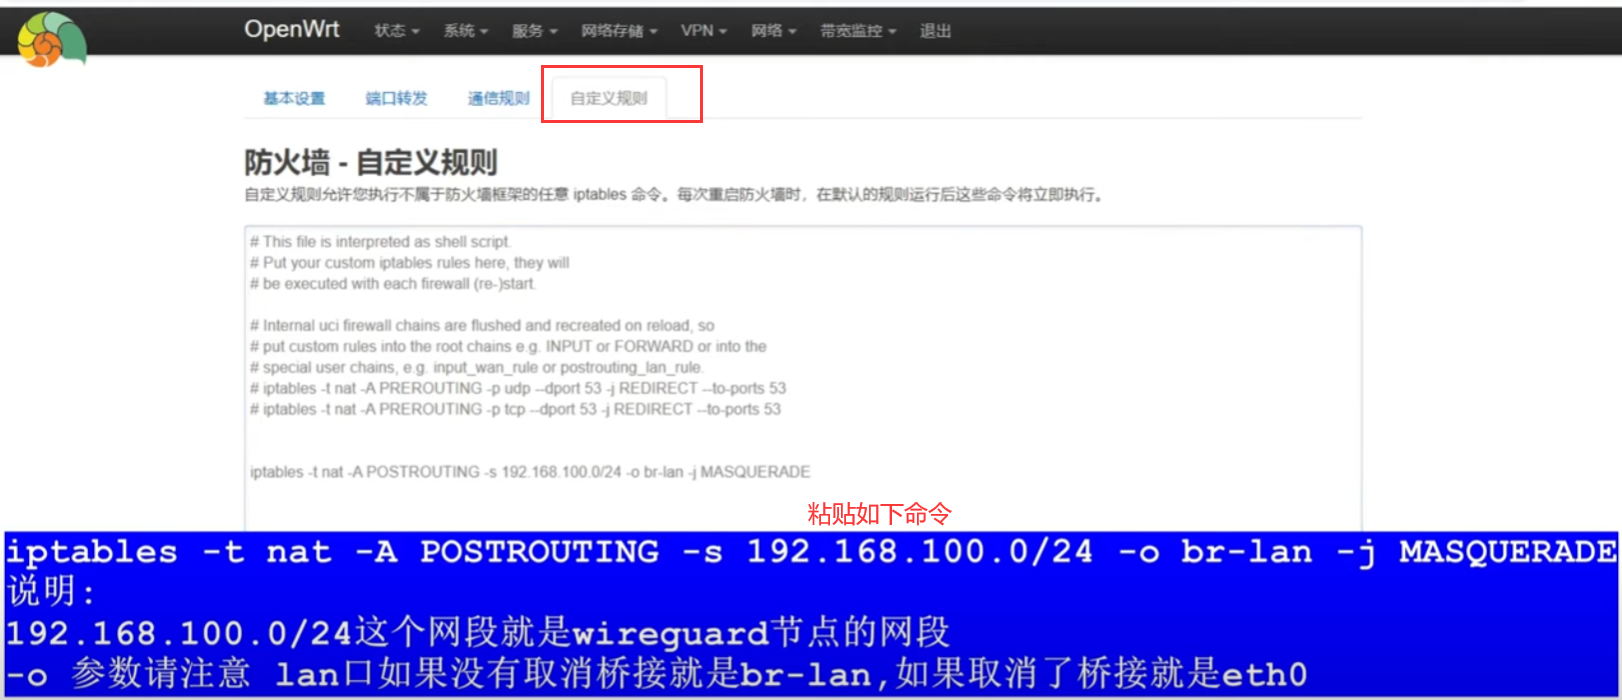
注意防火墙放行端口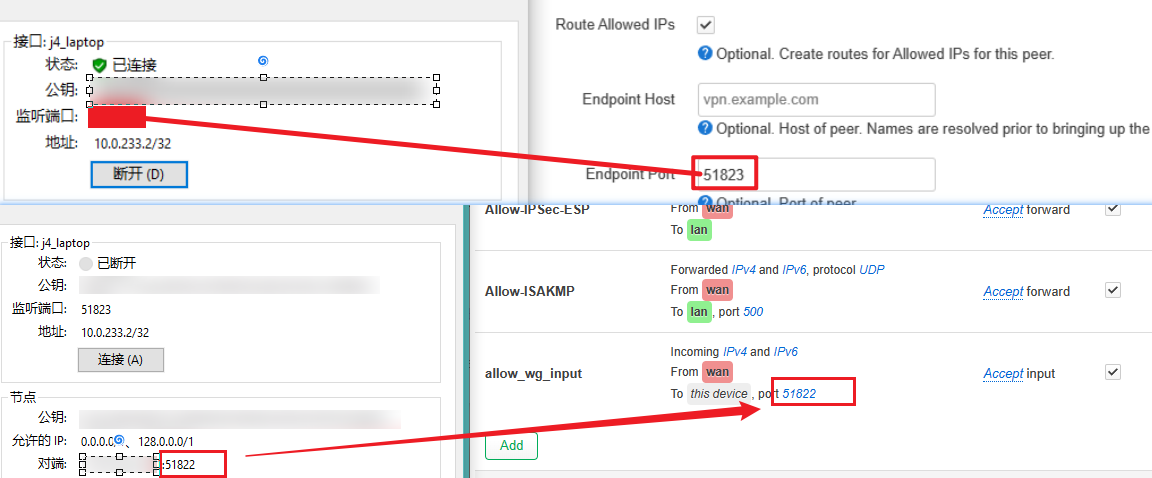
官方客户端软件下载
注意:如果连接不上
安装依赖
1 | #iptables |
重启后出现
注意不会代理ping,所以ping不通的话,可以用curl来测试代理是否生效。https失败可以尝试http
1 | Collected errors: |
解决办法如下
1 | opkg update |
Dynamic DNS: 根據網際網路的域名訂立規則,域名必須跟從固定的IP位址。但動態DNS系統為動態網域提供一個固定的名稱伺服器(Name server),透過即時更新,使外界使用者能夠連上動態使用者的網址。
cloudflare动态域名 或者阿里云动态域名的DDNS都是很好的选择。
1 | [root@ax6s ~]$ cat ddns.sh |
修改crontab -e
1 | PATH=/sbin:/bin:/usr/sbin:/usr/bin:/usr/local/sbin:/usr/local/bin |
脚本围绕,打印邻居路由表命令
1 | [root@ax6s ~]$ ip -6 neigh | grep 2c:f0:5d |
新建 /usr/lib/ddns/dynamic_dns_iphelper.sh
1 |
|
新建 /usr/lib/ddns/getip_demo.sh
1 |
|
脚本chmod +x就行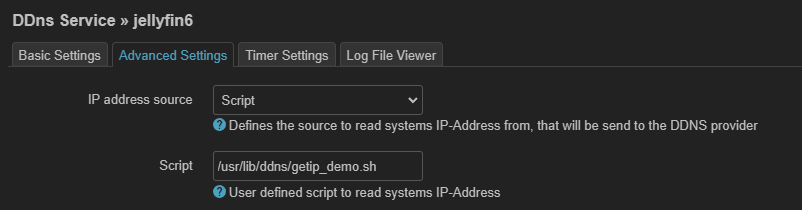
https://www.youtube.com/watch?v=F8z74oE71Gg&t=19s
https://xiumu.org/technology/openwrt-set-for-local-area-network-lan-equipment-ipv6-ddns.shtml