Pytorch 3 :Model & Training

导言

  • 构建复杂模型:学习如何构建更复杂的神经网络模型,如卷积神经网络(CNN)、循环神经网络(RNN)等。
  • 损失函数与优化器:理解不同的损失函数(如交叉熵、均方误差)和优化器(如SGD、Adam)。
  • 训练与验证:编写训练循环,理解如何监控训练过程,防止过拟合。
Read more

Pytorch 4 :Save & Load & Pretrain

导言

  • 保存与加载模型:学习如何保存训练好的模型,并在需要时加载模型进行推理或继续训练。
  • 迁移学习:学习如何使用预训练模型进行迁移学习,微调模型以适应新的任务。
  • 常用预训练模型:介绍PyTorch中常用的预训练模型,如ResNet、VGG等。
Read more

Cuda Program Basic

CUDA编程水平高低的不同,会导致几十上百倍的性能差距。但是这篇将聚焦于CUDA的编程语法,编译与运行。

Read more

Golang Syntax

为什么要学习go语言

  1. 同步方式轻松实现高并发,充分利用多核
  2. 基于消息传递的通信方式
  3. 适合服务器和网络编程
  4. 有垃圾回收机制
  5. 静态语言,有编译过程,和独立的静态可执行文件,只依赖glibc
    1. 不像python要安装各种库,java也要JRE
  6. 兼顾python的易开发性和c的性能
  7. 内存占用极小,支持10W+的并行

一些缺点

  1. 实际运行时,由于GC的影响,延迟会比较严重
  2. 代码会有很多重复的地方

有趣的工具

  1. gofmt
  2. gofix
  3. govet

数据类型

  • int8类型 表示 -128~127
  • Channel 类型
  • 切片类型 (可变长数组

变量声明

第一种,指定变量类型,如果没有初始化,则变量默认为零值

1
2
//var v_name v_type
var b, c int = 1, 2
1
2
3
4
5
6
7
//特殊
var a *int
var a []int
var a map[string] int
var a chan int
var a func(string) int
var a error // error 是接口

第二种,根据值自行判定变量类型。

1
2
//var v_name = value
var d = true

第三种,使用声明符号:=

但是如果变量已经使用 var 声明过了,再使用 := 声明变量,就产生编译错误,格式:

1
v_name := value

循环语句

1
2
3
for key, value := range oldMap {
newMap[key] = value
}

并发和通道通讯

go函数

Go 语言支持并发,我们只需要通过 go 关键字来开启 goroutine 即可。

goroutine 是轻量级线程,goroutine 的调度是由 Golang 运行时进行管理的。

goroutine 语法格式:go 函数名( 参数列表 )

Go 允许使用 go 语句开启一个新的运行期线程, 即 goroutine,以一个不同的、新创建的 goroutine 来执行一个函数。 同一个程序中的所有 goroutine 共享同一个地址空间。

通道(channel)

通道可用于两个 goroutine 之间通过传递一个指定类型的值来同步运行和通讯。操作符 <- 用于指定通道的方向,发送或接收。如果未指定方向,则为双向通道。

1
2
3
ch <- v    // 把 v 发送到通道 ch
v := <-ch // 从 ch 接收数据
// 并把值赋给 v

声明一个通道很简单,我们使用chan关键字即可,通道在使用前必须先创建:

1
ch := make(chan int)

example

1

1
2
3
4
5
6
7
8
9
10
11
12
13
func countGoodRectangles(rectangles [][]int) int {
cnt, maxLen := 0, 0
for _, rectangle := range rectangles {
k := int(math.Min(float64(rectangle[0]), float64(rectangle[1])))
if k == maxLen {
cnt++
}
if k > maxLen {
maxLen, cnt = k, 1
}
}
return cnt
}

webhook

https://github.com/swangeese/acsa-web/tree/webhook

需要进一步的研究学习

暂无

遇到的问题

暂无

开题缘由、总结、反思、吐槽~~

参考文献

https://www.runoob.com/go/go-concurrent.html

Go Install and Command

Install

1
2
3
4
5
6
wget https://go.dev/dl/go1.18.3.linux-amd64.tar.gz
rm -rf /usr/local/go && tar -C /usr/local -xzf go1.18.3.linux-amd64.tar.gz
(maybe need sudo)
sudo rm -rf /usr/local/go && sudo tar -C /usr/local -xzf go1.18.3.linux-amd64.tar.gz
export PATH=$PATH:/usr/local/go/bin
go version

Command usage

1
2
3
4
5
6
$ cd $HOME/go/src/hello
$ go run main.go #直接运行
Hello, World!!
$ go build # 产生可执行文件
$ ./hello
Hello, World!!

包管理

Packages

Go packages are folders that contain one more go files.

Modules

A modules (starting with vgo and go 1.11) is a versioned collection of packages.

1
2
go get github.co­m/a­nda­nhm­/go­-pr­ett­ytimee
go mod init github.co­m/a­nda­nhm­/go­-pr­ett­ytime

go list -m -u all 来检查可以升级的package,

使用go get -u need-upgrade-package 升级后会将新的依赖版本更新到go.mod

也可以使用 go get -u 升级所有依赖

作者:若与
链接:https://www.jianshu.com/p/760c97ff644c
来源:简书
著作权归作者所有。商业转载请联系作者获得授权,非商业转载请注明出处。

需要进一步的研究学习

暂无

遇到的问题

暂无

开题缘由、总结、反思、吐槽~~

参考文献

https://devhints.io/go

Go mod

简介

go modules 是 golang 1.11 新加的特性。现在1.12 已经发布了,是时候用起来了。Modules官方定义为:

模块是相关Go包的集合。modules是源代码交换和版本控制的单元。 go命令直接支持使用modules,包括记录和解析对其他模块的依赖性。modules替换旧的基于GOPATH的方法来指定在给定构建中使用哪些源文件。

使用

初始化项目

1
2
3
mkdir Gone
cd Gone
go mod init Gone

对应go.mod文件

1
2
module Gone
go 1.14

go.mod文件一旦创建后,它的内容将会被go toolchain全面掌控。

go toolchain会在各类命令执行时,比如go get、go build、go mod等修改和维护go.mod文件。

go.mod 提供了module, require、replace和exclude 四个命令

module 语句指定包的名字(路径)
require 语句指定的依赖项模块
replace 语句可以替换依赖项模块
exclude 语句可以忽略依赖项模块

自动添加依赖

对于main.go里的import

1
2
3
4
5
6
7
8
9
10
11
12
13
14
15
16
17
package main

import (
"crypto/hmac"
"crypto/sha1"
"encoding/hex"
"encoding/json"
"fmt"
"io/ioutil"
"log"
"net/http"
"os"
"os/exec"
"strings"
)

……

执行 go run main.go 运行代码会发现 go mod 会自动查找依赖自动下载,并修改go.mod(安装 package 的原則是先拉最新的 release tag,若无tag则拉最新的commit)

自己发布module包

结合github很简单实现

需要进一步的研究学习

暂无

遇到的问题

暂无

开题缘由、总结、反思、吐槽~~

参考文献

https://www.jianshu.com/p/760c97ff644c

Cuda Optimize : Vectorized Memory Access

baseline

1
2
3
4
5
6
7
8
9
10
11
12
13
__global__ void device_copy_scalar_kernel(int* d_in, int* d_out, int N) { 
int idx = blockIdx.x * blockDim.x + threadIdx.x;
for (int i = idx; i < N; i += blockDim.x * gridDim.x) {
d_out[i] = d_in[i];
}
}

void device_copy_scalar(int* d_in, int* d_out, int N)
{
int threads = 128;
int blocks = min((N + threads-1) / threads, MAX_BLOCKS);
device_copy_scalar_kernel<<<blocks, threads>>>(d_in, d_out, N);
}

简单的分块拷贝。

通过cuobjdump -sass executable.得到对应的标量copy对应的SASS代码

1
2
3
4
5
6
/*0058*/ IMAD R6.CC, R0, R9, c[0x0][0x140]                
/*0060*/ IMAD.HI.X R7, R0, R9, c[0x0][0x144]
/*0068*/ IMAD R4.CC, R0, R9, c[0x0][0x148]
/*0070*/ LD.E R2, [R6]
/*0078*/ IMAD.HI.X R5, R0, R9, c[0x0][0x14c]
/*0090*/ ST.E [R4], R2

(SASS不熟悉,请看SASS一文)

其中4条IMAD指令计算出读取和存储的指令地址R6:R7R4:R5。第4和6条指令执行32位的访存命令。

Vector way1: CUDA C/C++ standard headers

通过使用int2, int4, or float2

比如将int的指针d_in类型转换然后赋值。

1
2
3
reinterpret_cast<int2*>(d_in)
// simple in C99
(int2*(d_in))

但是需要注意对齐问题,比如

1
reinterpret_cast<int2*>(d_in+1)

这样是非法的。

Vector way2: structures

通过使用对齐的结构体来实现同样的目的。

1
2
3
4
struct Foo {int a, int b, double c}; // 16 bytes in size
Foo *x, *y;

x[i]=y[i];

实际修改LD.E.64

执行for循环次数减半,注意边界处理。

1
2
3
4
5
6
7
8
9
10
11
12
13
14
15
16
17
__global__ void device_copy_vector2_kernel(int* d_in, int* d_out, int N) {
int idx = blockIdx.x * blockDim.x + threadIdx.x;
for (int i = idx; i < N/2; i += blockDim.x * gridDim.x) {
reinterpret_cast<int2*>(d_out)[i] = reinterpret_cast<int2*>(d_in)[i];
}

// in only one thread, process final element (if there is one)
if (idx==N/2 && N%2==1)
d_out[N-1] = d_in[N-1];
}

void device_copy_vector2(int* d_in, int* d_out, int n) {
threads = 128;
blocks = min((N/2 + threads-1) / threads, MAX_BLOCKS);

device_copy_vector2_kernel<<<blocks, threads>>>(d_in, d_out, N);
}

对应汇编可以看出

1
2
3
4
5
6
/*0088*/                IMAD R10.CC, R3, R5, c[0x0][0x140]              
/*0090*/ IMAD.HI.X R11, R3, R5, c[0x0][0x144]
/*0098*/ IMAD R8.CC, R3, R5, c[0x0][0x148]
/*00a0*/ LD.E.64 R6, [R10]
/*00a8*/ IMAD.HI.X R9, R3, R5, c[0x0][0x14c]
/*00c8*/ ST.E.64 [R8], R6

变成了LD.E.64

实际修改LD.E.128

执行for循环次数减半,注意边界处理。

1
2
3
4
5
6
7
8
9
10
11
12
13
14
15
16
17
18
19
20
21
22
__global__ void device_copy_vector4_kernel(int* d_in, int* d_out, int N) {
int idx = blockIdx.x * blockDim.x + threadIdx.x;
for(int i = idx; i < N/4; i += blockDim.x * gridDim.x) {
reinterpret_cast<int4*>(d_out)[i] = reinterpret_cast<int4*>(d_in)[i];
}

// in only one thread, process final elements (if there are any)
int remainder = N%4;
if (idx==N/4 && remainder!=0) {
while(remainder) {
int idx = N - remainder--;
d_out[idx] = d_in[idx];
}
}
}

void device_copy_vector4(int* d_in, int* d_out, int N) {
int threads = 128;
int blocks = min((N/4 + threads-1) / threads, MAX_BLOCKS);

device_copy_vector4_kernel<<<blocks, threads>>>(d_in, d_out, N);
}

对应汇编可以看出

1
2
3
4
5
6
/*0090*/                IMAD R10.CC, R3, R13, c[0x0][0x140]              
/*0098*/ IMAD.HI.X R11, R3, R13, c[0x0][0x144]
/*00a0*/ IMAD R8.CC, R3, R13, c[0x0][0x148]
/*00a8*/ LD.E.128 R4, [R10]
/*00b0*/ IMAD.HI.X R9, R3, R13, c[0x0][0x14c]
/*00d0*/ ST.E.128 [R8], R4

变成了LD.E.128

summary

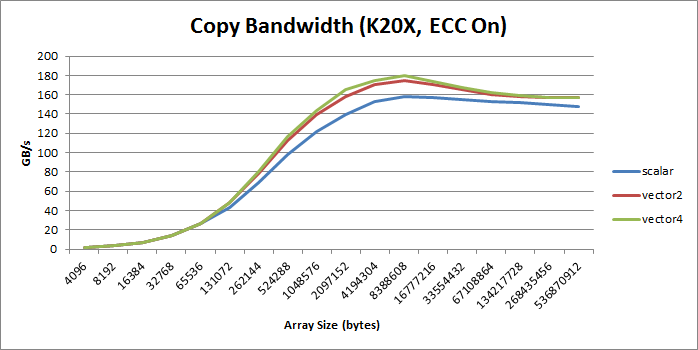
(个人感觉,提升也不大吗?也没有两倍和四倍的效果)

绝大部分情况,向量比标量好, increase bandwidth, reduce instruction count, and reduce latency. 。

但是会增加额外的寄存器(SASS里也没有看到??)和降低并行性(什么意思???)

参考文献

https://developer.nvidia.com/blog/cuda-pro-tip-increase-performance-with-vectorized-memory-access/#entry-content-comments